
Calc Guide
Chapter
11
Sharing and Reviewing Documents
This document is Copyright © 2005–2011 by its contributors as listed below. You may distribute it and/or modify it under the terms of either the GNU General Public License (http://www.gnu.org/licenses/gpl.html), version 3 or later, or the Creative Commons Attribution License (http://creativecommons.org/licenses/by/3.0/), version 3.0 or later.
All trademarks within this guide belong to their legitimate owners.
Contributors
Barbara
Duprey
Hal Parker
Feedback
Please direct any comments or suggestions about this document to: documentation@libreoffice.org
Acknowledgments
This chapter is based on Chapter 11 of the OpenOffice.org 3.3 Calc Guide. The contributors to that chapter are:
Martin
J. Fox Spencer E. Harpe Peter Kupfer
Sigrid Kronenberger Andy
Brown Jean Hollis Weber
Publication date and software version
Published 17 April 2011. Based on LibreOffice 3.3.
Some keystrokes and menu items are different on a Mac from those used in Windows and Linux. The table below gives some common substitutions for the instructions in this chapter. For a more detailed list, see the application Help.
|
Windows/Linux |
Mac equivalent |
Effect |
|
Tools → Options menu selection |
LibreOffice → Preferences |
Access setup options |
|
Right-click |
Control+click |
Open context menu |
|
Ctrl (Control) |
z (Command) |
Used with other keys |
|
F5 |
Shift+z+F5 |
Open the Navigator |
|
F11 |
z+T |
Open Styles & Formatting window |
Contents
Sharing documents (collaboration) 4
Setting up a spreadsheet for sharing 4
Opening a shared spreadsheet 5
Preparing a document for review (optional) 6
Identifying copies of spreadsheets 7
Recording changes (tutorial) 7
Finding comments using the Navigator 11
This chapter covers methods for editing shared documents: sharing (collaboration), recording changes, adding comments, reviewing changes, merging and comparing documents, and saving and using document versions. Basic editing techniques are discussed in Chapter 2, Entering, Editing, and Formatting Data.
Sharing documents (collaboration)
In LibreOffice Writer, Impress, and Draw, only one user at a time can open any document for editing. In Calc, many users can open the same spreadsheet for writing at the same time.
Each user who wants to collaborate should be sure to enter a name on the Tools → Options → LibreOffice → User Data page.
Some menu commands are not available (grayed out) when change tracking or document sharing is activated.
Setting up a spreadsheet for sharing
At any time, you can set up a spreadsheet for sharing with others. With the spreadsheet document open, choose Tools → Share Document to activate the collaboration features for this document. A dialog opens where you can enable or disable sharing.
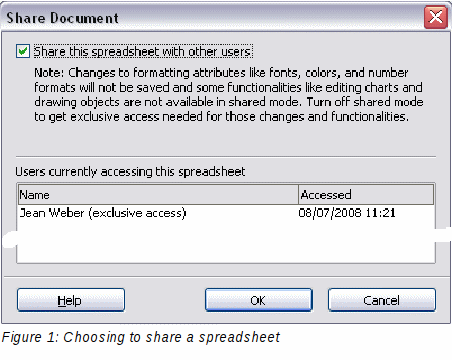
To enable sharing, select the box at the top of the dialog, and then click OK. A message appears stating that you must save the document to activate shared mode. Click Yes to continue. The word (shared) is then shown on the title bar after the document’s title.
The Tools → Share Document command can be used to switch the mode for a document from unshared to shared. However, if you want to use a shared document in unshared mode, you need to save the shared document using another name or path. This creates a copy of the spreadsheet that is not shared.
When you open a spreadsheet document that is in shared mode, a message appears stating that the document is in shared mode and that some features are not available in this mode. After clicking OK, the document is opened in shared mode.
The following features are known to be disabled in a shared spreadsheet document:
Edit
→
Changes, except for Merge
Document
Edit
→
Compare Document
Edit
→
Sheet →
Move/Copy &
Delete
Insert
→
Cells Shift Cells Down & Shift
Cells Right
Insert
→
Sheet from file
Insert
→
Names
Insert
→
Comment
Insert
→
Picture →
From File
Insert
→
Movie and Sound
Insert
→
Object
Insert
→
Chart
Insert
→
Floating Frame
Format
→
Sheet →
Rename, Tab
Color
Format
→
Merge Cells →
Merge and Center, Merge
Cells, Split
Cells
Format
→
Print Ranges
Tools → Protect Document
Data
→
Define Range
Data
→
Sort
Data
→
Subtotals
Data
→
Validity
Data
→
Multiple Operations
Data
→
Consolidate
Data
→
Group and Outline
(all)
Data
→
DataPilot
When you save a shared spreadsheet, one of several situations may occur:
If the document was not modified and saved by another user since you opened it, the document is saved.
If the document was modified and saved by another user since you opened it, one of the following events will occur:
If the changes do not conflict, the document is saved, the message below appears, and any cells modified by the other user are shown with a red border.

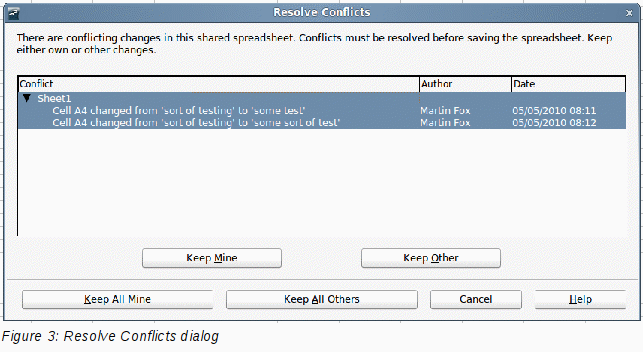
If the changes conflict, the Resolve Conflicts dialog is shown. You must decide for each conflict which version to keep, yours or the other person’s. When all conflicts are resolved, the document is saved. While you are resolving the conflicts, no other user can save the shared document.
If another user is trying to save the shared document and resolve conflicts, you see a message that the shared spreadsheet file is locked due to a merge-in in progress. You can choose to cancel the Save command for now, or retry saving later.
When you successfully save a shared spreadsheet, the document shows the latest version of all changes saved by all users.
You can use several methods to record changes that you or others make to a document.
You can use change marks to show added material, deleted material, and changes to formatting. Later, you or another person can review the document and accept or reject each change.
If you are not using file sharing, you can make changes to a copy of the document (stored in a different folder, under a different name, or both), then use Calc to compare the files and show the changes. See page 14.
You can save versions that are stored as part of the original file. See page 15.
Reviewers can leave comments in the document, either attached to specific changes or standalone.
Preparing a document for review (optional)
When you send a document to someone else to review or edit, you may want to protect it first so that the editor or reviewer does not have to remember to turn on the revision marks. After you have protected the document, any user must enter the correct password in order to turn off protection and accept or reject changes.
Open the document and make sure that the Edit → Changes → Record menu item has a check mark next to it, indicating that change recording is active.
(Optional) Click Edit → Changes → Protect Records. On the Protect Records dialog, type a password (twice) and click OK.
|
Note |
It is not necessary to password protect the document while preparing it for review. |
Identifying copies of spreadsheets
When not using the document sharing feature, it is important to keep track of the different copies of the document. This can be done either in the file name or in the file title. If you have not provided a file title in the spreadsheet’s properties, the spreadsheet’s file name is displayed in the title bar. To set the title of the spreadsheet, select File → Properties → Description.
For this chapter we will work with a budget proposal for a baseball team.
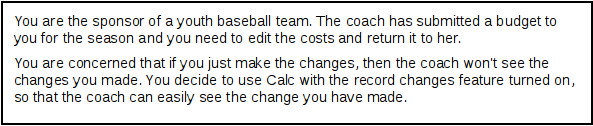
Figure 4 shows the budget spreadsheet your coach submitted.

Looking over the figures, you see a few places where money could be saved:
Post-game snacks can be bought by parents.
New uniforms can wait; only buy 10 to replace damaged ones.
Buy cheaper baseballs.
Only buy 2 spare gloves.
To make these changes, use the record changes feature in Calc. To start recording changes:
Open the Budget Spreadsheet.
Select Edit → Changes → Record from the menu bar.
Begin editing the document.
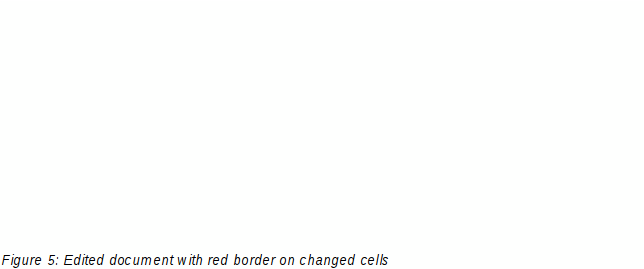
A colored border, with a dot in the upper left-hand corner, appears around a cell where changes were made (Figure 5). Other reviewers then quickly know which cells were edited. A deleted column or row is marked by a heavy colored bar.
|
Tip |
Some changes, for example cell formatting, are not recorded and marked. |
|
Tip |
To change the color that indicates changes, select Tools → Options → LibreOffice Calc → Changes. |
When you finish editing the document, you can send it to your coach.
You may want to explain your rationale for the changes. You can share your insight in two ways: by adding comments to the changes you made, or by adding general comments to the spreadsheet.
Calc automatically adds to any recorded change a comment that describes what was changed (for example, Cell B4 changed from ‘9’ to ‘4’). Reviewers and authors can add their own comments to explain their reasons for the changes.
To add a comment to a change:
Make the change to the spreadsheet.
Select the cell with the change.
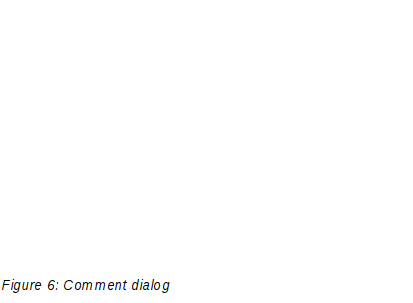
Choose Edit → Changes → Comments. The dialog shown in Figure 6 appears. The automatically-added comment provided by Calc appears in the title bar of this dialog and cannot be edited.
Type your own comment and click OK.
|
Tip |
You can step through your changes one at a time using the left and right arrows on the right hand side of the Comment dialog, and add comments to each change. The title bar for the Comment dialog shows the cell and the change you are commenting on. |
After you have added a comment to a changed cell, you can see it by hovering the mouse pointer over the cell, as shown in Figure 7.

The comment also appears in the dialog when you are accepting and rejecting changes, as shown in the first line of Figure 12 on page 13.
Select the cell with the change comment that you want to edit.
Select Edit → Changes → Comments.
Edit the comment and click OK.
|
Tip |
You can view your comments one at a time using the left and right arrows located on the right hand side of the Comment dialog. You do not need to click OK after editing each comment; you can save them all at once when you’re done editing. |
Calc provides another type of comments (formerly called “notes”), which authors and reviewers often use to exchange ideas, ask for suggestions, or brainstorm in the document.
To add a comment:
Select the cell that the comment applies to.
Select Insert → Comment or right-click and select Insert Comment. (The latter method does not work if the automatic spelling checker is active and the cell contains a misspelled word.) The box shown in Figure 8 appears.
Type the text of your comment in the box.
Click outside the box to close it.

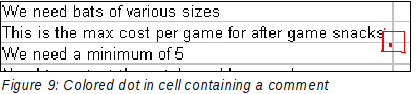
Now the cell to which you added the comment has a colored dot in the upper right-hand corner, as shown in Figure 9. It does not have a colored border, unless the cell was also changed.
|
Tip |
You can change the colors Calc uses for notes by selecting Tools → Options → LibreOffice → Appearance. |
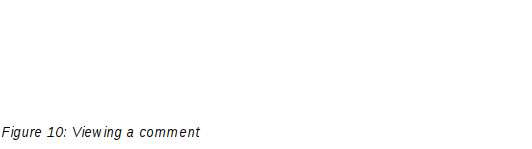
To view the comment you just added, hover the mouse pointer over the cell that has a comment; the comment appears, as shown below.
You can edit and format the text of a comment, just as you do for any other text.
Right-click on the cell containing the comment marker, and choose Show comment from the context menu.
Select the comment, then double-click on it. The cursor changes to the usual blinking text-entry cursor, and the Formatting toolbar changes to show text attributes.
When done, click outside the comment to deselect it. To hide the comment again, right-click on the cell and deselect Show Comment on the context menu.
You can change the background color, border style, transparency, and other attributes of a comment.
Right-click on the cell containing the comment marker, and choose Show comment from the context menu.
Click on the comment itself. The Formatting toolbar changes to show many of the comment formatting options. These are the same as the options for formatting graphics; see Chapter 5, Using Graphics in Calc, for more information.
You can also right-click on the comment to see a menu of choices, some of which lead to dialogs in which you can fine-tune the formatting; these dialogs are also discussed in Chapter 5.
When done, click outside the comment to deselect it. To hide the comment again, right-click on the cell and deselect Show Comment on the context menu.
Finding comments using the Navigator
The small comment markers in the corners of cells can be difficult to see, so Calc provides another way to find them, by using the Navigator. If any comments are in the spreadsheet, the Navigator shows a mark (usually a + or an arrow) next to the word Comments. Click on this mark to display a list of comments. Double-click on the comment you want to jump directly to the cell it is associated with.
At this point, we are going to change our perspective from the point of view of the team sponsor to that of the coach, so we can see how to review and accept or reject the changes to the document the coach originally wrote.
Calc gives you tremendous control over what changes you see when reviewing a document. To change the available filters, select Edit → Changes → Show. The dialog shown in Figure 11 opens.
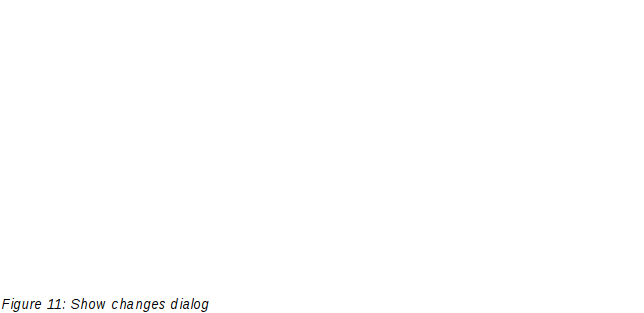
Using the different settings, you can control which changes appear on screen. You can filter based on:
Date – Only changes made in a certain time range are displayed.
Author – Only changes made by a specific author are displayed. This is especially useful if you have multiple reviewers on the document.
Range – Only changes made in a specific range of cells are displayed. This is especially useful if you have a large spreadsheet and only want to review a part of it.
Comment – Searches the content of the comments and only displays changes which have comments that match the search criteria.
Show accepted changes – Only changes you accepted are displayed.
Show rejected changes – Only changes you rejected are displayed.
|
Note |
You can also access the filter control in the Accept or Reject Changes dialog shown in Figure 12. Click the Filter tab to get a set of options similar to those shown in Figure 9. |
Accepting or rejecting changes
When you receive a document back with changes, the beauty of the recording changes system becomes evident. Now, as the original author, you can step through each change and decide how to proceed. To begin this process:
Open the edited document.
Select Edit → Changes → Accept or Reject. The dialog shown in Figure 12 appears.
Calc steps through the changes one at a time. You can choose to accept or reject each change as you go through.
The Comment column by default contains an explanation of the change that was made. If the reviewer added a comment to the change, it is displayed, followed by the description of the change, as in the first line of Figure 12.
If more than one person has reviewed the document, one reviewer may have modified another reviewer’s change. If so, the changes are hierarchically arranged with a plus sign for opening up the hierarchy.
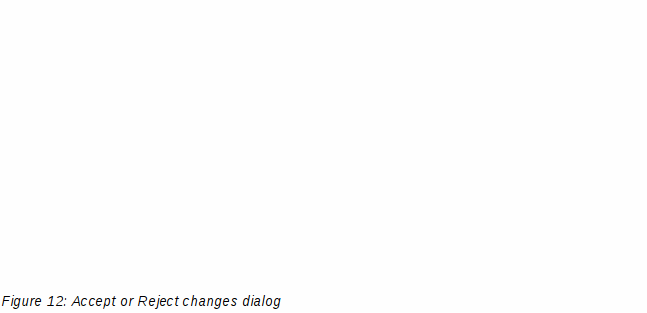
On the Filter tab of this dialog (not shown here), you can choose how to filter the list of changes: by date, author, cell range, or comments containing specific terms. After selecting the filter criteria, switch back to the List tab to see the results.
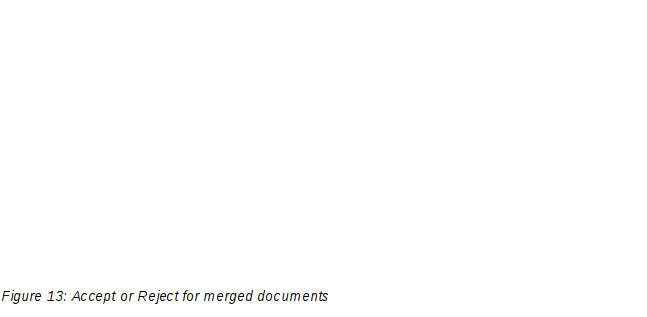
The processes discussed to this point are effective when you have one reviewer at a time. Sometimes, however, multiple reviewers all return edited versions of a document at the same time. In this case, it may be quicker to review all of these changes at once, rather than one review at a time. For this purpose, you can merge documents in Calc.
To merge documents, all of the edited documents need to have recorded changes in them.
Open the original document.
Select Edit → Changes → Merge Document.
A file selection dialog opens. Select a file you want to merge and click OK.
After the documents merge, the Accept or Reject Changes dialog opens, as in Figure 13, showing changes by more than one reviewer. If you want to merge more documents, close the dialog and then repeat steps 2 and 3.
Now all of the changes are combined into one document and you can accept or reject the changes. Changes from different authors appear in different colors in the document, as shown in Figure 14. In this example, all of the changes from Robert are blue and the changes from Mia are red.

Sometimes when sharing documents, reviewers may forget to record the changes they make. This is not a problem with Calc, because Calc can find the changes by comparing documents.
In order to compare documents you need to have the original document and the one that is edited. To compare them:
Open the edited document that you want to compare with the original document.
Select Edit → Compare Document.
An open document dialog appears. Select the original document and click Insert.
Calc finds and marks the changes as follows:
All data that occurs in the edited document but not in the original is identified as inserted.
All data that is in your original document but is not in the edited document is identified as deleted.
All data that is changed, is marked as changed.
From this point you can go through and accept or reject changes as you could normally.
Most documents go through many drafts. It is often useful to save new versions of a document. You can do this by saving a copy of the document (under a different name) after each revision, or by using Calc’s version feature.
|
Caution
|
If you do a Save As... of a document with different versions stored in it, the old versions are not saved in the new file. |
To use version management in Calc:
Choose File → Versions. The Versions dialog opens.
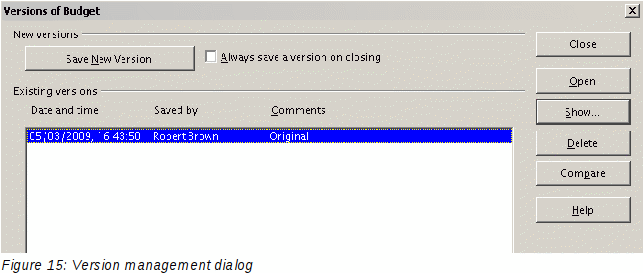
Click the Save New Version button to save a new version.
A dialog opens where you can enter comments about this version.
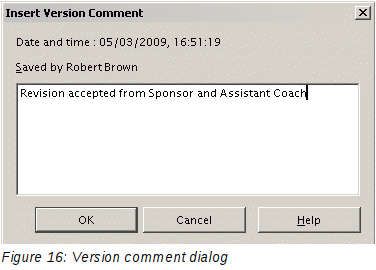
After you enter your comment and click OK, the new version is included in the version list.
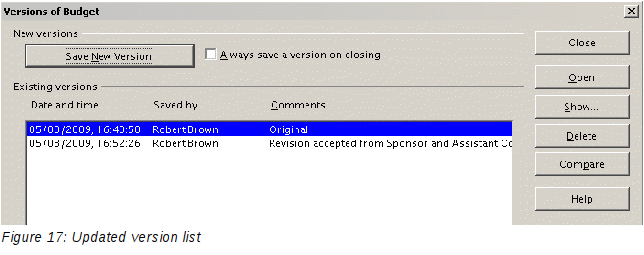
Now when you save the file, both versions are saved in the same file. From this point you can:
Open an old version – Select the version and click the Open button and a read-only copy of a previous version opens.
Compare all versions – Clicking the Compare button performs an action similar to merging documents together. An Accept or Reject Changes dialog opens showing all of the changes through the different versions.
Review the comments – Select a version and click the Show button to display the full comments made by yourself or other reviewers.
|
Note |
The new file is bigger in size, as if two spreadsheets were saved together. |