
Calc Guide
Chapter
14
Setting up and Customizing Calc
This document is Copyright © 2005–2011 by its contributors as listed below. You may distribute it and/or modify it under the terms of either the GNU General Public License (http://www.gnu.org/licenses/gpl.html), version 3 or later, or the Creative Commons Attribution License (http://creativecommons.org/licenses/by/3.0/), version 3.0 or later.
All trademarks within this guide belong to their legitimate owners.
Contributors
Barbara Duprey
Hal
Parker
Simon Brydon
Feedback
Please direct any comments or suggestions about this document to: documentation@libreoffice.org
Acknowledgments
This chapter is based on Chapter 14 of the OpenOffice.org 3.3 Calc Guide. The contributors to that chapter are:
Peter
Hillier-Brook Stephen Buck Regina Henschel
Jean Hollis
Weber Michele Zarri
Publication date and software version
Published 5 May 2011. Based on LibreOffice 3.3.
Some keystrokes and menu items are different on a Mac from those used in Windows and Linux. The table below gives some common substitutions for the instructions in this chapter. For a more detailed list, see the application Help.
|
Windows/Linux |
Mac equivalent |
Effect |
|
Tools → Options menu selection |
LibreOffice → Preferences |
Access setup options |
|
Right-click |
Control+click |
Open context menu |
|
Ctrl (Control) |
z (Command) |
Used with other keys |
|
F5 |
Shift+z+F5 |
Open the Navigator |
|
F11 |
z+T |
Open Styles & Formatting window |
Contents
Choosing options that affect all of LibreOffice 5
Security options and warnings 8
Choosing options for loading and saving documents 9
VBA Properties Load/Save options 11
Microsoft Office Load/Save options 11
HTML compatibility Load/Save options 12
Iterative references section 18
Controlling Calc’s AutoCorrect functions 21
Customizing the user interface 22
Adding a command to a toolbar 26
Choosing icons for toolbar commands 26
Customizing keyboard shortcuts 27
Example: Assigning styles to shortcut keys 28
Loading a saved keyboard configuration 29
Resetting the shortcut keys 29
Running macros from key combinations 29
This chapter describes some common customizations that you may wish to do. In addition to selecting options from those provided, you can customize menus, toolbars, and keyboard shortcuts, add new menus and toolbars, and assign macros to events. However, you cannot customize context (right-click) menus.
Other customizations are made easy by extensions that you can install from the LibreOffice website or from other providers.
|
Note |
Customizations to menus and toolbars can be saved in a template. To do so, first save them in a document and then save the document as a template as described in Chapter 4, Using Styles and Templates in Calc. |
Choosing options that affect all of LibreOffice
This section covers some of the settings that apply to all the components of LibreOffice. Other general options are discussed in Chapter 2, Setting Up LibreOffice, in the Getting Started guide.
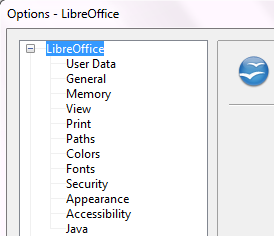
Choose Tools → Options. The list on the left-hand side varies depending on which LibreOffice component is open.
Click the + sign to the left of LibreOffice on the left-hand side. A list of subsections drops down.
|
Note |
The Back button has the same effect on all pages of the Options dialog. It resets the options to the values that were in place when you opened LibreOffice. |
Calc uses the first and last name stored in the LibreOffice – User Data page to fill in the Created and Modified fields in the document properties, and the optional Author field often used in the footer of a printed spreadsheet. Fill in the form on this page.
Set the print options to suit your default printer and your most common printing method. You can change these settings at any time, either through this dialog or during the printing process (by clicking the Options button on the Print dialog).
In the Options dialog, click LibreOffice → Print.
See Chapter 6, Printing, Exporting, and E-mailing, for more about the options on this page.
On the LibreOffice – Colors page, you can specify colors to use in LibreOffice documents. You can select a color from a color table, edit an existing color, and define new colors. These colors are stored in your color palette and are then available in all components of LibreOffice.

To modify a color:
Select the color to modify from the list or the color table.
Enter the new values that define the color. If necessary, change the settings from RGB (Red, Green, Blue) to CMYK (Cyan, Magenta, Yellow, Black) or vice versa. The changed color appears in the lower of the two color preview boxes at the top.
Modify the Name as required.
Click the Modify button. The newly defined color is now listed in the Color table.
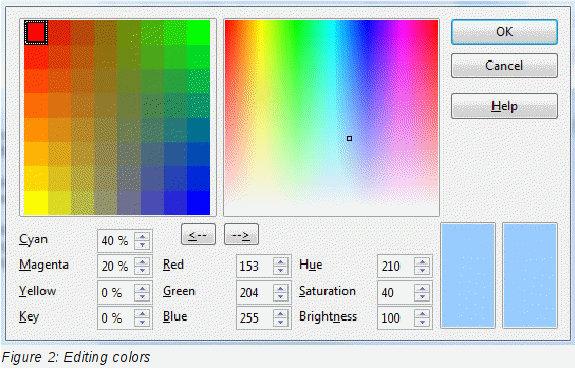
Alternatively, click the Edit button to open the Color dialog, shown in Figure 2. Here you can select a color from one of the color windows in the upper area, or you can enter values in the lower area using your choice of RGB, CMYK, or HSB (Hue, Saturation and Brightness) values.
The upper right color window is linked directly with the color input fields in the lower area; as you choose a color in the upper window, the numbers change accordingly. The two color fields at the lower right show the value of the selected color on the left and the currently set value from the color value fields on the right.
Modify the color components as required and click OK to exit the dialog. The newly defined color now appears in the lower of the color preview boxes shown in Figure 1. Type a name for this color in the Name box, then click the Add button. A small box showing the new color is added to the Color table.
Another way to define or alter colors is through the Colors page of the Area dialog, where you can also save and load palettes, a feature that is not possible here. In Calc, draw a temporary draw object and use the context menu of this object to open the Area dialog. If you load a palette in one component of LibreOffice, it is only active in that component; the other components keep their own palettes.
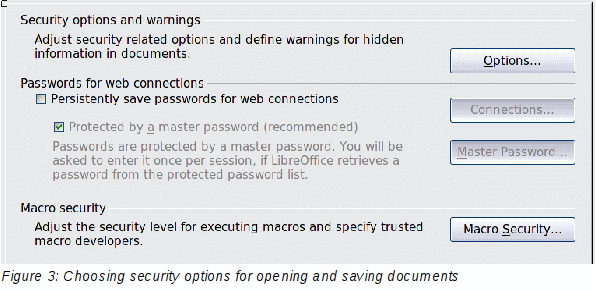
Use the LibreOffice – Security page to choose security options for saving documents and for opening documents that contain macros.
Security options and warnings
If you record changes, save multiple versions, or include hidden information or notes in your documents, and you do not want some of the recipients to see that information, you can set warnings to remind you to remove this information, or you can have LibreOffice remove some information automatically. Note that (unless removed) much of this information is retained in a file whether the file is in LibreOffice’s default OpenDocument format, or has been saved to other formats, including PDF.
Click the Options button to open a separate dialog with specific choices (Figure 4).
Macro security
Click the Macro Security button to open the Macro Security dialog (not shown here), where you can adjust the security level for executing macros and specify trusted sources.
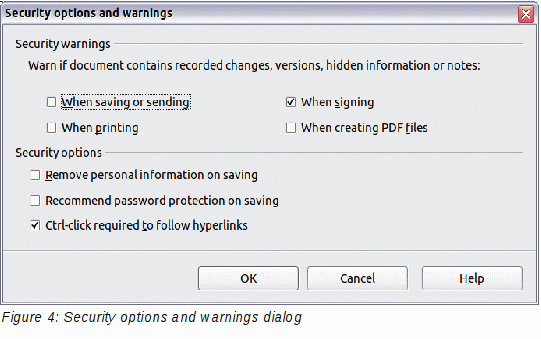
The following options are on the Security options and warnings dialog (Figure 13).
Remove personal information on saving
Select this option to always remove user data from the file properties when saving the file. To manually remove personal information from specific documents, deselect this option and then use the Delete button under File → Properties → General.
Ctrl-click required to follow hyperlinks
The default behavior in most components of LibreOffice is to Ctrl+click on a hyperlink to open the linked document, but you can choose to open hyperlinks using a single click. However, Calc opens hyperlinks using a single click, regardless of the selection for this option.
The other options on this dialog should be self-explanatory.
On the LibreOffice – Appearance page, you can specify which items are visible and the colors used to display various items.
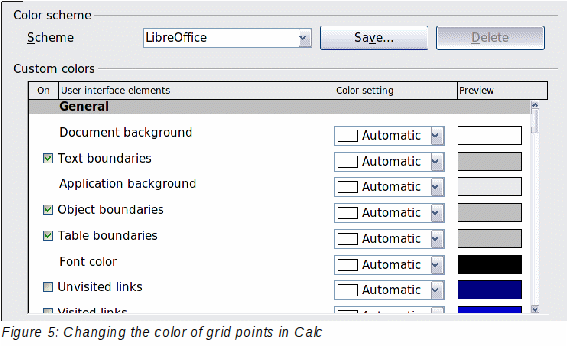
Scroll down in the page until you find Spreadsheet. To change the default color for grid points, click the down-arrow by the color and select a new color from the drop-down list.
If you wish to save your color changes as a color scheme, click Save, type a name in the Scheme box; then click OK.
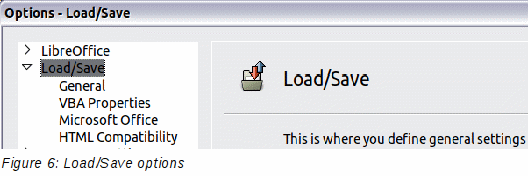
Choosing options for loading and saving documents
You can set the Load/Save options to suit the way you work. This chapter describes only a few of the options, those more relevant to working with Calc. See Chapter 2, Setting Up LibreOffice, in the Getting Started guide for a description of the other options.
If the Options dialog is not already open, click Tools → Options. Click the + sign to the left of Load/Save to display the list of load/save options pages.
Most of the choices on the Load/Save – General page are familiar to users of other office suites. Those specific to LibreOffice are in the Default file format and ODF settings section.
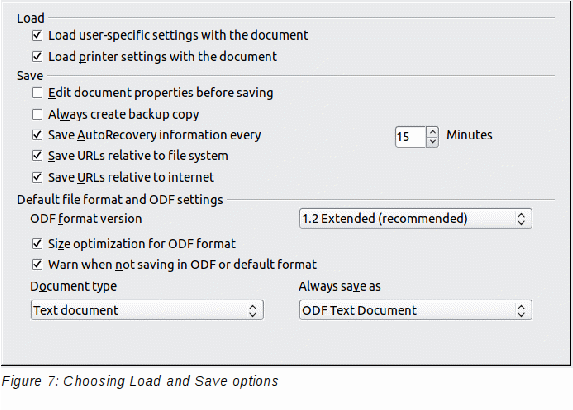
ODF format version
LibreOffice by default saves documents in OpenDocument Format (ODF) version 1.2 Extended. While this allows for improved functionality, there may be backwards compatibility issues. When a file saved in ODF 1.2 Extended is opened in an earlier version of LibreOffice (using ODF 1.0/1.1), some of the advanced features may be lost. Two notable examples are cross-references to headings and the formatting of numbered lists. If you plan to share documents with people who are still using older versions of LibreOffice, save the document using ODF version 1.0/1.1.
Size optimization for ODF format
LibreOffice documents are XML files. When you select this option, LibreOffice writes the XML data without indents and line breaks. If you want to be able to read the XML files in a text editor in a structured form, deselect this option.
Document type
If you routinely share documents with users of Microsoft Excel, you might want to change the Always save as attribute for spreadsheets to one of the Excel formats. Current versions of Microsoft Excel can open ODF files, so this may no longer be needed.
|
Note |
LibreOffice can open and save files in the .xlsx format produced by Microsoft Office 2007 and 2010. |
VBA Properties Load/Save options
On the Load/Save – VBA Properties page, you can choose whether to keep any macros in Microsoft Office documents that are opened in LibreOffice.
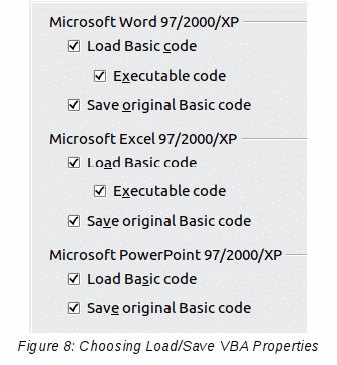
If you choose Save original Basic code, the macros will not work in LibreOffice but are retained if you save the file into Microsoft Office format.
If you choose Load Basic code to edit, the changed code is saved in an LibreOffice document but is not retained if you save into an Microsoft Office format.
If you are importing a Microsoft Excel file containing VBA code, you can select the option Executable code. Whereas normally the code is preserved but rendered inactive (if you inspect it with the StarBasic IDE you will notice that it is all commented), with this option the code is ready to be executed.
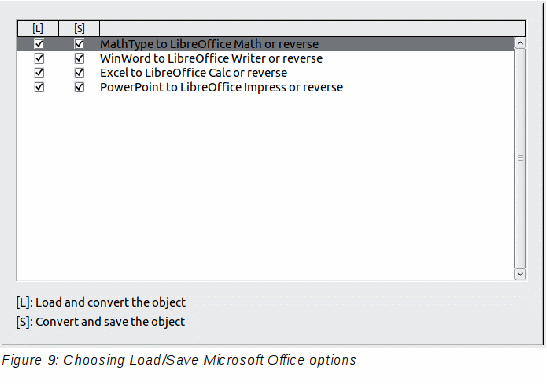
Microsoft Office Load/Save options
On the Load/Save – Microsoft Office page, you can choose what to do when importing and exporting Microsoft Office OLE objects (linked or embedded objects or documents such as spreadsheets or equations).
Select the [L] options to convert Microsoft OLE objects into the corresponding LibreOffice OLE objects when a Microsoft document is loaded into LibreOffice (mnemonic: “L” for “load”).
Select the [S] options to convert LibreOffice OLE objects into the corresponding Microsoft OLE objects when a document is saved in a Microsoft format (mnemonic: “S” for “save”).
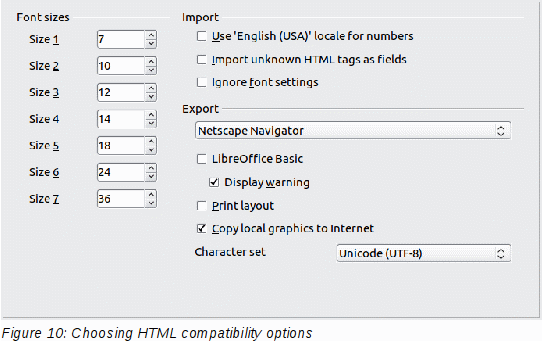
HTML compatibility Load/Save options
Choices made on the Load/Save – HTML Compatibility page (Figure 10) affect HTML pages imported into LibreOffice and those exported from LibreOffice. See HTML documents; importing/exporting in the Help for more information.
The main items of interest for Calc users are in the Export section: LibreOffice Basic and Display warning.
Export - LibreOffice Basic
Select this option to include LibreOffice Basic macros (scripts) when exporting to HTML format. You must activate this option before you create the LibreOffice Basic macro; otherwise the script will not be inserted. LibreOffice Basic macros must be located in the header of the HTML document. Once you have created the macro in the LibreOffice Basic IDE, it appears in the source text of the HTML document in the header.
If you want the macro to run automatically when the HTML document is opened, choose Tools → Customize → Events. See Chapter 12, Calc Macros, for more information.
Export - Display warning
When the LibreOffice Basic option (see above) is not selected, the Display warning option becomes available. If the Display warning option is selected, then when exporting to HTML a warning is shown that LibreOffice Basic macros will be lost.
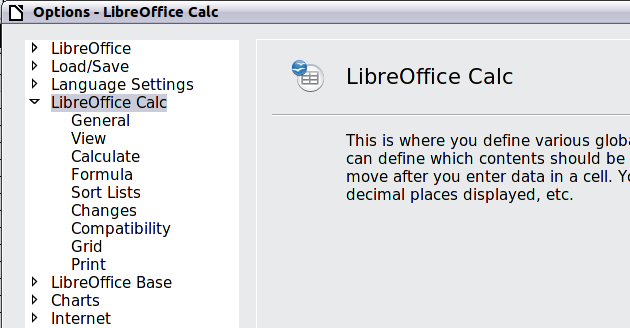
In the Options dialog, click the + sign to the left of LibreOffice Calc on the left-hand side. A list of subsections drops down.
In the Options dialog, choose LibreOffice Calc → General.
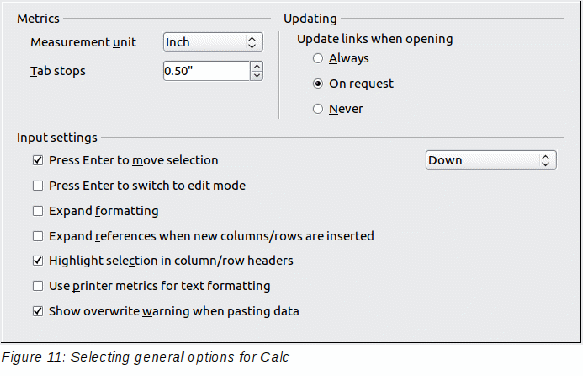
Choose the unit of measurement used in spreadsheets and the default tab stops distance.
Choose whether to update links when opening a document always, only on request, or never. Regardless of this setting, you can manually update links at any time. You might want to avoid updating links when opening documents if they often contain many charts or linked graphics that would slow down loading.
Press Enter to move selection
Specifies that pressing Enter moves the cursor to another cell. If this option is selected, you can also choose the direction the cursor moves: up, down, left, or right. If this option is not selected, pressing Enter completes data entry for a cell but does not move the cursor.
Press Enter to switch to edit mode
Specifies that pressing Enter puts the selected cell into edit mode.
Expand formatting
Specifies whether to automatically apply the formatting attributes of an inserted cell to empty adjacent cells. If, for example, an inserted cell has the bold attribute, this attribute will also apply to empty adjacent cells. However, cells that already have a special format will not be modified by this function. To see the affected range, press Ctrl+* (multiplication sign on the number pad). The format will also apply to all new values inserted within this range.
Expand references when new columns/rows are inserted
Specifies whether to expand references when inserting columns or rows adjacent to the reference range. This is only possible if the reference range, where the column or row is inserted, originally spanned at least two cells in the desired direction.
Example: If the range A1:B1 is referenced in a formula and you insert a new column after column B, the reference is expanded to A1:C1. If the range A1:B1 is referenced and a new row is inserted under row 1, the reference is not expanded, since there is only a single cell in the vertical direction.
If you insert rows or columns in the middle of a reference area, the reference is always expanded.
Highlight selection in column/row headings
Specifies whether to highlight column and row headers in the selected columns or rows.
Use printer metrics for text formatting
Specifies that printer metrics are applied for printing and also for formatting the display on the screen. If this option is not selected, a printer-independent layout is used for screen display and printing.
Show overwrite warning when pasting data
Specifies that, when you paste cells from the clipboard to a cell range that is not empty, a warning appears.
In the Options dialog, choose LibreOffice Calc → View.
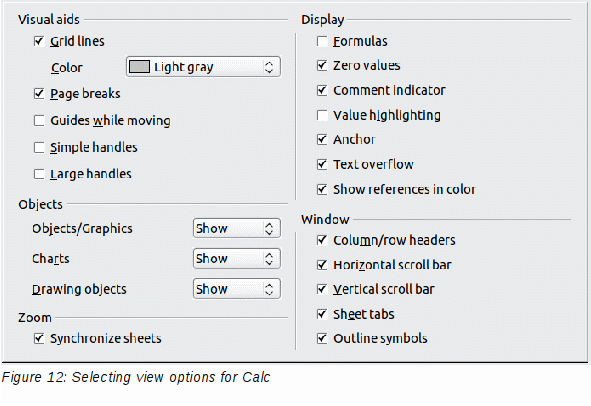
Specifies which lines are displayed.
Grid lines
Specifies whether to display grid lines between the cells when viewed onscreen. If this option is selected, you can also specify the color for the grid lines in the current document. The color choice overrides the selection made in Tools → Options → LibreOffice → Appearance → Spreadsheet → Grid lines.
For printing, choose Format → Page → Sheet and mark the Grid option.
Page breaks
Specifies whether to view the page breaks within a defined print area.
Guides while moving
Specifies whether to view guides when moving drawings, frames, graphics and other objects. These guides help you align objects.
Simple handles
Specifies whether to display the handles (the eight points on a selection box) as simple squares without a 3D effect.
Large handles
Specifies that larger than normal handles (the eight points on a selection box) are displayed.
Select various options for the screen display.
Formulas
Specifies whether to show formulas instead of results in the cells.
Zero values
Specifies whether to show numbers with the value of 0.
Comment indicator
Specifies that a small rectangle is shown in the top right corner of the cell when a comment exists for that cell. The text of the comment is shown when you hover the pointer over the cell, if tips are enabled under Tools → Options → LibreOffice → General.
To display a comment permanently, right-click on the cell and select Show comment from the context menu.
Value highlighting
Select this option to highlight all values in the sheet. Text is highlighted in black; numbers in blue; and formulas, logical values, dates, and so on, in green.
When this command is active, any colors assigned in the document are not displayed.
Anchor
Specifies whether the anchor icon is displayed when an inserted object, such as a graphic, is selected.
Text overflow
If a cell contains text that is wider than the width of the cell, the text is displayed over empty neighboring cells in the same row. If there is no empty neighboring cell, a small triangle at the cell border indicates that the text continues.
Show references in color
Specifies that each reference is highlighted in color in the formula. The cell range is also enclosed by a colored border as soon as the cell containing the reference is selected for editing.
Specifies whether to display or hide objects in three object groups: objects and graphics; charts; and drawing objects.
Specifies whether some elements are visible onscreen: column/row headers, horizontal scrollbar, vertical scrollbar, sheet tabs, and outline symbols.
If the Sheet tabs option is not selected, you can only switch between the sheets by using the Navigator.
Note that there is a slider between the horizontal scrollbar and the sheet tabs that may be set to one end.
Select the Synchronize sheets option to apply any selected zoom factor to all sheets in the spreadsheet. If this option is not selected, separate zoom factors can be applied to individual sheets.
In the Options dialog, choose LibreOffice Calc → Calculate.
Use this page to define the calculation settings for spreadsheets.
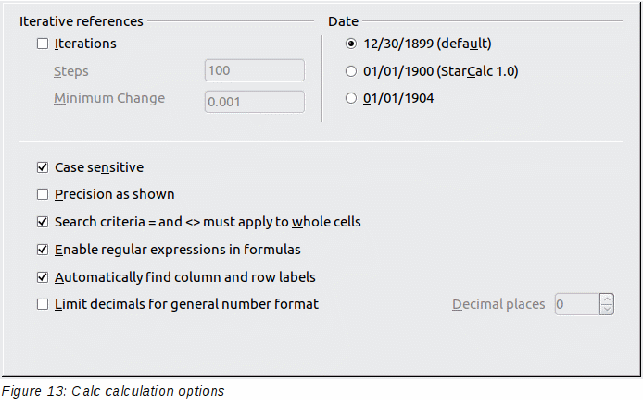
Iterative references are formulas that are continuously repeated until the problem is solved. In this section you can choose the number of approximation steps carried out during iterative calculations and the degree of precision of the answer.
Iterations
Select this option to enable iterations. If this options is not selected, an iterative reference causes an error message.
Steps
Sets the maximum number of iteration steps.
Minimum Change
Specifies the difference between two consecutive iteration step results. If the result of the iteration is lower than the minimum change value, then the iteration will stop.
Select the start date for the internal conversion from days to numbers.
12/30/1899 (default)
Sets 12/30/1899 as day zero.
01/01/1900 (StarCalc 1.0)
Sets 1/1/1900 as day zero. Use this setting for StarCalc 1.0 spreadsheets containing date entries.
01/01/1904
Sets 1/1/1904 as day zero. Use this setting for spreadsheets that are imported in a foreign format.
Specify a variety of options relevant to spreadsheet calculation.
Case sensitive
Specifies whether to distinguish between upper and lower case in texts when comparing cell contents. The EXACT text function is always case-sensitive, independent of the settings in this dialog.
Decimal places
Defines the number of decimals to be displayed for numbers with the Standard number format. The numbers are displayed as rounded numbers, but are not saved as rounded numbers.
Precision as shown
Specifies whether to make calculations using the rounded values displayed in the sheet. Charts will be shown with the displayed values. If this option is not selected, the displayed numbers are rounded, but they are calculated internally using the non-rounded number.
Search criteria = and <> must apply to whole cells
Specifies that the search criteria you set for the Calc database functions must match the whole cell exactly. When this option is selected, Calc behaves exactly like Microsoft Excel when searching cells in the database functions.
|
This search: |
Has this result: |
|
win |
Finds win, but not win95, os2win, or upwind |
|
win.* |
Finds win and win95, but not os2win or upwind |
|
.*win |
Finds win and os2win, but not win95 or upwind |
|
.*win.* |
Finds win, win95, os2win, and upwind |
If this option is not selected, the win search pattern acts like .*win.* —the search pattern can be at any position within the cell when searching with the Calc database functions.
Enable regular expressions in formulas
Specifies that regular expressions are enabled when searching and also for character string comparisons. This relates to the database functions, and to VLOOKUP, HLOOKUP and SEARCH.
Automatically find column and row labels
Specifies that you can use the text in any cell as a label for the column below the text or the row to the right of the text. The text must consist of at least one word and must not contain any operators.
Example: Cell E5 contains the text Europe. Below, in cell E6, is the value 100 and in cell E7 the value 200. If the Automatically find column and row labels option is selected, you can write the following formula in cell A1: =SUM(Europe).
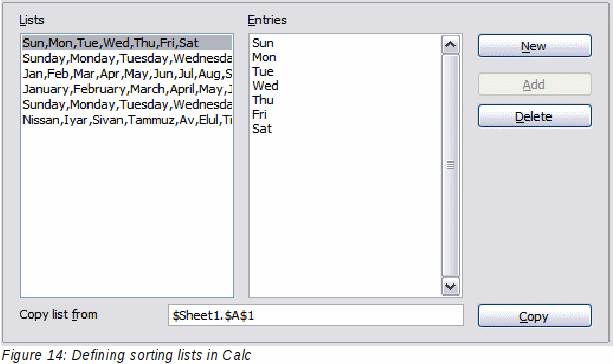
In the Options dialog, choose LibreOffice Calc → Sort Lists. Sort lists are used for more than sorting, for example filling a series of cells during data entry. In addition to the supplied lists, you can define and edit your own lists, as described in “Defining a fill series” in Chapter 2, Entering, Editing, and Formatting Data.
In the Options dialog, choose LibreOffice Calc → Changes.
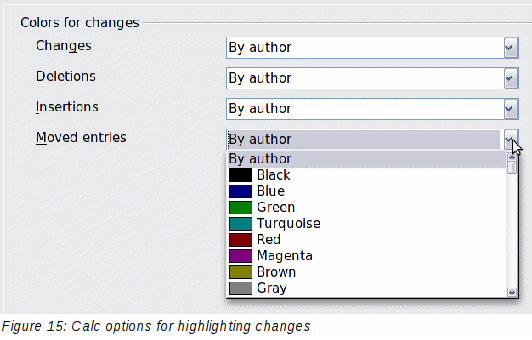
On this page you can specify options for highlighting recorded changes in spreadsheets. You can assign specific colors for insertions, deletions, and other changes, or you can let Calc assign colors based on the author of the change; in the latter case, one color will apply to all changes made by that author.
The Grid page defines the grid settings for spreadsheets. Using a grid helps you determine the exact position of any charts or other objects you may add to a spreadsheet. You can also set this grid in line with the snap grid.
If you have activated the snap grid but wish to move or create individual objects without snap positions, you can press the Ctrl key to deactivate the snap grid for as long as needed.
In the Options dialog, choose LibreOffice Calc → Grid.

Snap to grid activates the snap function.
Visible grid displays grid points on the screen. These points are not printed.
Here you can set the unit of distance for the spacing between horizontal and vertical grid points and subdivisions (intermediate points) of the grid.
Synchronize axes changes the current grid settings symmetrically.
In the Options dialog, choose LibreOffice Calc → Print. See Chapter 6, Printing, Exporting, and E-mailing, for more about the options on this page.
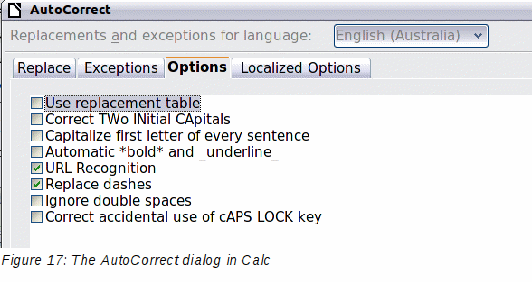
Controlling Calc’s AutoCorrect functions
Some people find some or all of the items in LibreOffice’s AutoCorrect function annoying because they change what you type when you do not want it changed. Many people find some of the AutoCorrect functions quite helpful; if you do, then select the relevant options. But if you find unexplained changes appearing in your document, this is a good place to look to find the cause.
To open the AutoCorrect dialog, click Tools → AutoCorrect Options. (You need to have a document open for this menu item to appear.)
In Calc, this dialog has four tabs, as shown below. Options are described in the Help; many will be familiar to users of other office suites.
Customizing the user interface
If you want to change the menu font from that supplied by LibreOffice to the system font for your operating system, do this:
Choose Tools → Options → LibreOffice → View.
Check Use system font for user interface and click OK.
In addition to changing the menu font, you can add and rearrange items on the menu bar, add items to menus, and make other changes.
To customize menus:
Choose Tools → Customize.
On the Customize dialog, pick the Menus page (Figure 18).

In the Save In drop-down list, choose whether to save this changed menu for Calc or for a selected document.
In the section LibreOffice Calc Menus, select from the Menu drop-down list the menu that you want to customize. The list includes all the main menus as well as sub-menus, that is menus that are contained under another menu. For example, in addition to File, Edit, View, and so on, there is File | Send and File |Templates. The commands available for the selected menu are shown in the central part of the dialog.
To customize the selected menu, click on the Menu or Modify buttons. You can also add commands to a menu by clicking on the Add button. These actions are described in the following sections. Use the up and down arrows next to the Entries list to move the selected menu item to a different position.
When you have finished making all your changes, click OK to save them.
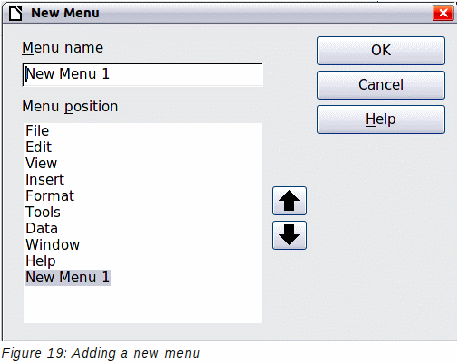
In the Customize dialog, click New to display the dialog shown in Figure 19.
Type a name for your new menu in the Menu name box.
Use the up and down arrow buttons to move the new menu into the required position on the menu bar. Click OK to save.
The new menu now appears on the list of menus in the Customize dialog. (It will appear on the menu bar itself after you save your customizations.)
After creating a new menu, you need to add some commands to it, as described in “Adding a command to a menu” on page 24.
To modify an existing menu, select it in the Menu list and click the Menu button to drop down a list of modifications: Move, Rename, Delete. Not all of these modifications can be applied to all the entries in the Menu list. For example, Rename and Delete are not available for the supplied menus.
To move a menu (such as File), choose Menu → Move. A dialog similar to the one shown in Figure 19 (but without the Menu name box) opens. Use the up and down arrow buttons to move the menu into the required position.
To move submenus (such as File | Send), select the main menu (File) in the Menu list and then, in the Menu Content section of the dialog, select the submenu (Send) in the Entries list and use the arrow keys to move it up or down in the sequence. Submenus are easily identified in the Entries list by a small black triangle on the right hand side of the name.
In addition to renaming, you can specify a keyboard shortcut that allows you to select a menu command when you press Alt+ an underlined letter in a menu command.
Select a menu or menu entry.
Click the Menu button and select Rename.
Add a tilde (~) in front of the letter that you want to use as an accelerator. For example, to select the Save All command by pressing Alt+V, enter Sa~ve All.
You can add commands to the supplied menus and to menus you have created. On the Customize dialog, select the menu in the Menu list and click the Add button in the Menu Content section of the dialog.
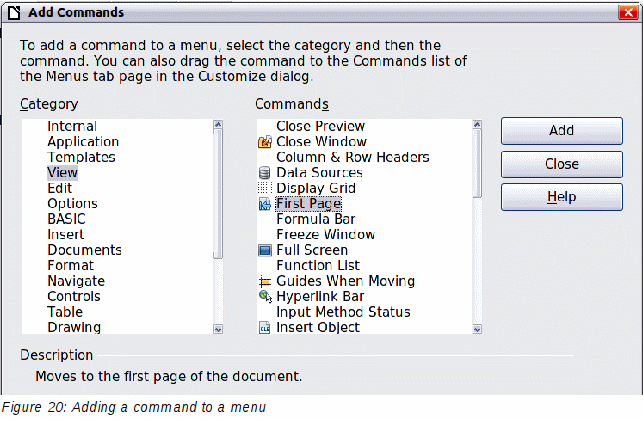
On the Add Commands dialog, select a category and then the command, and click Add. The dialog remains open, so you can select several commands. When you have finished adding commands, click Close. Back on the Customize dialog, you can use the up and down arrow buttons to arrange the commands in your preferred sequence.
In addition to changing the sequence of entries on a menu or submenu, you can add submenus, rename or delete the entries, and add group separators.
To begin, select the menu or submenu in the Menu list near the top of the Customize page, then select the entry in the Entries list under Menu Content. Click the Modify button and choose the required action from the drop-down list of actions.
Most of the actions should be self-explanatory. Begin a group adds a separator line after the highlighted entry.
You can customize toolbars in several ways, including choosing which icons are visible and locking the position of a docked toolbar, as described in Chapter 1, Introducing LibreOffice, of the Getting Started guide. This section describes how to create new toolbars and add other icons (commands) to the list of those available on a toolbar.
To get to the toolbar customization dialog, do any of the following:
On the toolbar, click the arrow at the end of the toolbar and choose Customize Toolbar.
Choose View → Toolbars → Customize from the menu bar.
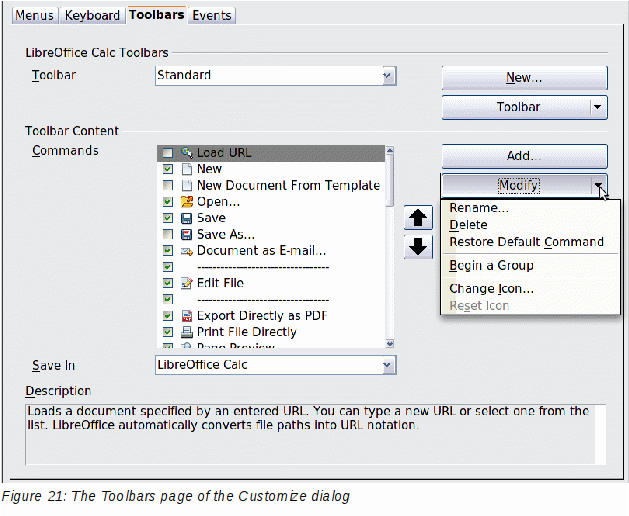
Choose Tools → Customize from the menu bar and pick the Toolbars page (Figure 21).
To customize toolbars:
In the Save In drop-down list, choose whether to save this changed toolbar for Calc or for a selected document.
In the section LibreOffice Calc Toolbars, select from the Toolbar drop-down list the toolbar that you want to customize.
You can create a new toolbar by clicking on the New button, or customize existing toolbars by clicking on the Toolbar or Modify buttons, and add commands to a toolbar by clicking on the Add button. These actions are described below.
When you have finished making all your changes, click OK to save them.
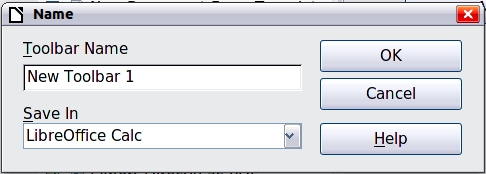
To create a new toolbar:
Choose Tools → Customize → Toolbars from the menu bar.
Click New. On the Name dialog, type the new toolbar's name and choose from the Save In drop-down list where to save this changed menu: for Calc or for a selected document.
The new toolbar now appears on the list of toolbars in the Customize dialog. After creating a new toolbar, you need to add some commands to it, as described below.
If the list of available buttons for a toolbar does not include all the commands you want on that toolbar, you can add commands. When you create a new toolbar, you need to add commands to it.
On the Toolbars page of the Customize dialog, select the toolbar in the Toolbar list and click the Add button in the Toolbar Content section of the dialog.
The Add Commands dialog is the same as for adding commands to menus (Figure 20). Select a category and then the command, and click Add. The dialog remains open, so you can select several commands. When you have finished adding commands, click Close. If you insert an item which does not have an associated icon, the toolbar will display the full name of the item: the next section describes how to choose an icon for a toolbar command.
Back on the Customize dialog, you can use the up and down arrow buttons to arrange the commands in your preferred sequence.
When you are done making changes, click OK to save.
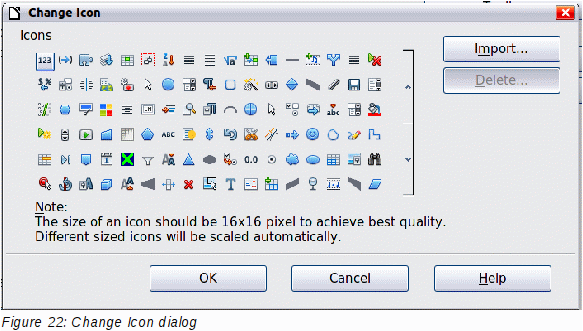
Choosing icons for toolbar commands
Toolbar buttons usually have icons, not words, on them, but not all of the commands have associated icons.
To choose an icon for a command, select the command and click Modify → Change icon. On the Change Icon dialog (Figure 22), scroll through the available icons, select one, and click OK to assign it to the command.
To use a custom icon, create it in a graphics program and import it into LibreOffice by clicking the Import button on the Change Icon dialog. Custom icons must be 16 x 16 or 26 x 26 pixels in size and cannot contain more than 256 colors.
Customizing keyboard shortcuts
In addition to using the built-in keyboard shortcuts (listed in Appendix A), you can define your own. You can assign shortcuts to standard LibreOffice functions or your own macros and save them for use with the entire LibreOffice suite or only for Calc.
|
Caution
|
Be careful when reassigning your operating system’s or LibreOffice’s predefined shortcut keys. Many key assignments are universally understood shortcuts, such as F1 for Help, and are always expected to provide certain results. Although you can easily reset the shortcut key assignments to the LibreOffice defaults, changing some common shortcut keys can cause confusion, frustration and possible data loss or corruption, especially if other users share your computer. |
|
Note |
Shortcut keys that are greyed-out in the listing on the Customize dialog, such as F1 and F10, are not available for reassignment. |
To adapt shortcut keys to your needs, use the Customize dialog, as described below.
Select Tools → Customize → Keyboard. The Keyboard page of the Customize dialog opens.
To have the shortcut key assignment available only with Calc, select Calc in the upper right corner of the page; otherwise select LibreOffice to make it available to every component.
Next select the required function from the Category and Function lists.
Now select the desired shortcut keys in the Shortcut keys list and click the Modify button at the upper right.
Click OK to accept the change. Now the chosen shortcut keys will execute the function chosen in step 3 above whenever they are pressed.
|
Note |
All existing shortcut keys for the currently selected Function are listed in the Keys selection box. If the Keys list is empty, it indicates that the chosen key combination is free for use. If it were not, and you wanted to reassign a shortcut key combination that is already in use, you must first delete the existing key. |
Example: Assigning styles to shortcut keys
You can configure shortcut keys to quickly assign styles in your document.
On the Keyboard page of the Customize dialog, choose the shortcut keys you want to assign a style to. In this example, we have chosen Ctrl+3.
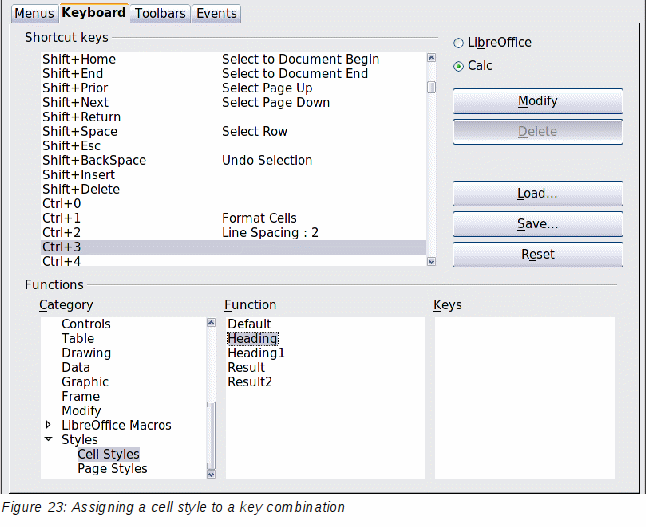
In the Functions section at the bottom of the dialog, scroll down in the Category list to Styles. Click the + sign to expand the list of styles.
Choose the category of style. (This example uses a cell style, but you can also choose page styles.) The Function list now displays the names of the available styles for the selected category. The example shows LibreOffice’s predefined cell styles.
To assign Ctrl+3 to be the shortcut key combination for the Heading style, select Heading in the Function list, and then click Modify. Ctrl+3 now appears in the Keys list on the right, and Heading appears next to Ctrl+3 in the Shortcut keys box at the top.
Make any other required changes, and then click OK to save these settings and close the dialog.
Changes to the shortcut key assignments can be saved in a keyboard configuration file for use at a later time, thus permitting you to create and apply different configurations as the need arises. To save keyboard shortcuts to a file:
After making your keyboard shortcut assignments, click the Save button on the Customize dialog.
In the Save Keyboard Configuration dialog, select All files from the Save as Type list.
Next enter a name for the keyboard configuration file in the File name box, or select an existing file from the list. If you need to, browse to find a file from another location.
Click Save. A confirmation dialog appears if you are about to overwrite an existing file, otherwise there will be no feedback and the file will be saved.
Loading a saved keyboard configuration
To load a saved keyboard configuration file and replace your existing configuration, click the Load button near the bottom right of the Customize dialog, and then select the configuration file from the Load Keyboard Configuration dialog.
To reset all of the keyboard shortcuts to their default values, click the Reset button near the bottom right of the Customize dialog. Use this feature with care as no confirmation dialog will be displayed; the defaults will be set without any further notice or user input.
Running macros from key combinations
You can also define shortcut key combinations that will run macros. These shortcut keys are strictly user-defined; none are built in. For more information on macros, see Chapter 12, Calc Macros.
Adding functionality with extensions
An extension is a package that can be installed into LibreOffice to add new functionality.
Although individual extensions can be found in different places, the official LibreOffice extension repository is at http://extensions.libreoffice.org/. Some extensions are free of charge; others are available for a fee. Check the descriptions to see what licenses and fees apply to the ones that interest you.
To install an extension, follow these steps:
Download an extension and save it anywhere on your computer.
In LibreOffice, select Tools → Extension Manager from the menu bar. In the Extension Manager dialog (Figure 24), click Add.
A file browser window opens. Find and select the extension you want to install and click Open. The extension begins installing. You may be asked to accept a license agreement.
When the installation is complete, the extension is listed in the Extension Manager dialog.
|
Tip |
To get extensions that are listed in the repository, you can open the Extension Manager and click the Get more extensions here link. You do not need to download them separately as in step 1 above. |
|
Note |
To install a shared extension, you need write access to the LibreOffice installation directory. |
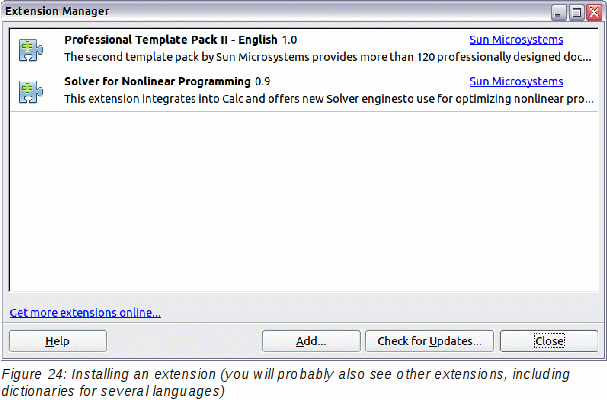
This section describes two of the available extensions for Calc. In each case, you need to install the extension as described in the previous section.
Professional Template Pack II
Provides more than 120 templates for Writer, Calc, and Impress. Available in several languages. After you have installed this extension, you will find the templates under File → New → Templates and Documents.
Solver for Nonlinear Programming
Calc ships with a solver engine for linear programming only. This extension adds more solvers, which are capable of handling nonlinear problems as well as linear ones:
DEPS - Differential Evolution & Particle Swarm Optimization
SCO - Social Cognitive Optimization
Some LibreOffice installations may have this extension included.