Impress Guide
Chapter
2
Using Slide Masters,
Styles, and Templates
This document is Copyright © 2005–2011 by its contributors as listed below. You may distribute it and/or modify it under the terms of either the GNU General Public License (http://www.gnu.org/licenses/gpl.html), version 3 or later, or the Creative Commons Attribution License (http://creativecommons.org/licenses/by/3.0/), version 3.0 or later.
All trademarks within this guide belong to their legitimate owners.
Contributors
Michele Zarri T. Elliot
Turner
Jean Hollis Weber Low Song Chuan
Feedback
Please direct any comments or suggestions about this document to: documentation@global.libreoffice.org
Acknowledgments
This chapter is based on Chapter 2 of the OpenOffice.org 3.3 Impress Guide. The contributors to that chapter are:
Michele
Zarri Peter Hillier-Brook Dan Lewis
Jean Hollis Weber Claire
Wood Jared Kobos
Hazel Russman
Publication date and software version
Published 31 July 2011. Based on LibreOffice 3.3.3.
Some keystrokes and menu items are different on a Mac from those used in Windows and Linux. The table below gives some common substitutions for the instructions in this chapter. For a more detailed list, see the application Help.
|
Windows/Linux |
Mac equivalent |
Effect |
|
Tools > Options menu selection |
LibreOffice > Preferences |
Access setup options |
|
Right-click |
Control+click |
Open context menu |
|
Ctrl (Control) |
z (Command) |
Used with other keys |
|
F11 |
z+T |
Open Styles and Formatting window |
Contents
Loading additional slide masters 6
Choosing and applying the background 8
The Styles and Formatting window 11
Modifying default text areas 11
Further modifications to the default text areas 13
Working with styles in Impress 14
Using templates supplied with LibreOffice 15
Using templates from other sources 15
Installing templates using the Extension Manager 15
Creating your own templates 16
Setting a custom template as the default 16
Resetting the default to Impress’s built-in Default template 17
In addition to careful planning of the content (as discussed in Chapter 1), you need to plan the appearance of the presentation. It is best to do this after you have developed an outline, because the outline will determine some of the requirements for the slides’ appearance. For example:
What color combinations (background and text) will look good and also be easy for your audience to read?
Would a picture help your audience understand the contents better?
Do you want particular text and a picture to appear on all the slides? (for example a company name and logo.)
Would the audience benefit from having the slides numbered so that they can quickly refer to one of them?
Do you want a background graphic or gradient? If so, you need to pick something that does not interfere or clash with content such as the colors used in charts.
Will you need one slide master or more than one? Will one slide design suit all of the content?
You can change the appearance of slides as you develop the presentation, but planning ahead will save you time in the long run.
A slide master is a slide that is used as the starting point for other slides. It is similar to a page style in Writer: it controls the basic formatting of all slides based on it. A slide show can have more than one slide master.
|
Note |
LibreOffice uses three terms for this one concept. Master slide, slide master, and master page all refer to a slide which is used to create other slides. This book uses the term slide master, except when describing the user interface. |
A slide master has a defined set of characteristics, including the background color, graphic, or gradient; objects (such as logos, decorative lines, and other graphics) in the background; headers and footers; placement and size of text frames; and the formatting of text.
All of the characteristics of slide masters are controlled by styles. The styles of any new slide you create are inherited from the slide master from which it was created. In other words, the styles of the slide master are available and applied to all slides created from that slide master. Changing a style in a slide master results in changes to all the slides based on that slide master; it is, however, possible to modify each individual slide without affecting the slide master.
|
Note |
Although it is highly recommended to use the slide masters whenever possible, there are occasions where manual changes are needed for a particular slide, for example to enlarge the chart area when the text and chart layout is used. |
Slide masters have two types of styles associated with them: presentation styles and graphic styles. The pre-packaged presentation styles can be modified, but new presentation styles cannot be created. However, not only can the pre-packaged graphic styles be modified, but new graphic styles can also be created.
Presentation styles are discussed in detail in Chapter 3, Working with Text. The use of graphic styles is covered in Chapter 6, Formatting Graphic Objects. See also “Working with styles in Impress” on page 14.
Impress comes with a collection of prepackaged slide masters. They are shown in the Master Pages section of the Tasks pane (Figure 1). This section has three subsections: Used in This Presentation, Recently Used, and Available for Use. Click the + sign next to the name of a subsection to expand it to show thumbnails of the slides, or click the – sign to collapse the subsection to hide the thumbnails.
Each of the slide masters shown in the Available for Use list is from a template of the same name. If you have created your own templates, or added templates from other sources, slide masters from those templates will also appear in this list. See “Working with templates” on page 15 for more about templates.
You can create a new slide master in a similar way to modifying the default slide master.
To start, enable editing of slide masters by selecting View > Master > Slide Master. You can also right-click on the default slide master in the Master Pages section of the tasks pane, and select Edit Master.
On the Master View toolbar, click the New Master icon (highlighted in the figure below).
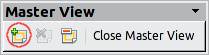
A second slide master appears in the Slides pane. Modify this slide master to suit your requirements. It is recommended that you rename this new slide master. To do that, right-click on the slide in the Slides pane and select Rename master from the pop-up menu.
When you are done, close the Master View toolbar to return to normal slide editing mode.
Figure 1: Available master
pages (slides)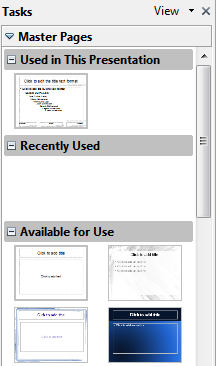
Applying
a slide master
In the Tasks Pane, be sure the Master Pages section is showing. (See Figure 1.)
To apply one of the slide masters to all slides in your presentation, click on it in the list.
To apply a different slide master to one or more selected slides:
In the Slides Pane, select the slides you want to change.
In the Tasks Pane, right-click on the slide master you want to apply to the selected slides, and click Apply to Selected Slides on the pop-up menu.
Loading additional slide masters
Sometimes, in the same set of slides, you may need to mix multiple slide masters that may belong to different templates (the use of templates is explained later in “Working with templates” on page 15). For example, you may need a completely different layout for the first slide of the presentation, or you may want to add a slide from a different presentation to your current presentation (based on a template available on the hard disk).
The Slide Design dialog box (Figure 2) makes this possible. Access this dialog box either from the menu bar (Format > Slide design) or from the pop-up menu that appears when right-clicking on a slide in the Slides pane.
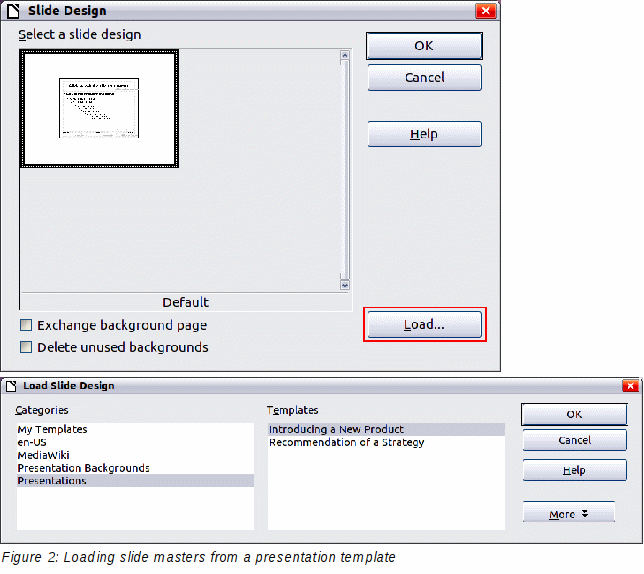
The main area in the dialog box shows the slide masters already available for use. To add more:
Click the Load button.
Select in the new dialog box the template from which to load the slide master. Click OK.
Click OK again to close the slide design dialog box.
The slide masters in the template you selected are now shown also in the Master Pages section of the Tasks pane in the Available for use subsection.
|
Note |
The slide masters you have loaded will also be available the next time you load the presentation. If you want to delete the unused slide masters, click the corresponding checkbox in the Slide Design dialog box. |
|
Tip |
To limit the size of the presentation file, you may want to minimize the number of slide masters used. |
The following items can be changed on a slide master:
Background (color, gradient, hatching, or bitmap)
Background objects (for example, add a logo or decorative graphics)
Text attributes for the main text area and notes
Size, placement, and contents of header and footer elements to appear on every slide
Size and placement of default frames for slide titles and content
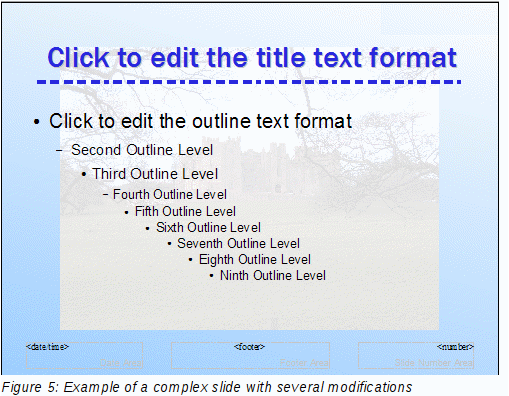
Refer to Figure 5 for a graphical representation of many of these elements.
Before working on the slide master, make sure that the Styles and Formatting window is open. See page 11 for instructions on doing this.
To select the slide master for modification:
Select View > Master > Slide Master from the menu bar. This unlocks the properties of the slide master so you can edit it.
Click Master Pages in the Tasks pane. This gives you access to the pre-packaged slide masters.
Click on the slide master you want to modify among the ones available (Figure 1).
Make changes as described in this chapter, then click the Close Master View icon on the Master View toolbar. Save the file before continuing.
|
Caution
|
Any changes made to one slide when in Master View mode will appear on all slides using this slide master. Always make sure you close Master View and return to Normal view before working on any of the presentation slides. Select View > Normal from the menu bar, or clicking Close Master View in the Master View toolbar to return to the normal slide view. |
The changes made to one of the slides in Normal view (for example, changes to the bullet point style, the color of the title area, and so on) will not be overridden by subsequent changes to the slide master. There are cases, however, where it is desirable to revert a manually modified element of the slide to the style defined in the slide master: to do that, select that element and choose Format > Default Formatting from the menu bar.
It is also possible to modify the default layout of the slide master, for example by moving the title to the side; however, you are restricted to modifications to the “Title, Text” layout (that is, the layout containing a title box and a text box).
Sometimes, depending on the contents of the slide, you may want to apply a different layout. The title and text boxes will inherit the properties of the slide master, but if you have changed the position of these text boxes in the slide master, the layout may appear corrupted and you may need to re-position some of the layout elements manually.
Choosing and applying the background
Backgrounds can be applied to a number of elements in Impress: the page, a default text area, a graphic object and so on. The procedures to apply a background are always the same.
The following procedure is used to apply a background to the page.
To begin, do one of the following:
Select Format > Page from the menu bar. On the Page Setup dialog box, choose the Background tab.
Make sure the Presentation Styles icon is selected in the Styles and Formatting window (Figure 6), right-click Background and select Modify from the pop-up menu. This opens the Background dialog box.
Select the type of fill you want for your background from the five choices: None, Color, Gradient, Hatching, or Bitmap.
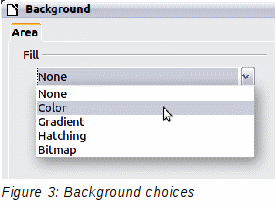
A list of choices for the selected fill type then appears (see Figure 4 for an example).
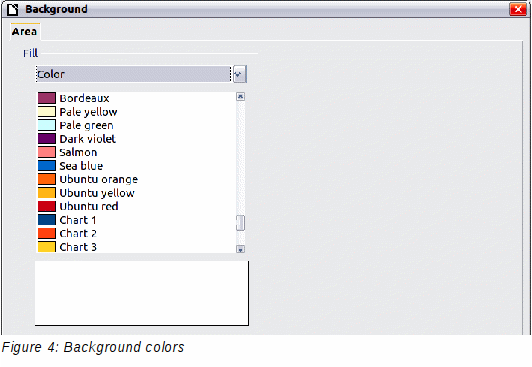
Select one of the items on the list and click OK. The fill you have chosen is added to the slide master, replacing any previously selected fill.
|
Tip |
You can make custom additions to each type of background, with the obvious exception of None. After you create new fills, they are listed in the Background dialog box along with the fills provided with LibreOffice. For example, the last color in Figure 4, Test Blue, is a custom color. See Chapter 6 for more information. |
This section describes how to add background objects and graphic elements (such as a logo, decorative lines, and so on). LibreOffice supports a large number of graphical formats.
When you want the same graphic to appear on every slide of your presentation, the easiest and quickest solution is to use the slide master. It saves time while creating the presentation, and also when you want to modify or reposition the graphic on the slide. If the graphic is added to each slide manually, these operations have to be performed on each individual slide in the presentation.
One of the most common actions in preparing a presentation is to add a picture to the slide master. To insert a picture already available on the hard disk, follow these steps:
Choose View > Master > Slide Master from the menu bar.
Select from the menu bar Insert > Picture > From File.
Navigate to the directory where your picture is and select it. If you want to see a preview, select the corresponding checkbox in the file browser dialog box.
|
Caution
|
LibreOffice offers the option to insert a picture as a link to the file rather than embedding it in the document. This can be useful when a presentation is not intended to be distributed elsewhere, and where it will remain in the same hierarchical directory structure. For example, it could be created on a notebook computer, from which the presentation will be given to, typically, a group of clients. If the presentation file is to be distributed, however, the picture should be embedded to avoid the “missing picture” syndrome when the presentation is finally given on a different computer. |
Once the picture is inserted, you need to move it to the background. To do that, while the picture is still selected, right click on the picture and select Arrange > Send to Back from the context menu. You may also need to reposition it and modify its size. To do that see Chapter 4, Adding and Formatting Pictures.
|
Tip |
If you want the image to blend with the background, you can set the background color of the picture as transparent. Select the picture, then chose Tools > Eyedropper from the menu bar. Select the first checkbox and then move the mouse cursor on the picture and click on the color you want to make transparent. This color appears next to the checkbox. Make sure that Replace with... is set to Transparent and click Replace. |
|
Tip |
An easy way to make the picture lighter so that the text stands out better against its background, is to increase the transparency of the picture or change the gamma. Both these adjustments can be quickly made from the Picture toolbar. |
In addition to pictures you can add a number of other background objects, for example decorative lines, text and shapes. Figure 5 is an example of a slide master with a custom background gradient, a background picture, another picture in the top right corner, some decorative lines and some customized presentation styles.
Within the slide master you can define a complete set of styles that define the default appearance of text and graphic objects inserted in slides based on that background. If for example your slide master has a dark background, you may want to set the font color of the title and text areas to be light. Rather than manually changing the font color for every new slide you create, a time-consuming operation prone to errors and omissions, simply modify the style in the slide master. Changes made to styles in the slide master only apply to the slides based on that particular slide master.
Styles in Impress are sub-divided into two main categories: Presentation styles and Graphics styles.
Presentation styles affect three elements of a slide master: the background, background objects (such as icons, decorative lines, and text frames), and the text placed on the slide. Text styles are further divided into Notes, Outline 1 through Outline 9, Subtitle, and Title. The outline styles are used for the different levels of the outline to which they belong. For example, Outline 2 is used for the sub-points of Outline 1, and Outline 3 is used for the sub-points of Outline 2.
The pre-packaged presentation styles can be modified, but new presentation styles cannot be created.
Graphics styles apply to lines, shapes and text boxes created using the Impress drawing tools and define the formatting of such objects.
There are 15 pre-packaged graphics styles to choose from. You can create additional styles or modify the pre-packaged styles.
|
Note |
The presence of text and title styles both in the Presentation and Graphics styles may seem confusing. This apparent duplication is due to the fact that Impress facilitates the operation of adding structured text to the slides by means of special text boxes where the Presentation styles apply (AutoLayout boxes). The title and other text styles in the Graphics styles group continue to apply to other text boxes you may want to add, or to the text associated to shapes or lines. |
The Styles and Formatting window
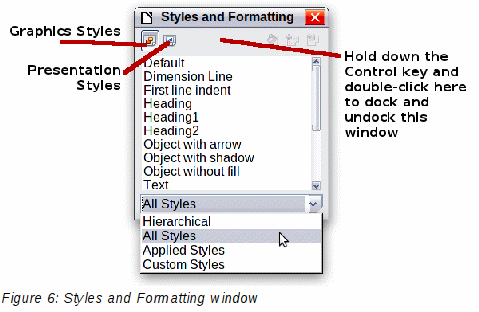
To work on the slide master styles, start by opening the Styles and Formatting window shown in Figure 6. Either press F11 or select Format > Styles and Formatting from the main menu.
|
Tip |
At the bottom of the Styles and Formatting window is a drop-down list. You can choose to show all styles or other groups of styles, for example applied styles or (in the case of Graphics styles), custom styles. |
You can dock or undock the Styles and Formatting window by holding down the Control key while double-clicking the top of the window between the icons (see Figure 6). Press F11 to close the Styles and Formatting window when you do not need it: LibreOffice will remember its position the next time you re-open it.
When a slide master is opened for editing, it contains five areas, as shown in Figure 7.
Title area for AutoLayouts
Object area for AutoLayouts
Date area
Footer area
Slide number area
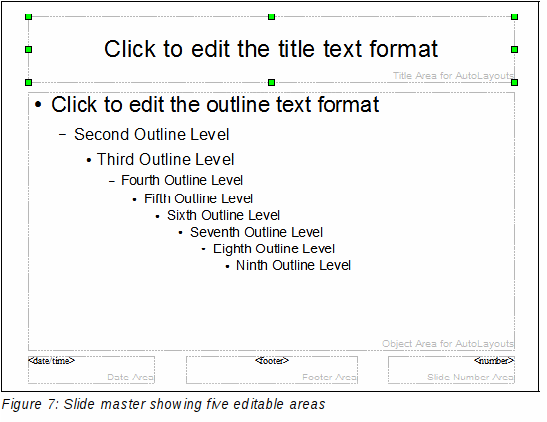
Click with the left mouse button on any of these areas to display eight green squares (handles) around the rectangle. Use these handles to modify the size and position of the area.
To change the position, move the mouse towards one of the edges, away from the green handles, until the cursor changes shape1, then click the left mouse button and drag the area to the desired position.
To modify the shape and size of one of the rectangular areas, use one of the 8 green handles: the ones in the corners modify both the sides of the rectangle simultaneously while those in the middle of the sides modify only one dimension at a time. The shape of the mouse cursor usually changes when over the handle, giving a clear visual indication of how it will affect the shape of the rectangular area.
|
Tip |
To keep the ratio between the sides of the rectangular area constant, move the mouse to one of the 4 green handles at the corner of the area and keep the Shift key pressed while dragging the handle with the mouse. |
To accurately control the shape and size as well as the position of the default text area, it is better to use the Position and Size dialog box than the mouse. First select the rectangular area by clicking on any point inside it, then press F4 or choose Format > Position and Size. The dialog box shown in Figure 8 is displayed.
The functions of this dialog box are explained in the Draw Guide, so only a short description of the most important fields is provided in this chapter.
Use the Position section to specify the X (horizontal) and Y (vertical) position of the rectangular area. The values represent the distance of the base point (selected on the right hand side) relative to the top left corner of the slide.
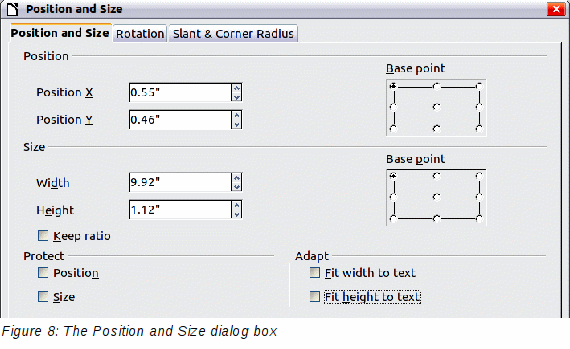
Use the Size section to specify the width and height of the rectangular area. Select in the Base point section the part of the rectangular area you do not want to move while resizing. The default setting (top left corner) means that the position of the top left corner of the area will not change after resizing.
You can also use the Rotation tab of the dialog box to rotate the default text area. For example, you can place the footer area on the side by rotating each text area by 90 degrees, and obtain a more modern-looking layout. In general it is preferable to use only right angles for ease of editing, although the program does not impose restrictions on the values that can be used.
Further modifications to the default text areas
Besides the shape, size and position, it is also possible to modify other aspects of the 5 areas of the slide master, such as the background, border, alignment relative to the slide, and position relative to other objects.
While the background style and line style of an area can be accessed from the Format menu, in order to access the Alignment and Arrange menus you need either to open the Drawing toolbar or to use the context menu. To display the Drawing toolbar (Figure 9), select View > Toolbars > Drawing; to open the context menu, right-click on the edge of the rectangular area after selecting it. On the Drawing toolbar, click the arrow next to the Alignment or Arrange icon (highlighted in Figure 9) to display choices. See the Draw Guide for details.

The date area and slide number area do not automatically appear on every slide, even though you have defined them. In order to show them, you need to close the Master View and select the desired field from the menu bar: Insert > Page number or Insert > Date and time. This procedure is explained in detail in Chapter 8, Adding and Formatting Slides, Notes, and Handouts.
Some of the supplied slide masters have text objects in the footer. You can add other text objects to the master page for your slides to act as a header or a footer.
Choose View > Master > Slide Master from the menu bar.
On the Drawing toolbar (see Figure 9), select the Text icon.
Click once and drag in the master page to draw a text object, and then type or paste your text into the object or add fields as described below.
Choose View > Normal when you are finished.
To add a field, such as the date or page number, to a text object in the header or footer, choose Insert > Fields. and select the required field from the submenu. If you want to edit a field in your slide, select it and choose Edit > Fields. See Chapter 3, Adding and Formatting Text, for more information.
The fields you can use in Impress are:
Date (fixed)
Date (variable) —updates automatically when you reload the file
Time (fixed)
Time (variable)—updates automatically when you reload the file
Author—First and last names listed in the LibreOffice user data
Page number (slide number)
File name
|
Tip |
To change the number format (1,2,3 or a,b,c or i,ii,iii, etc.) for the page number field, choose Format > Page and then select a format from the list in the Layout Settings area. To change the author information, go to Tools > Options > LibreOffice > User Data. |
Working with styles in Impress
If you are familiar with styles in Writer, you will find both similarities and differences in Impress. The presentation styles are similar to paragraph styles in Writer and are used in a very similar fashion. You cannot create new presentation styles but you can fully configure the existing ones. Note that, as with the Heading styles in Writer, the Outline styles are hierarchically linked, so that a change in the Outline 1 will cascade through all the other Outline levels.
In Impress you will also find the graphics styles very useful. They define the characteristics of a graphic object (including a text object). If, for example, you need to create a organization chart diagram in one of the slides of your presentation, you will likely want all of the boxes to have a consistent appearance, meaning the same line style, same font type, maybe the same shadow, and so on. The easiest way to achieve this result with the minimum effort is to create a graphics style for the boxes and apply it to each box. The major benefit is that if later on you decide to modify, say, the background color of the boxes, all you need to do is modify the style rather than each individual box.
Presentation styles are discussed in detail in Chapter 3, Working with Text. The use of graphics styles is covered in Chapter 6, Formatting Graphic Objects.
All documents in LibreOffice are based on templates. However, Impress is a little different from other LibreOffice components, in that it starts with the Presentation Wizard unless you have elected to turn the Wizard off.
When you choose File > New > Presentation from the menu bar, if the Presentation Wizard is active, the Wizard offers several choices for a new presentation, one of which is From template.
If you have turned the Presentation Wizard off, when you start a new presentation by choosing File > New > Presentation from the menu bar, LibreOffice uses the default presentation template. If you have not defined your own default template, LibreOffice uses a blank template supplied with the program.
Using templates supplied with LibreOffice
Impress comes with a set of predefined templates. Two are in the Presentations folder and the others are in the Presentation backgrounds folder. The difference between them is that Presentation templates include a series of slides with sample titles and topics, while Presentation background templates have only backgrounds and background objects. Both types have predefined presentation and graphics styles.
You can create a new presentation from a previously saved presentation template by choosing File > New > Templates and Documents from the menu bar. This opens the Templates and Documents – Templates dialog box. To open a new presentation based on a template, double-click that template’s name in the list.
Using templates from other sources
If you have created your own templates, or imported templates from another location, they are probably stored in the My Templates folder in the Templates and Documents – Templates dialog box. Templates installed using the Extension Manager may be installed in their own folders. You can use them in the same way as the templates installed with Impress.
See page 19 for information on importing templates into LibreOffice.
Installing templates using the Extension Manager
The Extension Manager provides an easy way to install collections of templates, graphics, macros, or other add-ins that have been “packaged” into files with a .OXT extension.
Although individual extensions can be found in different places, this page lists many of them: http://extensions.libreoffice.org/. Some extensions are free of charge; others are available for a fee. Check the descriptions to see what licenses and fees apply to the ones that interest you.
For more about the Extension Manager and some extensions of interest to Impress users, see Chapter 11, Setting Up and Customizing Impress.
To install a collection of templates packaged as an extension:
Download the extension and save it anywhere on your computer.
In LibreOffice, select Tools > Extension Manager from the menu bar. In the Extension Manager dialog, click Add.
A file browser window opens. Find and select the extension you want to install and click Open. The extension begins installing. You may be asked to accept a license agreement.
When the installation is complete, the extension is listed in the Extension Manager dialog box.
The slide masters from the templates will now appear in the list of Available Master Pages in the Tasks Pane (Figure 1).
|
Tip |
To get extensions that are listed in the repository, you can open the Extension Manager and click the Get more extensions here link. You do not need to download them separately as in step 1 above. It is also advised that you use the Extension Manager to check for any new Impress updates. |
To create a template from a presentation:
Open the presentation that you want to use for a template.
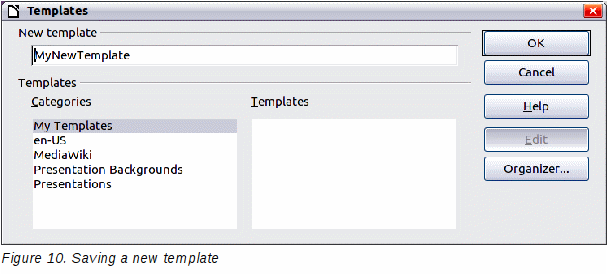
From the main menu, choose File > Templates > Save. The Templates dialog box opens.
In the New template field, type a name for the new template.
In the Categories list, click the folder in which you want to store the template. This is usually the My Templates folder, unless you have created other folders.
To learn more about template folders, see “Organizing templates” on page 18.
Click OK. LibreOffice saves the new template and the Templates dialog box closes.
|
Note |
All the slide masters used in the template become available for use in other presentations. |
You can set a custom presentation template to be the default template. You can reset the default later if you choose.
Setting a custom template as the default
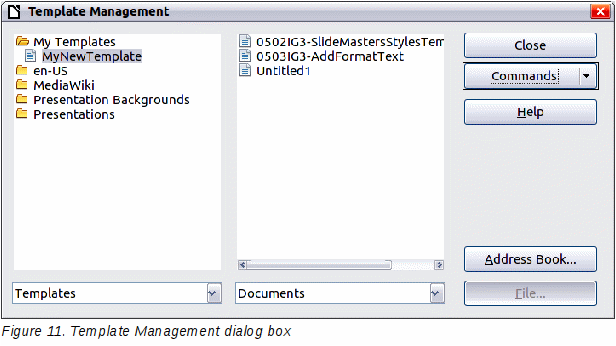
You can set any template to be the default, as long as it is in one of the folders displayed in the Template Management dialog box.
To set a custom template as the default:
From the main menu, choose File > Templates > Organize. The Template Management dialog box opens.
In the box on the left, double-click the folder containing the template that you want to set as the default, then select the template.
Click the Commands button.
From the drop-down menu, choose Set As Default Template. The next time that you create a document by choosing File > New the document will be created from this template.
Resetting the default to Impress’s built-in Default template
To re-enable Impress’s Default presentation background template as the default:
In the Template Management dialog box, in the box on the left, click the Presentation Backgrounds folder.
Click the Commands button.
From the drop-down menu, choose Reset Default Template > Presentation.
|
Note |
Use the instructions in this section only if you have customized the presentation template. |
You can edit a template’s styles and content, and then, if you wish, you can reapply the template’s styles to documents that were created from that template.
|
Note |
You can only reapply styles. You cannot reapply content. |
To edit a template:
From the main menu, choose File > Templates > Edit. A standard file browser window opens.
Find and select the template that you want to edit, and then click Open. The selected template opens in Impress.
Edit the template just as you would any other presentation. To save your changes, choose File > Save from the main menu.
The next time that you open a presentation that was created from the changed template, the following message appears.
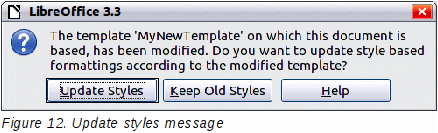
Click Update Styles to apply the template’s changed styles to the document. Click Keep Old Styles if you will never want to apply the template’s changed styles to the document. Whichever option you choose, the message box closes and the presentation opens in Impress.
LibreOffice can only use templates that are in LibreOffice template folders. You can create new LibreOffice template folders and use them to organize your templates. For example, you might have separate template folders for different purposes or projects. You can also import and export templates.
To begin, choose File > Templates > Organize from the main menu. The Template Management dialog box (Figure 11) opens.
|
Note |
All the actions made by the Commands button in the Template Management dialog box can be made as well by right-clicking on the templates or the folders. |
To create a template folder:
In the Template Management dialog box, click any folder.
Click the Commands button and choose New from the drop-down menu. A new folder called Untitled appears.
Type a name for the new folder, and then press Enter. LibreOffice saves the folder with the name that you entered.
You cannot delete the template folders supplied with LibreOffice or installed using the Extension Manager; you can only delete folders that you have created.
To delete a template folder that you have created:
In the Template Management dialog box, select the folder that you want to delete.
Click the Commands button and choose Delete from the drop-down menu. A message box appears and asks you to confirm the deletion. Click Yes.
To move a template from one template folder to another:
In the Template Management dialog box, double-click the folder that contains the template you want to move. A list of all the templates contained in that folder appears underneath the folder name.
Click the template that you want to move and drag it to the desired folder. If you do not have the authority to delete templates from the source folder, this action copies the template instead of moving it.
You cannot delete the templates supplied with LibreOffice or installed using the Extension Manager; you can only delete templates that you have created or imported.
To delete a template:
In the Template Management dialog box, double-click the folder that contains the template you want to delete. Click the template that you want to delete.
Click the Commands button and choose Delete from the drop-down menu. A dialog box appears and asks you to confirm the deletion. Click Yes.
If the template that you want to use is in a different location, you must import it into an LibreOffice template folder.
To import a template into a template folder from another location on your computer:
In the Template Management dialog box, click the folder into which you want to import the template.
Click the Commands button and choose Import Template from the drop-down menu. A standard file browser window opens.
Find and select the template that you want to import and click Open. The file browser window closes and the template appears in the selected template folder.
If you want, type a new name for the template, and then press Enter.
To export a template from a template folder to another location:
In the Template Management dialog box, double-click the folder that contains the template you want to export.
Click the template that you want to export.
Click the Commands button and choose Export Template. from the drop-down menu. The Save As window opens.
Find the folder into which you want to export the template and click Save.
1The shape of the cursor to move and resize objects is operating system specific.