

Impress Guide
Chapter
3
Adding and Formatting Text
This document is Copyright © 2005–2011 by its contributors as listed below. You may distribute it and/or modify it under the terms of either the GNU General Public License (http://www.gnu.org/licenses/gpl.html), version 3 or later, or the Creative Commons Attribution License (http://creativecommons.org/licenses/by/3.0/), version 3.0 or later.
All trademarks within this guide belong to their legitimate owners.
Contributors
Michele
Zarri T. Elliot Turner
Jean Hollis Weber Low Song
Chuan
Feedback
Please direct any comments or suggestions about this document to: documentation@global.libreoffice.org
Acknowledgments
This chapter is based on Chapter 3 of the OpenOffice.org 3.3 Impress Guide. The contributors to that chapter are:
Nicole
Cairns Martin J Fox Peter Hillier-Brook
Jean Hollis Weber Michele
Zarri
Publication date and software version
Published 30 July 2011. Based on LibreOffice 3.3.3.
Some keystrokes and menu items are different on a Mac from those used in Windows and Linux. The table below gives some common substitutions for the instructions in this chapter. For a more detailed list, see the application Help.
|
Windows/Linux |
Mac equivalent |
Effect |
|
Tools > Options menu selection |
LibreOffice > Preferences |
Access setup options |
|
Right-click |
Control+click |
Open context menu |
|
Ctrl (Control) |
z (Command) |
Used with other keys |
|
F11 |
z+T |
Open Styles and Formatting window |
Contents
Using text boxes created from the Layout pane 5
Using text boxes created from the text box tool 5
Inserting special characters 9
Inserting non-breaking spaces and hyphens 9
Introduction to formatting text 10
Using styles to format text 11
Modifying a presentation style 11
Updating a style from a selection 11
Applying a presentation style 12
Creating bulleted and numbered lists 17
Creating lists in AutoLayout text boxes 18
Creating lists in other text boxes 18
Creating a new outline level 18
Changing the appearance of the list 18
This chapter describes the different ways to add text to slides and format the text.
Text in slides is contained in text boxes.
There are two ways to add text boxes to a slide:
Choose a predefined layout from the Layouts section of the Tasks pane, containing text elements as described in Chapter 1. These text boxes are called AutoLayout text boxes.
Create a text box using the
text tool
![]() in the Drawing toolbar.
in the Drawing toolbar.
This chapter describes how to create, modify, use, and delete text boxes. It also discusses the various types of text that can be inserted and explains how to format the text. Finally, it provides information on how to insert special forms of text such as numbered or bulleted lists, tables, fields and hyperlinks.
Using text boxes created from the Layout pane
In Normal view:
Click in the text box that reads Click to add text.
Type or paste your text in the text box.
These text boxes are known as AutoLayout text boxes. See also “Creating bulleted and numbered lists” on page 17.
Using text boxes created from the text box tool
In Normal View:
Click on the Text
icon
![]() on the Drawing toolbar. The default position of the drawing toolbar
is towards the bottom of the screen. If the toolbar with the text
icon is not visible, choose View
> Toolbars > Drawing.
on the Drawing toolbar. The default position of the drawing toolbar
is towards the bottom of the screen. If the toolbar with the text
icon is not visible, choose View
> Toolbars > Drawing.
Click and drag to draw a text box on the slide. This sets the width. Do not worry about the height—the text box will expand if needed as you type. To reposition the text box to a different part of the slide, see “Moving a text box” on page 6; to change the width, see “Resizing a text box” on page 7.
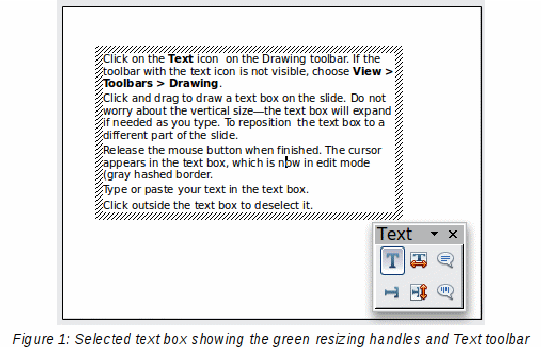
Release the mouse button when finished. The cursor appears in the text box, which is now in edit mode (gray hashed border; see Figure 1).
Type or paste your text in the text box.
Click outside the text box to deselect it.
|
Note |
In addition to the normal text boxes where text is horizontally aligned, it is possible to insert text boxes where the text is aligned vertically. This choice is available only when Asian languages are enabled in Tools > Options > Language Settings > Languages.
Click
on the
|
In Normal view, notice how the pointer changes from an arrow to an I-beam as you move it over the text in a text box.
Click when the pointer becomes an I-beam. The text box is now in edit mode. In this mode a gray border is visible around the text box edges.
Move the I-beam (or pointer) over the gray border. Notice how it changes shape, becoming the usual “move” symbol on your operating system (for example, a hand).
When the “move” symbol appears, click once. Blue selection handles appear.
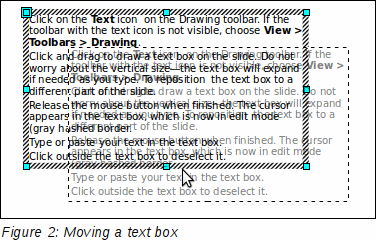
Click anywhere in the text box or on the gray border (except for the blue handles) and drag to move the text box. A semi-transparent copy of the text box shows where your text box will be placed. See Figure 2.
Release the mouse button when the text box is in the desired position. To return to edit mode, click outside the text box area and then repeat step 1) of this procedure.
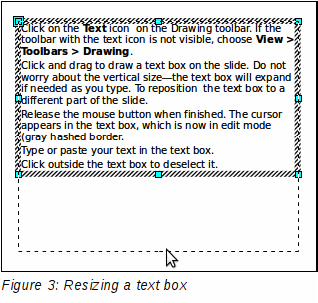
In Normal view, enter edit mode by clicking on the text box, then move the mouse to the gray edge of the text box. When the cursor shape changes, click the left mouse button again. The text box should now display blue resizing handles. Move the pointer over any handle. Notice how the pointer changes shape, indicating in what direction the text box will be resized. The corner handles change the two dimensions of the text area simultaneously, while the four handles at the center of each side modify only one dimension.
When the two-headed arrow is displayed, click and drag to resize the text box.
|
Tip |
To maintain the proportions of a text box while resizing, press and hold the Shift key, then click and drag. Make sure to release the mouse button before releasing the Shift key. |
Impress
also provides a different type of text box which resizes horizontally
to automatically fit the text as it is inserted. To insert an
auto-resizing text box, click on the
![]() icon in the text toolbar (see Figure 1) and then click on the place
in the slide where you want the first letter of the text to appear.
If the text toolbar is not visible, choose View
> Toolbars
> Text.
icon in the text toolbar (see Figure 1) and then click on the place
in the slide where you want the first letter of the text to appear.
If the text toolbar is not visible, choose View
> Toolbars
> Text.
For more accurate control over the shape, size and position of the text box, instead of using the mouse, use the Position and Size dialog box. Select the text box, then press F4 or select Format > Position and Size from the menu bar. The use of this dialog box is explained in Chapter 2.
Click the text once to display the gray border.
Move the cursor to the edge of the text box and click the left mouse button. The gray border now shows blue selection handles.
Press Delete.
|
Tip |
Sometimes it is faster to to delete a text box by dragging a selection rectangle around the text box and then hitting the Delete key. Take care to avoid selecting and accidentally deleting other text boxes or shapes. |
Text may be inserted into the text box by copying it from another document and pasting it into Impress. However, the pasted text will probably not match the formatting of the surrounding text or that of the other slides in the presentation. This may be what you want on some occasions; however in most cases you want to make sure that the presentation style is consistent. There are several ways to ensure consistency; these methods are explained below.
It
is normally good practice to paste text without formatting and apply
the formatting later. To paste without formatting, either press
Control+Shift+V
and then select Unformatted
text from the dialog box that appears, or click on
the small black triangle next to the paste symbol in the standard
toolbar
![]() and select Unformatted text. The unformatted text will be
formatted with the outline style at the cursor position in an
AutoLayout text box or with the default graphic style in a normal
text box.
and select Unformatted text. The unformatted text will be
formatted with the outline style at the cursor position in an
AutoLayout text box or with the default graphic style in a normal
text box.
If pasting the text into an AutoLayout area, then to give the pasted text the same look and feel of the rest of the presentation apply the appropriate outline style to the text. To do so:
Paste the text in the desired position. Do not worry if it does not look right: it will in a minute.
Select the text you have just pasted (see “Selecting text” on page 10 for details on how to do that).
Select Format > Default formatting from the menu bar. This operation will assign one of the nine Presentation styles to the text (depending on where the insertion is made).
Use the four arrow buttons in
the Text Formatting toolbar
![]() to move the text to the appropriate position and give it the
appropriate outline level. The button with the arrow pointing left
promotes the list entry by one level (for example from Outline 3 to
Outline 2), the right arrow button demotes the list entry by one
level, the up and down arrow buttons move the list entry.
to move the text to the appropriate position and give it the
appropriate outline level. The button with the arrow pointing left
promotes the list entry by one level (for example from Outline 3 to
Outline 2), the right arrow button demotes the list entry by one
level, the up and down arrow buttons move the list entry.
Apply manual formatting as required to sections of the text (to change font attributes, tabs, and so on).
If you are pasting text into a text box, you can still use styles to quickly format the text. Note that only one graphic style can be applied to the copied text. To do this:
Paste the text in the desired position.
Select the text you have just pasted (see “Selecting text” on page 10 for details).
Select the desired graphic style.
Apply manual formatting as required to sections of the text.
|
Tip |
Presentation styles are very different from Writer styles and are applied in quite a different way. Refer to ”Using styles to format text on page 11 for details. |
To insert special characters, such as copyright, math, geometric, or monetary symbols, or characters from another language:
Click in the place in the text where you want to insert the character.
Choose Insert
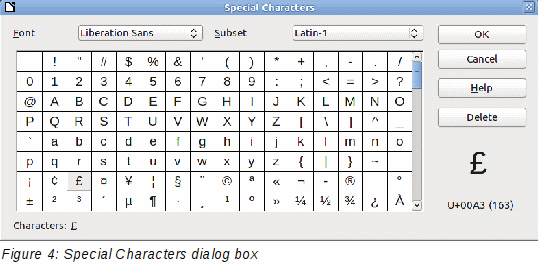
> Special Character. The Special Characters
dialog box appears. See Figure 4. Alternatively if the
![]() icon is visible, you can click this to bring up the Special
Characters dialog box.
icon is visible, you can click this to bring up the Special
Characters dialog box.
|
Tip |
To show toolbar buttons that are not visible, click on the small down-arrow on the right end of the tool bar, move the cursor over Visible Buttons and then click on the icon you wish to make visible. |
Choose the font and character subset from the Font and Subset drop-down menus.
Click the character you want to insert. You may have to scroll to find the one you want.
Click OK.
Characters you select will be inserted in the order they were selected. If you accidentally click the wrong character, clicking another character will only add it to the ones being inserted. Click Delete (all the characters selected will be deleted), then click the correct characters. Alternatively, you can also go ahead and insert all the selected characters and delete any unwanted ones from the document, as special characters behave like any other character.
Inserting non-breaking spaces and hyphens
Where it is not desirable for words separated by a space or by a hyphen to span over two lines, or where an optional hyphen is desired, you can insert a special formatting mark.
To access the Formatting marks options, select from the menu bar Insert > Formatting marks. Impress supports three formatting marks:
Non-breaking space: A non-breaking space between two words prevents these two words being separated over two lines. Press Control+Shift+Spacebar on the keyboard to insert a non-breaking space.
Non-breaking hyphen: A non-breaking hyphen keeps the two words separated by the hyphen on the same line.
Optional hyphen: An invisible hyphen that is activated (thus breaking the word) only when the word is too long to fit on one line.
Introduction to formatting text
The appropriate use of text formatting can give a presentation a consistent look and a dynamic feel, and it can even enhance the audience’s understanding of your message by preventing distracting elements.
When you enter text, either in an AutoLayout text box or in a normal text box, it is formatted with a set of predefined attributes known as a style. The style used depends on the outline level of the point where the text was entered for AutoLayout text boxes (for example, if you are entering a level 2 item, Impress will format it according to the Outline 2 presentation style) or the Default Graphic style for text boxes.
|
Tip |
Sometimes, as seen also in the “Pasting text” section on page 8, it is very useful to re-apply the baseline style to a selection of text, thus eliminating any manual formatting applied to it (particularly if you made a mistake and you do not know how to undo it). To do this, select the manually formatted text, and then select Format > Default formatting from the menu bar. |
Broadly speaking, formatting text may require some intervention in three areas:
The character attributes (for example the font color)
The paragraph attributes (for example the alignment)
The list attributes (for example the type of bullet)
In some cases it is quicker and more efficient to apply manual formatting; but in situations where you need to perform the same modifications to many different parts of the presentation, the use of styles is recommended. Both these techniques are described here.
|
Note |
Unlike in Writer, where it is recommended to try to use styles whenever possible, in Impress manual formatting needs to be used more often. This is because presentation styles are fixed; therefore it is not possible, for example, to have two different level 1’s or different types of bullet points for the same outline level. Also, the lack of support for character styles forces the use of manual formatting to modify sections of the text. |
Text must be selected before it can be formatted.
To format all the text in a text box, click once on the text, then click once on the border of the text box. The green resizing handles are displayed. Now any formatting changes will apply to all the text in the text box.
To format only part of the text, click once on the text, then select the text to be formatted by clicking and dragging (highlighting) over it. You can also use keyboard combinations to select text: move the cursor where you want to begin your selection, press Shift and then use the arrow buttons to extend your selection. Formatting changes will apply only to the selected text.
|
Tip |
To select text word by word, instead of by character, press the Control key and Shift key together. To speed up the selection even further, you can combine the Shift key with the Home key or the End key to extend the selection up to the start or end of the line in which the cursor is positioned, respectively. |
Impress has two categories of styles: presentation styles and graphics styles. Presentation styles are used on text inserted into an AutoLayout area, slide master backgrounds, and background objects. However, for text inserted in a text box or a graphic object, you need to apply a graphic style.
In this chapter we focus mostly on Presentation styles. For information on graphic styles, see Chapter 6, Formatting Graphic Objects.
Modifying a presentation style
To modify a presentation style, follow these steps:
Open the Styles and Formatting window by pressing F11 or selecting Format > Styles and Formatting from the menu bar.
Select the style category by
clicking on either the Presentation Styles icon
![]() at the top of the Style and Formatting window.
at the top of the Style and Formatting window.
Right-click on the style to be modified and select Modify from the pop-up menu.
The top portion of the dialog box for a presentation style is shown in Figure 5.

This dialog box consists of 14 pages, which can be divided in two groups: those that determine the formatting of the text and those that determine the properties of the slide master background and the background objects.
There is no difference between the parameters that characterize a style and the attributes given manually to portions of text; in fact the pages that open when applying formatting manually are the same that you configure in the style dialog box. Therefore once you master the formatting of text, you will know how to create and modify a style. In particular:
For the Font and Font Effects style pages, refer to “Formatting characters” on page 12.
For the Indents and Spacing, Alignment, and Tabs style pages, refer to “Formatting paragraphs” on page 15.
For the Bullet and numbering type, Graphics, Customize style pages, refer to “Creating bulleted and numbered lists” on page 17.
The other tabs of the Presentation Style dialog box are all related to formatting the background and background objects and are described in detail in Chapter 6.
Updating a style from a selection
To update a style from a selection:
Select an item that has the format you want to adopt as a style.
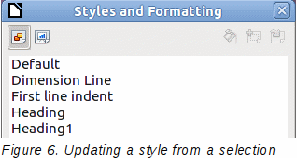
In the Styles and Formatting window, select the style you want to update, and then click the Update Style icon (see Figure 6).
To apply a presentation style, move the paragraph to the appropriate outline level as described in “Changing the order or the outline level lines” on page 22.This is different from Writer, where you select the desired style from the Styles and Formatting window.
To
view the character formatting options, select Format
>
Character or
click the
Character button
![]() on the Text Formatting
toolbar. (If a toolbar with
the text icon is not visible, choose View
> Toolbars
> Text Formatting.)
The Character dialog box appears. Note that character styles
do not exist in Impress.
on the Text Formatting
toolbar. (If a toolbar with
the text icon is not visible, choose View
> Toolbars
> Text Formatting.)
The Character dialog box appears. Note that character styles
do not exist in Impress.
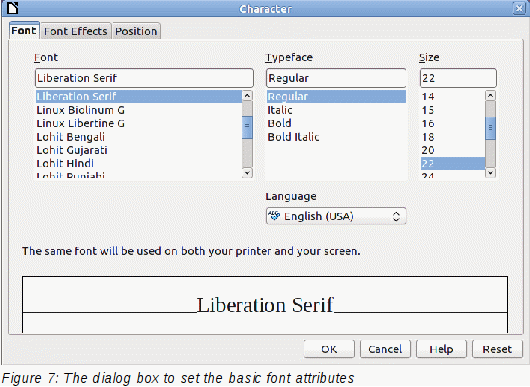
Use the Font page to select the desired font type, its base attributes (Italic, Bold, etc.) as well as the size. A sample of the font is displayed in the lower part of the dialog box. You can also specify the language of this style.
|
Tip |
When writing a presentation in multiple languages, you can make the best of the language setting by creating two styles that only differ in the language but are otherwise the same. This allows you to check the spelling of all of the contents without affecting the appearance. |
This page is available when creating or modifying a presentation style or a graphics style.
If Asian language support has been enabled (Tools > Options > Language Settings > Languages), the Font page looks like Figure 8.
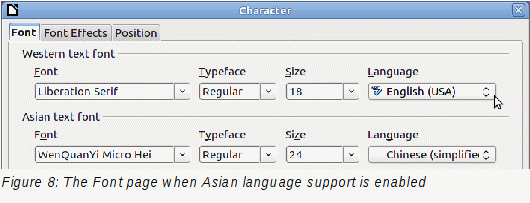
The page is divided into three parts. The top and bottom parts have the same functionality as described above, while in the middle part you can specify the Asian text font and its attributes.
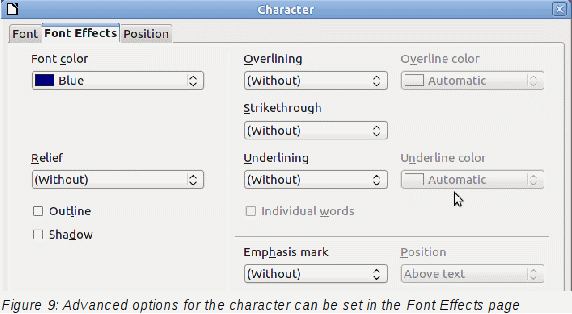
Use the Font Effects page to apply special effects to the text, such as overlining and underlining, color, shadow and so on. As for the Font page, a sample of the text is displayed in the lower part of the dialog box allowing a quick visual check of the effects applied. This page is available when creating or modifying a presentation style or a graphics style.
The Position page has advanced options to customize text. This page is not available when creating or modifying a presentation style or a graphics style.
Use this page to set the text position relative to the baseline when you need to insert subscripts or superscripts.
To create a superscript or a subscript do the following:
Select Superscript or Subscript as applicable.
Specify the amount by which the text should be raised (superscripts) or lowered (subscripts).
Specify the dimensions of the character relative to the baseline character size (in percentage).
The amount by which the text is raised or lowered can be set to automatic by selecting Automatic.
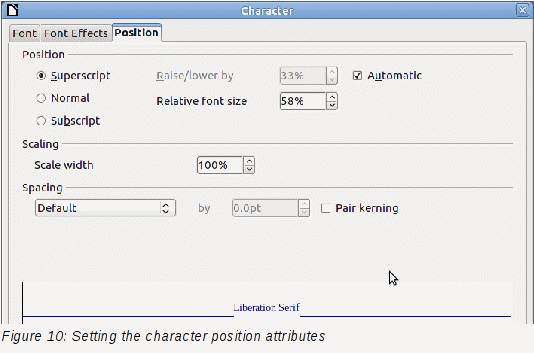
Two more position attributes can be set on this page:
The (width) scaling of the text, which specifies the percentage of the font width by which to compress or expand the individual characters of the selected text.
The spacing between the characters of the font, which can be defined in number of points. Selecting the Pair kerning check-box causes LibreOffice to automatically adjust the spacing between certain pairs of characters to visually improve the appearance. For example, when writing a V followed by an A (VA) the spacing between the two letters is reduced (strong kerning) as can be easily seen when compared with, say, VS which is not a kerning pair.
To view the paragraph formatting
options, select Format
>
Paragraph or
click the Paragraph
button
![]() on the Text Formatting toolbar. If
a toolbar with the text icon is not visible, choose View
> Toolbars
> Text Formatting. The Paragraph dialog box is
shown. It contains three pages that are described in detail below. If
Asian language support has been activated, a page called Asian
Typography is also displayed.
on the Text Formatting toolbar. If
a toolbar with the text icon is not visible, choose View
> Toolbars
> Text Formatting. The Paragraph dialog box is
shown. It contains three pages that are described in detail below. If
Asian language support has been activated, a page called Asian
Typography is also displayed.
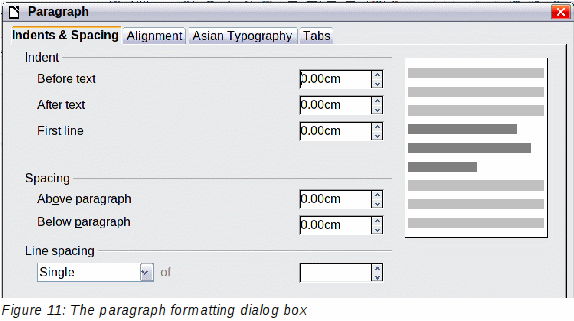
The Indents and Spacing page, shown in Error: Reference source not found, has four sections:
Indent: modifies the indentation of the text (before and after) as well as the indentation of the first line.
Spacing: defines the space before and after each paragraph formatted with the style.
Line spacing: determines the spacing between two lines formatted with the style. Note that selecting Proportional spacing requires specifying the percentage of a line to be used as spacing; 100% corresponds to a single line, 200% to a double line, 50% to half a line. If Leading is selected, specify the amount of line spacing in your default unit of measurement.
Preview area: provides a visual representation of the settings before you apply them.
|
Tip |
Setting the line spacing to less than 100% is a good method to cram a lot of text into a text box, however care must be taken as too small a value will make the text hard to read. |
|
Tip |
You can change the default unit of measurement, for example from inches to centimeters, from Tools > Options > LibreOffice Impress > General. |
The Indents and Spacing page is also available when creating or modifying a graphics style or when modifying a presentation style.
Use the Alignment page to determine the text alignment: Left, Right, Center, or Justified. A preview shows the effects of the changes. If Asian language support has been enabled, a Text direction list appears under Properties at the bottom on the page.
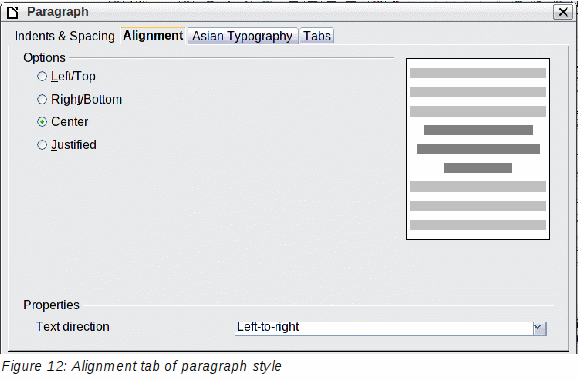
The
same alignment options can be accessed from the Text Formatting
toolbar.
![]()
The Alignment page is also available when creating or modifying a graphics style, or modifying a presentation style.
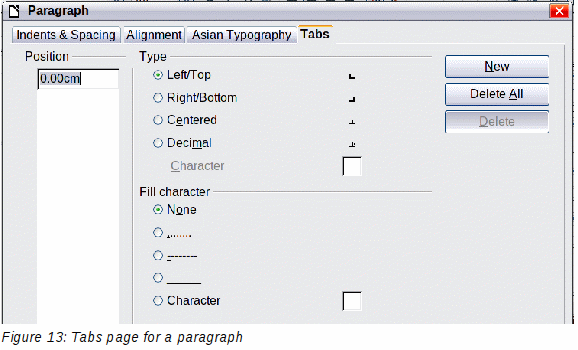
Use the Tabs page to set tab stops. To delete an existing tab stop, select it in the list and click the Delete button. To delete all the tab stops, click the Delete All button.
To create a new tab stop:
Set the size of the tab stop in the edit box on the left.
Select the type. If you set the type to Decimal, specify in the box below the character to be regarded as the decimal point.
Select a fill character which will be drawn from the tab insertion point up to the tab stop. You can choose any character to act as fill character.
Click the New button to apply the new tab stop.
This page is available in the Format > Paragraph dialog box and in the Graphics Styles dialog box.
Use the Asian Typography page, shown in Figure 14, to set the following properties relative to line changes:
Apply list of forbidden characters to the beginning and end of lines
Allow hanging punctuation
Apply spacing between Asian, Latin and Complex text
The use of these options is self-explanatory.

Creating bulleted and numbered lists
The procedure to create a bulleted or numbered list varies depending on the type of text box used, although the tools to manage the list and customize the appearance are the same.
In text boxes created automatically by Impress (called AutoLayout), the outline styles available are by default bulleted lists, while for normal text boxes an additional step is required to create a bulleted list.
Creating lists in AutoLayout text boxes
Every text box included in the available layouts is already formatted as a bulleted list, therefore to create a bulleted list the only necessary steps are:
From the Layout pane, choose a slide design that contains a text box. Those are easily recognizable from the thumbnail.
Click in the text box that reads Click to add an outline.
Type the text, then press Enter to start a new bulleted line.
The default list type is a bulleted list. To customize the list appearance or to change from bulleted to numbered and vice versa, refer to “Changing the appearance of the list ” on page 18.
|
Tip |
Press Shift+Enter to start a new line without creating a new bullet or number. The new line will have the same indentation as the previous line. Click the bullets icon on/off on the text formatting toolbar for a line without bullet. If the text formatting toolbar is not showing, enable it by selecting View > Toolbar > Formatting in the menu bar. |
Creating lists in other text boxes
To create a list in a text box, follow these steps:
Place the cursor in the text box.
Click the Bullets
On/Off button
![]() in the text formatting toolbar.
in the text formatting toolbar.
Type the text and press Enter to start a new bulleted line.
The way to change the appearance of a list is explained on page 18.
If necessary, press Enter to begin a new line.
![]()
Press
Tab
or click the indentation arrows in the Text Formatting toolbar.
Each time you press Tab
or click the right arrow, the line indents to the next outline
level. Pressing Enter
creates a new line at the same level as the previous one. To return
to the previous level, press Shift+Tab
or
click the left arrow.
In the AutoLayout text boxes, promoting or demoting an item in the list corresponds to applying a different outline style, so the second outline level corresponds to Outline 2 style, the third to Outline 3 style and so on. As a consequence, a change in the level also produces other changes (for example font size, bullet type, and so on).
|
Caution
|
Do not try to change the outline level by selecting the text and then clicking the desired outline style as you would in Writer. Due to the way that presentation styles work, it is not possible to apply them in this way. |
Changing the appearance of the list
You
can fully customize the appearance of a list, changing the bullet
type or numbering for the entire list or for single entry. All the
changes can be made using the Bullets and Numbering dialog box, which
is accessed by selecting Format
> Bullets and Numbering or by clicking on the
Bullets and Numbering
icon
![]() on the text formatting toolbar.
on the text formatting toolbar.
For the entire list:
Select the entire list or click on the gray border of the text box so that just the green resizing handles are displayed.
Select Format
> Bullets and Numbering or click on the Bullets
and Numbering
icon
![]() .
.
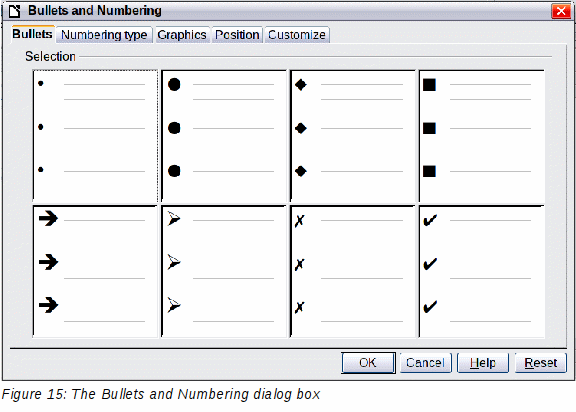
The Bullets and Numbering dialog box (Figure 15) contains five tabs: Bullets, Numbering type, Graphics, Position, and Customize.
If a bulleted list is needed, select the desired bullet style from the six default styles available on the Bullets page.
If a graphics style is needed, select one from those available on the Graphics page.
If a numbered list is needed, select one of the 6 default numbering styles on the Numbering type page.
Later in this section is an explanation on how to add further bullets and numbering styles to the existing ones.
For a single line in the list:
Click anywhere in the line to place the cursor in it.
Follow steps 2–4 of the previous instruction set.
If the list was created in an AutoLayout text box, then an alternative way to change the entire list is to modify the Outline styles. Changes made to the outline style will apply to all the slides using them, so be careful before using this command. The pages related to list management are described below.
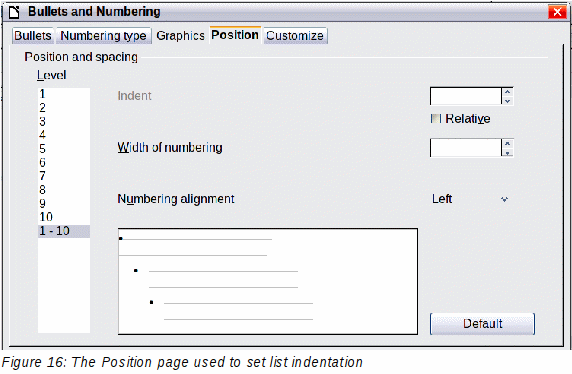
Use the Position page, shown in Figure 16, to fine tune the indentation and spacing of the bullet point and its text. This page is particularly effective when used in combination with the Customize page.
To set up an outline level, first select it from the list on the left hand side of the page. Select level 1 – 10 to modify all the levels simultaneously. Then set the Indent, which is the spacing between the bullet or number and the text. If you select the Relative option, the indent value will be measured relative to the previous level and not from the margin.
The numbering alignment is only useful when creating a numbered list; use it to specify the alignment of the numbers. For example, you may want to align them to the right to line up one- and two-digit numbers in a pleasing way.
|
Tip |
To fully appreciate how the Numbering alignment works, try to create a numbered list with more than 10 elements and make sure that enough room has been made for a two (or more) digit number using the Width of numbering field. |
The Position page is not available if you are modifying a presentation style or graphics style, however the same effects can be obtained by using the Indents and Spacing page of the dialog box for creating or modifying a slide (see Error: Reference source not found).
Use the Customize page, shown in Figure 17, to alter the style of all the outline levels.
The options available on this page depend on the type of marker selected for the list. Select first the level you want to modify on the left hand side of the box. To modify all levels at once, select 1 – 10 as the level. Because the levels are arranged in a hierarchical structure, changing for example the font attribute of one of the levels ripples through all the lower levels.
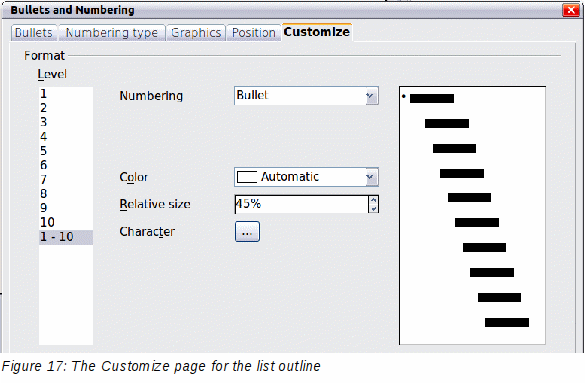
Depending on the numbering style selected in the Numbering box (bullet, graphic, numbering), some of the following options may become available on the page:
Before: Enter any text to appear before the number (for example, Step).
After: Enter any text to appear after the number (for example, a punctuation mark).
Color: Pick the color for the list marker (number or bullet character).
Relative size: Specify the size of the number relative to the size of the characters in the paragraph of the list.
Start at: Enter the first value of the list (for example, you might want the list to start at 4 instead of 1).
Character button: Click this button to select the character for the bullet.
Graphics selection button: Opens a gallery of available graphics or allows the selection of a file on the hard disk to be used as a marker.
Width and Height: Specify the dimensions of the graphic marker.
Keep ratio checkbox: If selected, the ratio between the width and the height of the graphic marker is fixed.
The right hand side of the screen shows a preview of the modifications made. To revert to the default values, click the Reset button in the bottom right corner.
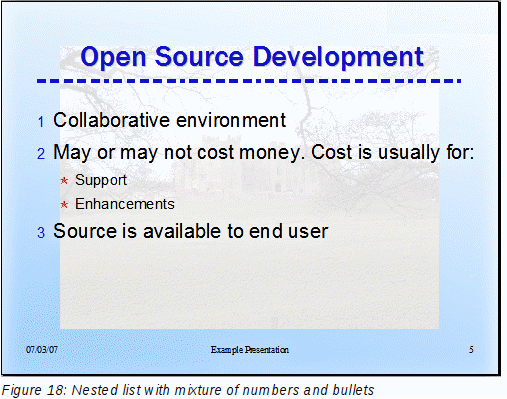
Using the Customize page, you can create complex structured layouts, for example a nested list with numbering followed by bullets, as in Figure 18.
Changing the order or the outline level lines
Click once in a line of text to place the cursor in it, then click on the Outline tab (to the right of the Normal tab) in the Workspace and use the Promote/Demote buttons in the Text Formatting toolbar to move the text to the appropriate position and give it the appropriate outline level.
![]() The button with the arrow
pointing left promotes the list entry by one level (for example from
Outline 3 to Outline 2), the right arrow button demotes the list
entry by one level, the up and down arrow buttons move the list
entry. Numbering adjusts automatically.
The button with the arrow
pointing left promotes the list entry by one level (for example from
Outline 3 to Outline 2), the right arrow button demotes the list
entry by one level, the up and down arrow buttons move the list
entry. Numbering adjusts automatically.
|
Tip |
You can also use the Tab key and Shift + Tab keys to promote and demote the outline level of a line in a list. |
Tables are a powerful mechanism to convey structured information quickly, so they represent an important tool when creating a presentation. You can create tables directly in Impress; there is no need to embed a Calc spreadsheet or a Writer text table, although in some circumstances it makes sense to do so as the functionality provided by a Calc spreadsheet is far superior to that provided by an Impress table.
Many predefined table designs are available in the Table design section of the task pane.
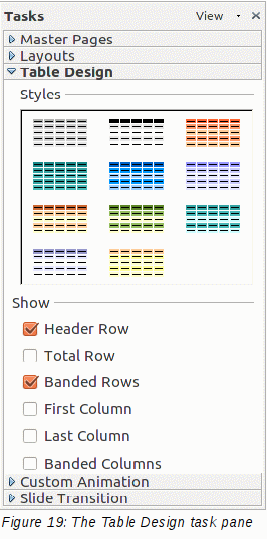
When working with tables it is useful to know the number of rows and columns needed as well as the look and feel. The parameters can be adjusted later, but this is more laborious than setting the correct table dimensions from the beginning.
To insert a table, proceed as follows:
Position the slide which will contain the table in the work area. If necessary modify the slide layout in order to reserve the place for the table.
If the task pane is already open select Table Design. If the task pane is not visible, select View > Task pane, then select the Table Design task.
Select one of the predefined styles, which only differ in the color scheme. You will be able to change the table colors later on; however, it is recommended that you select a color scheme similar to the one you want. Selecting a style opens the dialog box of Figure 20 where you can specify the number of rows and columns.
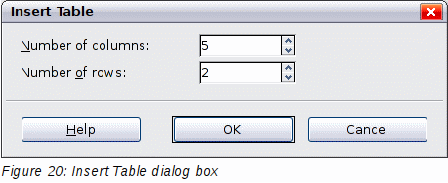
The table is placed initially at the center of the slide, but you can move it by selecting it and then dragging it to the new position, or by using the method described in “Position and size” on page 27.
You can also create a table directly by selecting Insert > Table from the main menu or with the Insert Table button in the Standard toolbar. When using this method, the default style and settings are applied to the newly created table. The use of the Insert Table button is described more in detail later in this section.
Once the table is added to the slide, you can control its appearance, size, position and so on using a combination of the task pane options, the Table toolbar and the Table properties dialog box.
The following options are available in the Show section of the task pane:
Header Row: selected by default, it adds a first row with a different background from the rest of the table.
Total Row: the opposite of Header row; if selected, it changes the background of the last row to make it stand out from the other rows.
Banded Rows: selected by default, this option colors alternate rows with different backgrounds making it easier to ready data presented in rows.
First Column: highlights the first column of the table by allocating a darker background to it.
Last Column: does the same to the last column.
Banded Columns: when selected, alternate columns are colored differently.
When a table is selected, 8 blue square handles appear around the edges and the Table toolbar should be displayed. If necessary, you can open the toolbar using View > Toolbars > Table. By default the toolbar will float, but you can dock it at any time to the side or top edge of the work area.
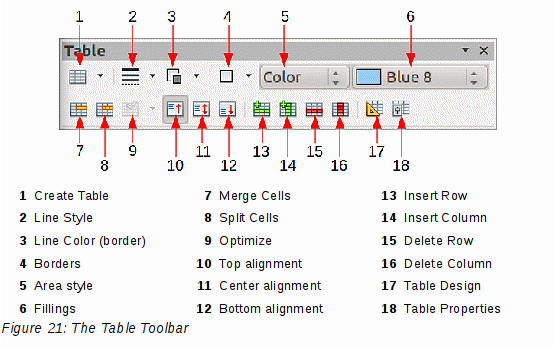
The Table toolbar contains the majority of the tools you need to manipulate a table; these are described below.
Table
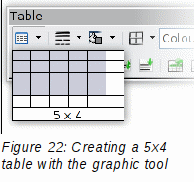
Use to create a new table on the selected slide. Opens the Insert Table dialog box where you can select the desired number of rows and columns. Click on the small black triangle next to the button to open the graphic tool for inserting a table. To use the tool, move the mouse to the right and down in the grid until you reach the cell you want to be the last and click there.
|
Note |
Any newly inserted table is given a set of default attributes such as color scheme, banded rows, header row and so on. Currently such defaults are hard coded in LibreOffice and cannot be changed. |
Line Style
Use to change the style of the line of the selected cells. Opens a new dialog box where you can choose from a range of predefined styles.
Line Color
Open a color selection dialog box where you can choose the color of the lines around the selected cells.
Borders
Use to select among some predefined border configurations. The borders are applied to the selected cells. If the desired border pattern is not available, you will need to use the Table properties dialog box.
Area filling
In the drop-down menu, first choose how the selected cells should be filled: Invisible, Color, Gradient, Hatching, or Bitmap. Depending on the selection, the Available Fillings drop-down menu is populated with the available schemes. Refer to Chapter 6 (Formatting Graphic Objects) for details on how to manage area filling styles.
Merge cells
Merges the selected cells. Note that the contents of the merged cells are also merged.
Split cells
The opposite operation of Merge cells. Make sure that the cursor is positioned on the cell you want to split, then click to open the Split Cells dialog box.
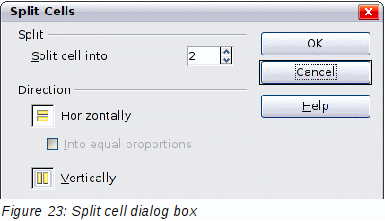
Select the number of resulting cells from the split as well as whether the cell should be split horizontally or vertically. When splitting horizontally, you can select the “into equal proportions” option to get all cells of equal size. The contents of the split cell are kept in the original cell (the one on the left or the top).
Optimize
Evenly distributes the selected cells either horizontally or vertically. If you want to optimize the whole table, you can evenly distribute rows or columns by right-clicking on the table edge and selecting Row > Space Equally or Column > Space Equally from the pop-up menu.
Vertical Alignment
You can select the vertical alignment of the text on a cell by cell basis between Top, Center and Bottom. The chosen setting only applies to the selected cells. The alignment commands can be applied to all the cells of the table by right-clicking on the edge of the table, choosing Cell from the pop-up menu, and then choosing the required alignment.
Insert or delete rows and columns
Use the Table toolbar to insert or delete rows and columns of your table. Rows and columns are inserted below and to the right of the selected cell. You can insert rows and columns at the end of the table using the pop up menu that opens by right clicking on the edge of the table. The insert commands are under the Row or under the Column menu.
Table Design
The only purpose of this button is to open the Table Design pane in the task pane.
Click the Table Properties icon to open the Format Cells dialog box, which contains the following pages:
Font: see “Font page” on page 12 for a description of the available options.
Font Effects: see “Font Effects page” on page 13 for a description of the available options.
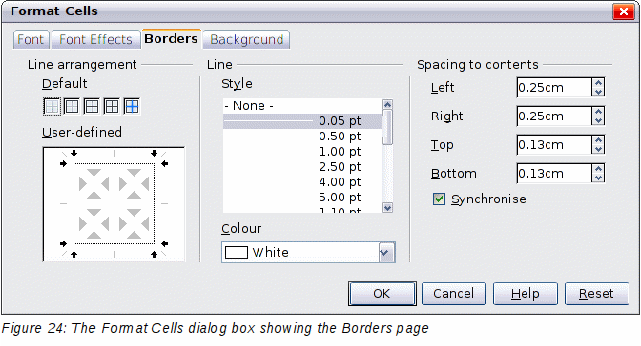
Borders: here you can set advanced properties not available from the Table Toolbar, such as the spacing between the text and the border as well as setting the style of each individual border of the table separately. This page also provides the same options as the line style and line color buttons of the Table Toolbar.
|
Note |
It is currently not possible to define diagonal borders for Impress tables. |
Background: changes the background of the selected cells and provides the same functionality as the Area Style Filling and Available Filling drop down menus of the Table Toolbar.
|
Note |
The Table Properties dialog box can also be accessed from the pop-up menu that opens when right-clicking on the table. |
Impress treats tables just like any other graphic object; it is therefore possible to change their position on the slide as well as their size by using the mouse or, for more accurate control, with the Position and size dialog box. You can open the dialog box by pressing F4 when the table is selected or by right-clicking on the table and then selecting Position and Size from the pop-up menu. The functions provided in this dialog are described in Chapter 6 (Formatting Graphic Objects).
|
Note |
Unlike other graphic objects, tables cannot be rotated. |
To delete a table, select it and then press the Delete key on the keyboard.
Fields allow the automatic insertion of text into the slide. You can think of a field as a kind of formula which is calculated when the document is loaded or printed, and the result is written to the document. Fields are commonly used when creating templates and slide masters, as explained in Chapter 2. Examples of fields include: date/time, slide number, file name and author.
To insert a field into a slide, move the cursor where the field will be and then select from the menu bar Insert > Fields followed by one of these choices:
Date (fixed): inserts the date at the time of inserting the field.
Date (variable): The field is updated to contain the date at the time of opening the file.
Time (fixed): a field displaying the time of insertion.
Time (Variable): a field which is updated to the time of opening the file.
Author: The author of the presentation. This information is derived from the value recorded in the general options. To modify this information go to Tools > Options > LibreOffice section then select User Data.
Page number: inserts the page number of the slide.
Page Count: inserts the total number of the slides.
File name: a field with the name of the file.
By default, fields are displayed with a gray background when you are in edit mode. To remove the shading, go to View in the menu bar and deselect Field Shading; alternatively, press Control+F8.
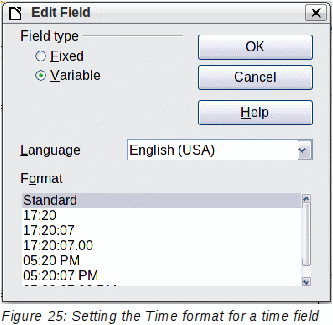
The appearance of all the fields, excluding the page number field, can be customized from the corresponding field editor. To access the field editor (Figure 25):
Move the cursor to the field and select it.
Select Edit > Fields from the menu bar.
Select the desired format in the dialog box that appears.
Click OK when satisfied.
|
Tip |
A similar list of format choices can be accessed by selecting the field and right clicking. |
Modifications to the page number fields can be done in two ways:
Select the field and apply the formatting manually.
Switch to the slide master editing mode (View > Master > Slide Master), then modify the Background object style as desired. Once back in Normal view, insert the page numbers from the Insert > Page Number box. See Chapter 2 for more information about editing a slide master.
When inserting text (such as a website address or URL) that can be used as a hyperlink, Impress formats it automatically, creating the hyperlink and applying a color and underlining. If you do not want Impress to do that, select Edit > Undo Insert from the menu bar or press Control+Z immediately after the formatting has been applied.
You can also insert hyperlinks manually.
|
Tips |
To prevent LibreOffice from automatically turning website addresses (URLs) into hyperlinks, go to Tools > AutoCorrect > Options and deselect the URL Recognition checkbox. To change the color of hyperlinks, go to Tools > Options > LibreOffice > Appearance, scroll to Unvisited links and/or Visited links, select the checkboxes, pick the new colors and click OK. Caution: this will change the color for all hyperlinks in all components of LibreOffice—this may not be what you want. |
To insert a hyperlink, or to customize the appearance of a hyperlink, select Insert > Hyperlinks from the menu bar. The dialog box shown in Figure 26 opens.
On the left hand side, select one of the four types of hyperlinks:
Internet: a web address, normally starting with http://
Mail & News: for example an email address.
Document: the hyperlink points to another document or to another place, commonly referred to as a bookmark, in the presentation.
New document: the hyperlink creates a new document.
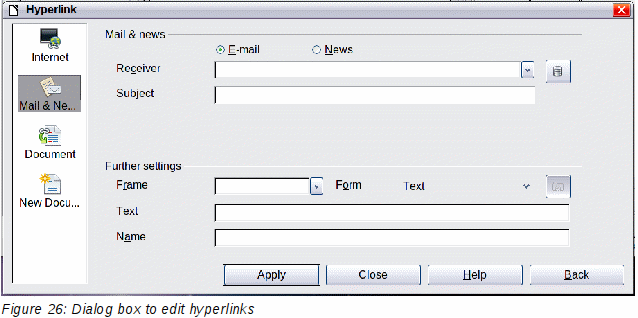
The top right part of the dialog box changes according to the choice made for the hyperlink type. A full description of all the choices, and their interactions, is beyond the scope of this chapter. Here is a summary of the most common choices used in presentations:
For an Internet type hyperlink, choose the type of hyperlink (choose between Web, FTP or Telnet), and enter the required web address (URL).
For a Mail and News type hyperlink, specify whether it is a mail or news link, the receiver address and for email, also the subject.
For a Document type hyperlink, specify the document path (the Open File button opens a file browser); leave this blank if you want to link to a target in the same presentation. Optionally, you can specify the target in the document (for example a specific slide). Click on the Target icon to open the Navigator where you can select the target, or if you know the name of the target, you can type it into the box.
|
Note |
For navigation within a presentation it is generally better to use the object interaction menu that you can find either in the Drawing toolbar or in the pop-up menu that opens when right-clicking on an object. |
For a New Document type hyperlink, specify whether to edit the newly created document immediately or just create it (Edit later) and the type of document to create (text, spreadsheet, etc.). For a presentation, Edit now is the more likely choice. The Select path button opens a directory picker.
The Further settings section in the bottom right part of the dialog box is common to all the hyperlink types, although some choices are more relevant to some types of links.
Set the value of Frame to determine how the hyperlink will open. This applies to documents that open in a Web browser.
Form specifies if the link is to be presented as text or as a button. See “Working with hyperlink buttons” for more information.
Text specifies the text that will be visible to the user.
Name is applicable to HTML documents. It specifies text that will be added as a NAME attribute in the HTML code behind the hyperlink.
Event button: this button will be activated to allow LibreOffice to react to events for which the user has written some code (macro). This function is not normally needed in Impress.
To edit a text hyperlink, select it (by dragging across the text, not clicking on it), then choose Edit > Hyperlink from the main menu bar. Make changes as needed and click Apply when done. If you need to edit several hyperlinks, you can leave the Hyperlink dialog box open until you have edited all of them. Be sure to click Apply after each one. When you are finished, click Close.
Working with hyperlink buttons
 A
hyperlink button is inserted in the center of the current slide. In
most cases, that is not where you want it to appear. To edit the text
or size of a hyperlink button, or to move it to another place on the
slide, first display the Form Controls toolbar (View
> Toolbars > Form Controls). Select the
Design
Mode On/Off icon (upper right corner of the
toolbar).
Now you can click on the button and drag it to another position, or right-click to open a dialog box where you can change the text on the button, the size of the button, and other properties.
When you have finished editing the button, click the Design Mode On/Off icon again to make the button active again. For a detailed description of the button properties and on how to work with Form Controls refer to the Writer Guide.