
Impress Guide
Chapter
9
Slide Shows
Transitions, animations, and more
This document is Copyright © 2007–2011 by its contributors as listed below. You may distribute it and/or modify it under the terms of either the GNU General Public License (http://www.gnu.org/licenses/gpl.html), version 3 or later, or the Creative Commons Attribution License (http://creativecommons.org/licenses/by/3.0/), version 3.0 or later.
All trademarks within this guide belong to their legitimate owners.
Contributors
Michele
Zarri
T. Elliot Turner
Jean Hollis Weber
Feedback
Please direct any comments or suggestions about this document to: documentation@global.libreoffice.org
Acknowledgments
This chapter is based on Chapter 9 of the OpenOffice.org 3.3 Impress Guide. The contributors to that chapter are:
Michele
Zarri Peter Hillier-Brook Rachel Kartch
Jean Hollis Weber Claire
Wood
Publication date and software version
Published 31 July 2011. Based on LibreOffice 3.3.3.
Some keystrokes and menu items are different on a Mac from those used in Windows and Linux. The table below gives some common substitutions for the instructions in this chapter. For a more detailed list, see the application Help.
|
Windows/Linux |
Mac equivalent |
Effect |
|
Tools > Options menu selection |
LibreOffice > Preferences |
Access setup options |
|
Right-click |
Control+click |
Open context menu |
|
Ctrl (Control) |
z (Command) |
Used with other keys |
|
F5 |
Shift+z+F5 |
Open the Navigator |
|
F11 |
z+T |
Open Styles and Formatting window |
Contents
Putting together a slide show 4
Choosing basic settings for a slide show 4
Showing slides in a different order 6
Setting up a custom slide show 6
Editing, deleting, or copying a custom slide show 7
Setting the timing of automatic slide changes 9
Playing a sound throughout the presentation 9
Removing a transition effect 9
Using slide animation effects 10
Applying an animation effect 10
Starting an animation effect 11
Choosing additional properties of an animation effect 12
Example: Using multiple animation effects 12
Example: Setting up a motion path 15
LibreOffice Impress gives you the tools to organize and display a slide show, including:
Which slides to show and in what sequence
Whether to run the show automatically or manually
Transitions between slides
Animations on individual slides
Interactions: what happens when you click a button or link
Most tasks associated with putting together a slide show are best done in Slide Sorter view. Choose View > Slide Sorter from the menu bar or click the Slide Sorter tab at the top of the workspace. All of your slides appear in the workspace; you may need to scroll to see them all.
Choosing basic settings for a slide show
Basic settings for a slide show include which slide to start from, the way you advance the slides, the type of presentation, and pointer options.
Choose Slide Show > Slide Show Settings. The Slide Show dialog box appears.
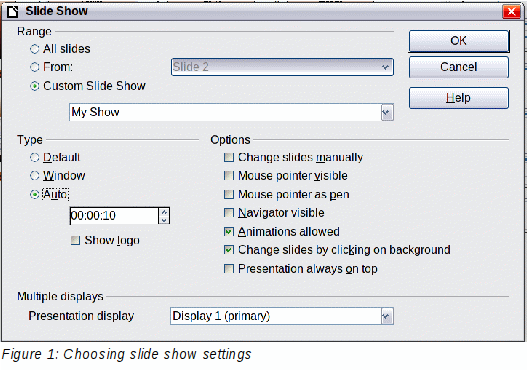
In the Range section, choose which slides to include in the slide show:
All slides includes all of the slides except for those marked Hidden (see “Hiding slides” on page 5). Slides are shown in the sequence they occur in the file. To change the sequence, either rearrange the slides in the slide sorter or choose a custom slide show (see below).
From: starts the show at a slide other than the first. For example, you might have several slides at the beginning that describe you and your company, but when you present this show to your work colleagues, you want to skip that introduction.
Custom Slide Show shows the slides in a different sequence that you have previously set up. This choice is not available until after you set up a custom slide show (see “Showing slides in a different order” on page 6). You can set up as many different custom shows as you wish from one set of slides; they will appear in the drop-down list under this choice.
In the Type section, choose how the slides will be displayed:
Default shows the slides full screen, without the LibreOffice program controls visible, and exits the show after the last slide.
Window runs the slide show in the LibreOffice program window and exits the show after the last slide.
Auto restarts the slide show after the last slide. A pause slide is displayed between the last slide and the start slide. Press the Esc key to stop the show.
In the box under this choice, specify the length of time before the show restarts. If you enter zero, the show restarts immediately without showing a pause slide.
The Show Logo option shows the LibreOffice logo on the pause slide.
In the Options section:
Change slides manually prevents slides from changing automatically even if an automatic transition has been set up.
Mouse pointer visible shows the mouse pointer during a slide show. If you do not have a laser pointer or other device to highlight items of interest during the show, this can be quite useful.
Mouse pointer as pen enables you to write or draw on slides during the presentation. Anything you write with the pen is not saved when you exit the slide show. The color of the pen cannot be changed.
Navigator visible displays the Navigator during the slide show. For more about the Navigator, see Chapter 1 (Introducing Impress).
Animations allowed displays all frames of animated GIF files during the slide show. If this option is not selected, only the first frame of an animated GIF file is displayed. (This has nothing to do with the slide animations described in “Using slide animation effects” on page 10.)
Change slides by clicking on background advances to the next slide when you click on the background of a slide. (Other ways of advancing to the next slide include pressing the spacebar on the keyboard.)
Presentation always on top prevents any other program window from appearing on top of the presentation.
In the Multiple displays section:
You can choose which display to use for full screen slide show mode, if the current desktop is displayed on more than one monitor.
If the current desktop spans only one monitor, or if the multiple-display feature is not supported on the current system, you cannot select another display.
By default the primary display is used for slide show mode.
|
Note |
This multiple displays setting is not a property saved in the document, but is instead saved as a local setting in the user configuration. This means that if you open the presentation on a different computer the local settings are applied. |
You may not want to show all of the slides in a particular show. You can either hide some of the slides or set up a custom slide show; which method is best depends on your needs. For example, you may have draft slides that you do not want to show until they are finished, or you may have some slides that contain information for yourself, but not your audience.
To hide a slide:
In the Slides pane, or in Slide Sorter view, select the slides that you want to hide.
Click the Show/Hide Slide icon on the Slide View toolbar, right-click and select Hide Slide from the context menu, or choose Slide Show > Show/Hide Slide. The slide number is now in a box with a diagonal line through it, to indicate that it is hidden. The slide remains in the file.
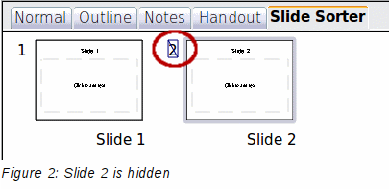
To show a hidden slide:
In the Slides pane, or in Slide Sorter view, select the hidden slides that you want to show.
Click the Show/Hide Slide icon on the Slide View toolbar, right-click and select Show Slide from the context menu, or choose Slide Show > Show/Hide Slide.
Showing slides in a different order
To show the slides in a different order, you can either rearrange them in the slide sorter, or set up a custom slide show. You can define as many custom slide shows as you need from one set of slides.
In a custom slide show, you can choose which slides to include as well as the order in which they are shown. Any slides marked Hidden will not appear in a custom show.
Setting up a custom slide show
To set up a new custom slide show:
Choose Slide Show > Custom Slide Show from the menu bar.
On the Custom Slide Shows dialog box, click New.
On the Define Custom Slide Show dialog box, type a name for the new custom show. Then, in the Existing slides list, select the slides to include in the show. Click the >> button to include the slides in the Selected slides list. In Figure 4, Title Slide and Slide 4 have been included; Slide 2 has been selected but not yet included.
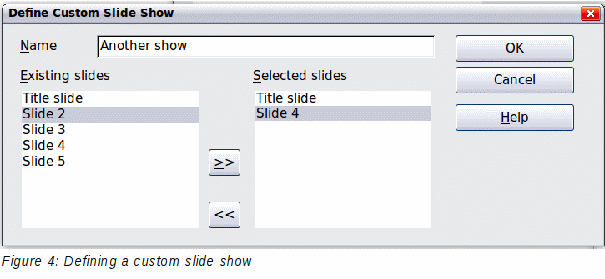
You can select and include several slides at the same time. Hold down the Shift key and click the first and last slide in a group to select that group (for example, slides 3 through 7), or hold down the Control key and click on individual slides to select them (for example, slides 3, 5, and 9).
|
Note |
If you include several slides at the same time, they are added to the Selected slides list in numerical order regardless of the order in which you selected them. In other words, if you click on slides 3, 9, and 5 in that order and add them all at the same time, they will be included in the Selected slides list in this order: 3, 5, 9. To put them in a different order, either select and include them one at a time or select and drag them up or down the list. You can also use the Slide Sorter view to rearrange the order of slides. |
|
Tip |
Slides are added to the Selected slides list after whichever slide is currently highlighted in that list. The last slide added is highlighted unless you select a different one. For example, you may have added slides 1, 2, 3 and 9, in that order. Slide 9 will be highlighted. If you now want to add slide 15 between slides 2 and 3, select slide 2 in the Selected slides list, then select slide 15 in the Existing slides list and click >>. You can also add slide 15 at the end of the Selected slides list and then drag it up to where you want it in the sequence. |
When you have finished arranging the order of the slides, click OK to save this custom show and return to the Custom Slide Shows dialog box.
To activate a custom show, select it in the list in the Custom Slide Shows dialog box and then select the Use Custom Slide Show option at the bottom.
Editing, deleting, or copying a custom slide show
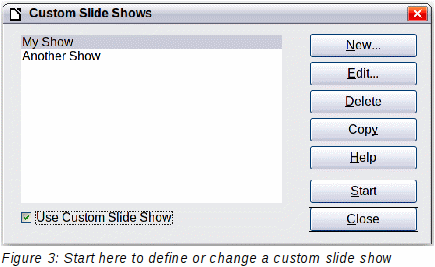
To edit a custom slide show (add, remove, or change the order of slides, or change the name of the show), select it in the Custom Slide Shows dialog box (Figure 3) and click Edit.
To delete a custom slide show, select it in the Custom Slide Shows dialog box and click Delete. Deletion is immediate; no confirmation message appears.
To create a copy of a slide show, select it in the Custom Slide Shows dialog box and click Copy. You can now edit the copy to rename it and add, remove, or change the order of slides in it.
You can run a custom slide show (for example, to test it) from the Custom Slide Shows dialog box, if the Use Custom Slide Show checkbox is selected. Select the slide show from the list and click Start.
When you have finished working with custom slide shows, click Close to save all changes and close the Custom Slide Shows dialog box.
Slide transitions are the effects that take place when one slide gives way to the next one in the presentation, like Roll down from top or Fly in from left. They add dynamic flair to a slideshow, smoothing the transition between slides.
Figure 5: Slide Transition
drawer of Tasks pane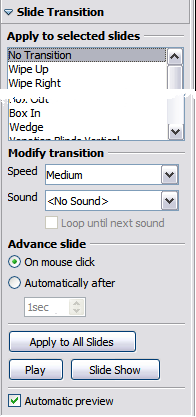
In the Tasks pane, choose Slide
Transition.
In the Slides pane or Slide Sorter view, select the slides to which you want to apply the transition. If you want the transition to apply to all slides, you do not need to select them first.
In the Apply to selected slides list, select a transition.
Modify the selected transition by changing the speed or adding a sound, in the Modify transition area. If you choose to play a sound, select it in the Sound list. The Loop until next sound option now becomes active. Select this option to play the sound repeatedly until another sound starts. If you select this option and there are no subsequent sounds in your slide show, the sound will play continuously for the remainder of the show.
Choose next how to advance to the next slide: manually (on mouse click) or automatically. If you choose automatically, you can specify how long the slide remains visible before it automatically advances to the next slide.
If you want the transition to apply to all slides, click the Apply to All Slides button.
To start the slide show from the current slide (so you can see all the transitions), click the Slide Show button.
If the Automatic preview checkbox is marked, the effect of a selected transition is immediately displayed in the work area. You can replay the effect at any time by pressing the Play button.
You can apply a single type of transition to all slides in the presentation or apply a different transition to any single slide, even having a different transition for every slide in the show. While using many different transitions may be fun to do, it may not give your show a professional appearance.
|
Tip |
If you want most of the slides to have the same transition, but a few to be different, you may find it easier to apply one transition to all slides and then change only the ones you want to be different. |
Setting the timing of automatic slide changes
You can set up a slide show to run automatically, either unattended or while you speak. To set the default time for slides to be displayed before changing to the next slide, go to the Slide Transition drawer of the Tasks pane (Figure 5), leave the transition effect set to No Transition, choose Automatically after in the Advance slide section, set a time, and click the Apply to All Slides button.
To vary the timing for some slides, choose Slide Show > Rehearse Timings from the menu bar, or click the Rehearse Timings icon on the Slide Show toolbar. The slide show begins in full-screen mode, and a timer appears in the lower left-hand corner of the screen.
When you want to advance to the next slide, click the timer. To keep the default setting for this slide, click the slide, not the timer. Continue for all slides in your presentation. Impress records the display time for each slide. When you next look at the time set under Automatically after, you will see that the times have changed to match what you set when rehearsing.
If you want the whole presentation to auto-repeat, open the menu Slide Show > Slide Show Settings. Click Auto and OK.
Playing a sound throughout the presentation
You can use the Slide Transition pane to set up Impress so that a sound or a song is played throughout the presentation. To do that:
Select the slide where you want the sound to start and go to the Slide Transition pane.
In the Modify transition section, select the entry Other sound from the Sound drop-down menu.
Select the Loop until next sound checkbox if you want the sound to restart once it is finished.
|
Caution
|
Do not click the Apply to all button; otherwise your selected sound will restart at every slide. |
|
Note |
The sound file is linked to the presentation rather than embedded; therefore if you plan to display the presentation on a different machine, remember that you also have to make the sound file available on the machine where the presentation will be played, and re-establish the link to the local sound file before starting the slideshow. |
Select the desired slides.
Choose No Transition in the list on the Slide Transition page of the Tasks pane.
Slide animations are similar to transitions, but they are applied to individual elements on a single slide—a title, chart, shape, or individual bullet point. Animations can make a presentation more lively and memorable. Just as with transitions, heavy use of animations can be fun, but distracting and even annoying for an audience expecting a professional presentation.
Animation effects need to be applied from Normal view so that you can select individual objects on a single slide.
|
Note |
At present it is not possible to apply animation effects to the slide master elements. This means that if you want to display the items in a text box one by one, and use the same animation on more than one slide, you need to apply the effects to each slide, or alternatively copy the text box from one slide to another. |
In Normal view, display the desired slide. Select the text or object you want to animate. An object such as a graphic or an entire text box will have green handles around it when selected. If you choose only a portion of the text in a text box, you may not see any green handles.
|
|
You have three choices for starting an animation effect:
On click —the animation does not start until you click the mouse.
With previous—the animation runs at the same time as the previous animation.
After previous—the animation runs as soon as the previous animation ends.
Choosing additional properties of an animation effect
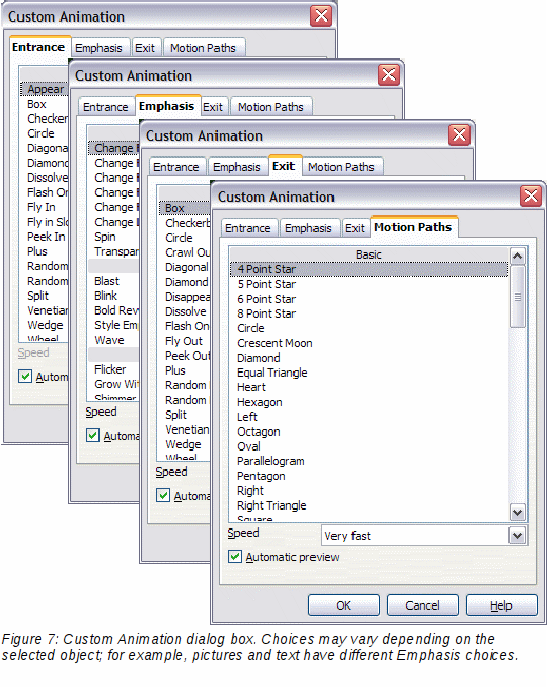
Many animations have a set of properties that you can set or change. For example, if you choose the Change Font Color effect on the Emphasis page, you can specify the font color. If you choose Fly In on the Entrance page, you can specify the direction from which the object flies in.
The label on the properties box changes depending on the choices available for each effect. For example, a Fly In effect has a box labelled Direction and a Change Font Color effect has a box labelled Font color.
Example: Using multiple animation effects
To illustrate how you can set up multiple effects, let’s look at a common animation: list items fly in one at a time from the bottom of the slide, and as each new item appears, the previous items change to a different color. Here is how to create these effects:
Step 1. Apply the “fly in” effect to individual list items.
Display the Custom Animation page of the Task pane.
Create a slide with several items in a bullet list. Our example slide (Figure 8) has four.
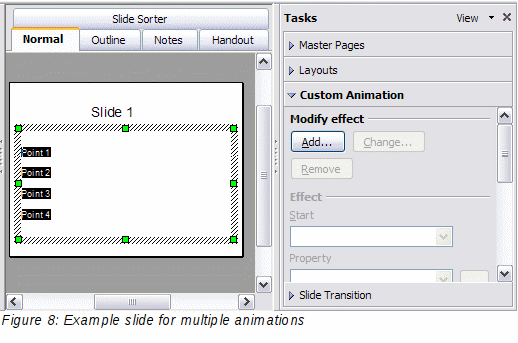
Select all four items. Click Add on the Custom Animation pane.
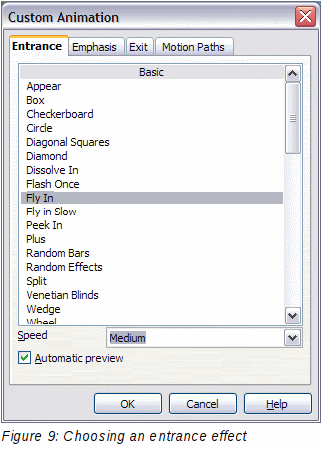
On the Entrance page of the Custom Animation dialog box (Figure 9), select Fly In, optionally change the Speed to Medium, and click OK.
The four effects you have just set up are listed in the animations list on the Custom Animation page, as shown in Figure 10.
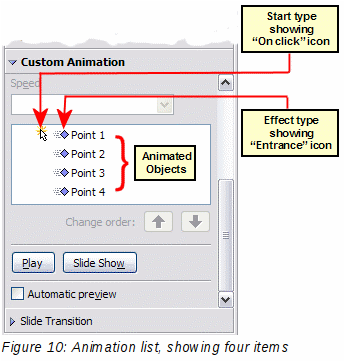
Step 2. Apply the “change font color” effect to some list items.
Now we want to set each of the first three list items to change color when the following item appears on the slide. To do this:
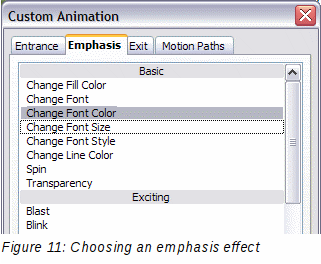
Select the first three items on the slide (not the animations list) and click Add in the Custom Animation pane. This time we go to the Emphasis page of the Custom Animation dialog box and choose Change Font Color, as shown in Figure 11. Click OK to save this effect.
Notice that the three new animations are listed at the bottom of the animations list, and the “type of effect” icon for these three effects (in the second column) is different from the icon for the first four effects (see Figure 12).
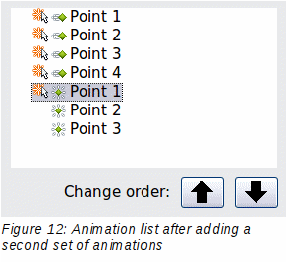
You could, if you wish, select any of the last three items and choose a different color from the Font color list on the Custom Animation pane.
Use the Change order: up-arrow button to move each of the last three items up the list to just under the other item with the same name. The animation list will now look like Figure 13.
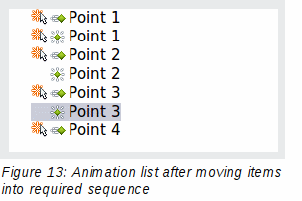
Step 3. Change the timing for some list items from With previous to On click
Notice that all of the items on the animations list (except for the two “Point one” items) are set to start at the same time as the previous item. However, it is best if when you click to make the next point appear the previous point is dimmed. We will therefore set the color change of the previous point and the entrance of the new point to run on mouse click simultaneously.
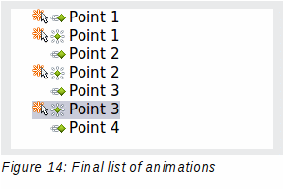
Select the color change animations and choose On click from the Start list, then select the entrance animations (except the first) and choose With Previous from the Start list. The animation list now looks like Figure 14.
Test this set of animations by clicking the Slide Show button.
Example: Setting up a motion path
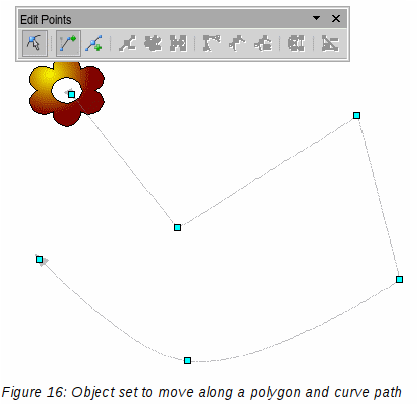
The Motion path effect moves an object along a path consisting of a combination of straight and curved lines. Several pre-packaged paths are provided in LibreOffice, but it is not difficult to create your own custom path. Start by selecting the object you want to animate and selecting a pre-packaged motion path animation that is similar to the effect you want to obtain. Alternatively use the Polygon or Curve animation to create a new path.
Select the object to show the animation path, which will be displayed as a thin gray line with a triangle showing the starting point and another indicating the end point. Click on any point on the line so that blue handles are displayed around it. When the blue handles around the path are shown, you can move or resize the path the same way you would perform these operations on a graphic object.
|
Note |
When moving a path, remember to also move the object on that path; otherwise the animation will start with a jump. Currently it is not possible to rotate a path. |
If
instead you want to modify the individual points on the line, select
the Points
tool
![]() from the Drawing toolbar while the path is selected. The Edit Points
toolbar of Error: Reference source not found should be displayed; if
not, select it from View
> Toolbars > Edit Points.
from the Drawing toolbar while the path is selected. The Edit Points
toolbar of Error: Reference source not found should be displayed; if
not, select it from View
> Toolbars > Edit Points.
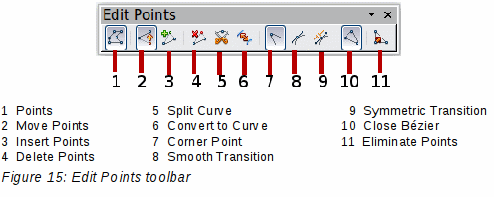
Once a point is selected, you can add an additional point, delete it, move it and so on. For a detailed explanation on how to manipulate the points on a curve, see the Draw Guide. Once you are satisfied with the shape of the curve and its speed, click anywhere on the screen to deselect the object and continue normal editing.
Figure 16 shows a polygon motion path with a curved section.
You can combine a motion with other effects such as spinning or changing of size or colors to create dramatic effects.
Click the Effect Options button [...] next to the Properties drop-down list to display the Effect Options dialog box.
|
Note |
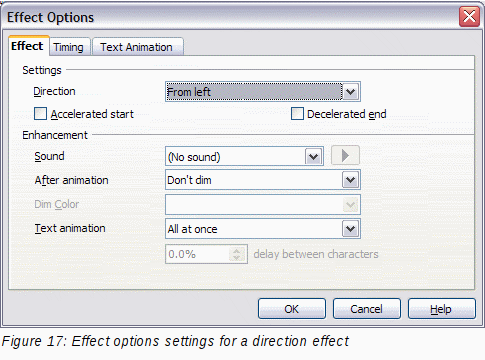
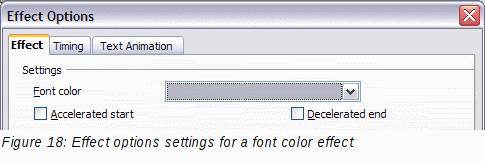
What you see in the Effect Options dialog box depends on the selected animation object. For example, the dialog box has three pages for text objects but only two pages for picture objects (the Text Animation page does not appear). The Settings section on the Effect page also varies. Figure 17 shows the Effect page for a Direction effect, and Figure 18 shows the Settings section for a Font Color effect. For picture objects, the Text animation box on the Effect page is unavailable. |
On the Effect page of the Effect Options dialog box (Figures 17 and 18), you can choose a sound to play, whether to dim or hide the object after animation, and (in the case of text objects) whether to animate the text all at once or word by word or letter by letter.
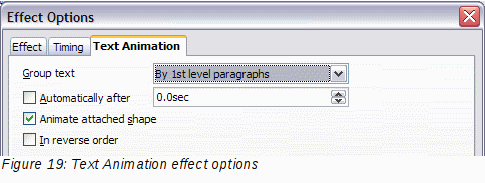
On the Text Animation page of the Effect Options dialog box (Figure 19), you can group text in other ways: as one object, all paragraphs at once, or by first-level paragraphs (that is, one list item together with its sub-items, if any).
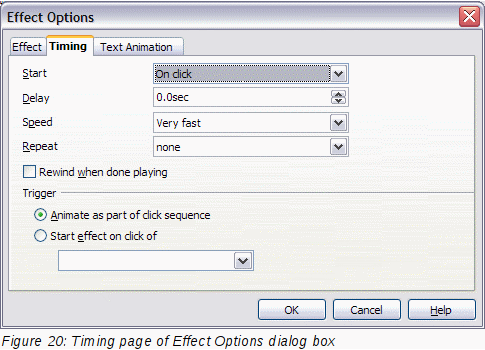
The choices on the Timing page of the Effect Options dialog box, shown in Figure 20, allow you to change the speed, delay, and other aspects of the effect's timing.
On the Custom Animation page of the Task pane, select the desired object.
Click the Remove button.
Interactions are things that happen when you click on an object in a slide. They are typically used with buttons or images, but text objects can also have interactions. Possible interactions include: go to previous slide, go to next slide, go to first slide, go to last slide, go to page or object (that is, a specific slide or named object in a slide), go to document, play sound, or run a macro.
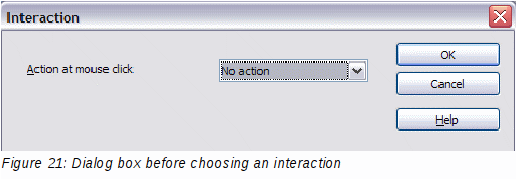
To apply an interaction to an object (or change an interaction applied to an object), right-click on the object and choose Interaction from the pop-up menu. The Interaction dialog box (Figure 21) appears. Select an interaction from the Action at mouse click drop-down list.
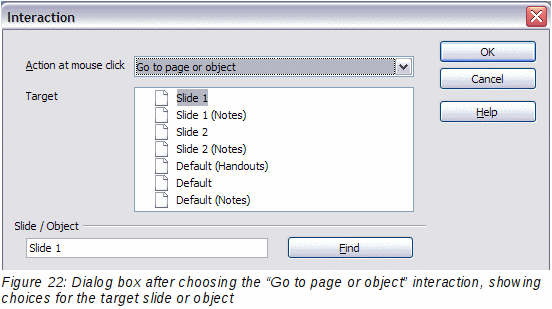
With some interactions, after you select one, the dialog box changes to offer more choices. For example, Figure 22 shows the Interaction dialog box after choosing Go to page or object.
|
Tip |
A sound interaction can be also applied using the Effect Options dialog box (Figure 17). |
To run the slide show, do one of the following:
Press F5 or F9. (F9 does not work on a Mac.)
Click Slide Show > Slide Show on the main menu bar.
Click the Slide Show button on the Presentation toolbar or the Slide Sorter toolbar.
If the slide transition is Automatically after x seconds, let the slide show run by itself.
If the slide transition is On mouse click, do one of the following to advance from one slide to the next.
Press the down arrow key, the right arrow key, or the Page Down key on the keyboard.
Click the left mouse button.
Press the Spacebar.
To go backwards through the show one slide at a time, press the up arrow key, the left arrow key, or the Page Up key. For more complex navigation, use the right-click menu (see below).
Custom animations on a slide are run in the specified order when performing one of the above actions.
When you advance past the last slide, the message Click to exit presentation... appears. Click the left mouse button or press any key to exit the presentation.
To exit the slide show and return to the Impress workspace at any time, including at the end, press the Esc key.
Navigating using the right-click menu
If your presentation consists of more than one slide, right-clicking anywhere on the screen brings up a menu. The choices are:
Next: Moves to the next slide in the defined sequence.
Previous: Move to the previous slide in the defined sequence.
Go to Slide: Displays a submenu allowing to quickly navigate through the presentation. Choices on the submenu include First slide, Last Slide, or any slide in the show. This illustrates why giving the slides meaningful names, rather than leaving them at the default Slide 1, Slide 2, and so on, can be very helpful.
Screen: Displays a submenu with two choices. Each choice blanks the screen, showing it as either all black or all white. This can be useful if you want to pause the show for awhile (perhaps during a break or to demonstrate something on another computer).
End Show: Ends the presentation and returns you to the Impress workspace. This is the same effect as pressing the Esc key.
Controlling a slide show using the Presenter Console
Most installations of LibreOffice Impress come with the Presenter Console extension built in. If it is not included, you can also get the extension and install it as described in Chapter 11, Setting up and Customizing Impress.
The Presenter Console provides extra control over slide shows (presentations) through different views on the presenter’s computer screenand on the projection that the audience sees. The presenter’s view includes the current slide, the upcoming slide, the slide notes, and a presentation timer.
|
Note |
The Presenter Console works only on operating systems that support two displays, and only when two displays are connected (one may be the laptop’s built-in screen). |
The Presenter Console provides three easily changeable views:
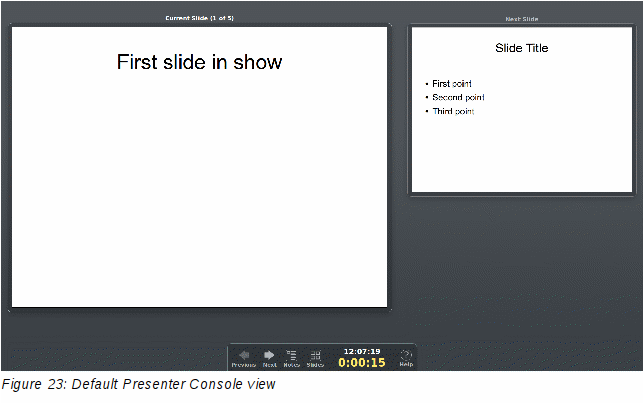
The first view displays the current slide, including the effects, and the upcoming slide (Figure 23).
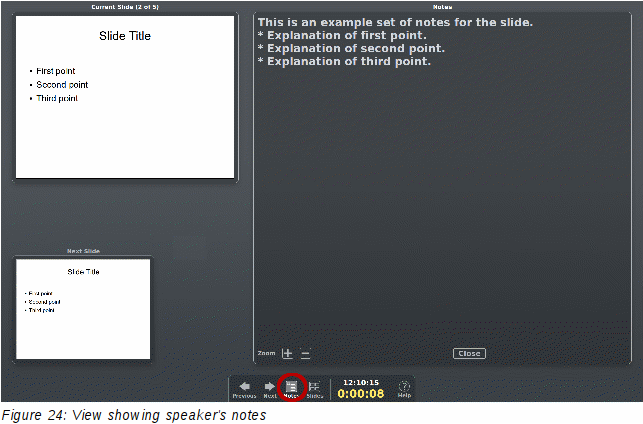
The second view shows the speaker's notes in large, scalable type, plus the current and upcoming slide (Figure 24).
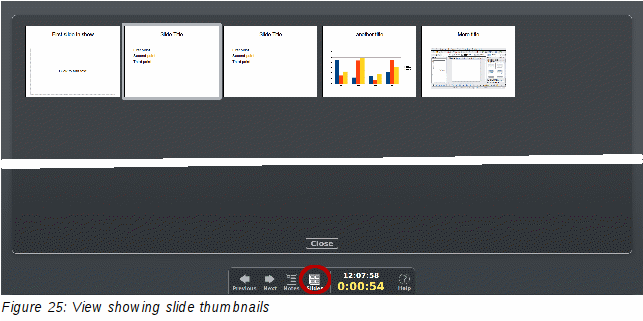
The third view is a slide sorter view with the slide thumbnails. Here you can clear on a thumbnail to jump to a slide out of sequence (Figure 25).
Lastly, the presenter can display a set of help notes with navigational and other information (Figure 26).
