
Writer Guide
Chapter
15
Using Forms in Writer
This document is Copyright © 2011 by its contributors as listed below. You may distribute it and/or modify it under the terms of either the GNU General Public License (http://www.gnu.org/licenses/gpl.html), version 3 or later, or the Creative Commons Attribution License (http://creativecommons.org/licenses/by/3.0/), version 3.0 or later.
All trademarks within this guide belong to their legitimate owners.
Contributors
Ron
Faile Jr.
Barbara Duprey
Hal Parker
Feedback
Please direct any comments or suggestions about this document to: documentation@libreoffice.org
Acknowledgments
This chapter is based on Chapter 15 of the Writer Guide for OpenOffice.org. The contributors to that chapter are:
Iain
Roberts Tara Hess Sigrid Kronenberger
Janet Swisher Jean Hollis
Weber Claire Wood
Michele Zarri
Publication date and software version
Published 22 February 2011. Based on LibreOffice 3.3.
Some keystrokes and menu items are different on a Mac from those used in Windows and Linux. The table below gives some common substitutions for the instructions in this chapter. For a more detailed list, see the application Help.
|
Windows/Linux |
Mac equivalent |
Effect |
|
Tools → Options menu selection |
LibreOffice → Preferences |
Access setup options |
|
Right-click |
Control+click |
Open context menu |
|
Ctrl (Control) |
z (Command) |
Used with other keys |
|
F5 |
Shift+z+F5 |
Open the Navigator |
|
F11 |
z+T |
Open Styles & Formatting window |
Contents
Alternatives to using forms in Writer 4
Accessing an existing data source 18
Creating a form for data entry 19
Advanced form customization 22
Linking a macro to a form control 22
Fine-tuning database access permissions 23
This chapter covers the use of forms within Writer documents. Most of the information here also applies to forms in other LibreOffice components, but there are some differences.
The chapter presents information on using forms in four main sections: setting up a basic form, an example for creating a form, linking a form to a data source, and finally some advanced techniques.
LibreOffice forms cover a lot of ground and not everything is included here. Notable omissions are using forms in HTML documents and writing macros to link to form controls.
A standard text document displays information: a letter, report, or brochure, for example. Typically the reader may edit everything or nothing in the document. A form has sections that are not to be edited, and other sections that are designed for the reader to make changes. For example, a questionnaire has an introduction and questions (which do not change) and spaces for the reader to enter answers.
LibreOffice offers several ways to enter information into a form, including check boxes, option buttons, text boxes, pull-down lists, and other items, collectively known as form controls.
Forms are used in three ways:
To create a simple document for the recipient to complete, such as a questionnaire sent out to a group of people who fill it in and return it.
To link into a database or data source and allow the user to enter information. Someone taking orders might enter the information into a database using a form.
To view information held in a database or data source. A librarian might call up information about books.
Using forms to access a database offers a fast and easy way to build up complex graphical front ends. Your form can include not only the fields that link up to the data source but also text, graphics, tables, drawings and other elements.
A typical way to use a simple form is:
You design the form, then save it when you are happy with it.
You send the form to others (for example, by email).
They fill in the form, save it and send it back to you.
You open the form and see what their answers are.
|
Tip |
By using a data source, or setting a form to update over the web, you can automatically gather data. However, both of those are more complex and you might prefer to keep things simple. |
Alternatives to using forms in Writer
In LibreOffice, the Base component provides an alternative way to access a data source. There are a lot of similarities between forms in Base and Writer, but one may be better for a particular task than the other. Base is appropriate only if the form accesses a data source; you would not use it for simple forms.
Most other LibreOffice components—Calc, Impress, and Draw—also support forms in almost the same way that Writer does.
This section explains how to create a simple form without any links to a data source or database and without advanced customization.
There is nothing special to be done when creating a document to use as a form. Create a new Writer document with File → New → Text document.
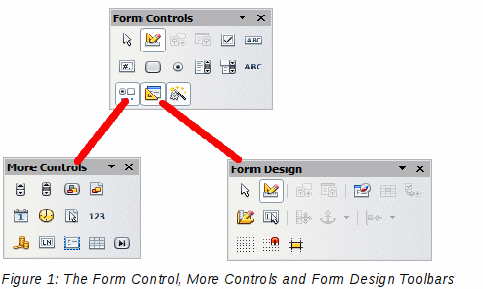
Two toolbars control form creation: Form Controls and Form Design. Select View → Toolbars → Form Controls and View → Toolbars → Form Design to show them both. The Form Controls toolbar has a button for each of the most commonly used types of control.
You can also open the Form Design toolbar from the Form Controls toolbar. Some of the less commonly used controls are on a third toolbar—More Controls—also opened from the Form Controls toolbar.
You can dock these toolbars in different places on the Writer window, or leave them floating. Figure 1 shows the three toolbars floating.
See “Form controls reference” on page 7 for descriptions of the tools on these toolbars.
Click
the Design Mode On/Off button
![]() on
the Form Controls toolbar to turn design mode on. (Click it again
when you want to turn it off.) This activates the buttons for
inserting form controls and selects controls for editing.
on
the Form Controls toolbar to turn design mode on. (Click it again
when you want to turn it off.) This activates the buttons for
inserting form controls and selects controls for editing.
When design mode is off, the form behaves as it would for the end user. Buttons can be pressed, check boxes selected, list items selected, and so on.
To insert a form control into
the document, click the control’s icon to select it. The mouse
pointer changes to look like this:
![]()
Click in the document where you want the control to appear. (You can move it later.)
Holding the left mouse button down, drag the control to size it. Some controls have a fixed size symbol followed by the name of the control (for example, Check Box or Option Button).
The control button remains active, so you can insert several controls of the same type without needing to go back to the toolbar.
To change to another tool, click its icon on the toolbar.
To
stop inserting controls, click on the Select
button
![]() on the Form Controls toolbar, or click on any of the controls you
have just inserted. The mouse pointer changes back to its normal
appearance.
on the Form Controls toolbar, or click on any of the controls you
have just inserted. The mouse pointer changes back to its normal
appearance.
|
Tip |
Holding down Shift when creating a form control makes the control square. If you press Shift when resizing an existing control, its proportions are kept the same. |
|
Note |
When you insert a group box,
list box, or combo box, a wizard is launched to guide you through
the setup. If you prefer not to run the wizard, click the Wizards
On/Off button
|
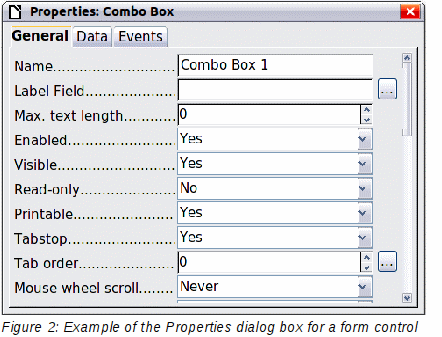
After inserting the controls, you need to configure them to look and behave as you want. Right-click on a form control within your document and select Control from the context menu to open the Properties dialog box for the selected control. Double-clicking on a form control also opens this dialog box.
The Properties dialog box has three pages: General, Data, and Events. For simple forms, only the General page is of any interest. On this page you can set the look and feel of the control. See “Configure form controls” on page 14 and “Form control formatting options” on page 24 for more information, and the descriptions in the Help for details. Configuration for use with a database is discussed in “Creating a form for data entry” on page 19.
The fields on this dialog box vary with the type of control. For example:
Some controls have visible labels, such as Push Button and Option Button. The label text can be set.
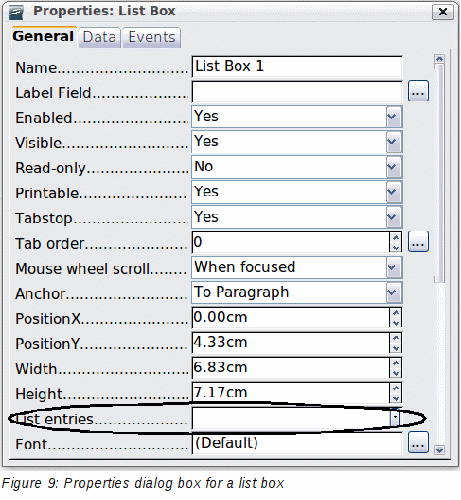
The List Box contains a list of options to choose from. Set these in the List entries box.
Notice the scroll bar in this dialog box. You can use the scroll bar or enlarge the dialog box to see additional fields.
To
use the form, leave design mode by clicking the Design
Mode On/Off button
![]() to deactivate it. Save the form document.
to deactivate it. Save the form document.
|
Form Control toolbar |
|
|
|
Selects a form control to perform some other action on it. |
|
|
Toggles between design mode on (to edit forms) and design mode off (to use forms). |
|
|
Launches form control properties dialog box. This dialog box can be kept open as different controls are selected. |
|
|
Launches form properties dialog box, controlling properties for the form as a whole, such as which data source it connects to. |
|
|
A box that can be selected or deselected on the form. You can label the box. |
|
|
A control to create a box into which the form user can type any text. |
|
|
A control allowing numeric formatting options. For example, you can set maximum and minimum values for the number entered, or the number type (decimal places, scientific, currency). |
|
|
Creates a button that can be linked to a macro. The label is the name that appears on the button. |
|
|
Creates an option button (also known as a radio button). When multiple buttons are grouped together, only one can be selected at a time. The easiest way to group multiple buttons is to use the Group Box button on the More Controls toolbar, with wizards enabled. |
|
|
Creates a list of options as a pull-down menu that the user can choose from. If wizards are on, creating a list box launches the List Box Wizard. This wizard is only useful if your form is linked to a data source. If the form is not linked to a data source, turn wizards off and create an empty list box. Then click the control button and, in the List Entries option on the General tab, enter the options you want to appear on the list. |
|
|
As with a List Box, you set up a list of choices. In addition, a panel at the top either displays the choice made or allows the form user to type in something else. This works the same as the List Box. |
|
|
A text label. The difference between this and just typing on the page is that, as a control, you can link a label field to macros so, for example, something happens when the mouse passes over it or clicks on it. |
|
|
Launches the More Controls toolbar. |
|
|
Launches the Form Design toolbar, which can also be opened with View → Toolbars → Form Design. |
|
|
Some form controls (List Box and Combo Box) have optional wizards. If you do not want the wizard to launch when you create one of these controls, use the Wizards On/Off button to switch wizards off. |
|
More Controls toolbar |
|
|
|
Allows form users to choose a number by cycling through the list of numbers. You can specify maximum, minimum, default, and the step between numbers. This control is not commonly used in Writer, as the number is not displayed. In Calc, however, a Data tab appears on the Control Properties dialog box, so you can link the spin button to a cell. |
|
|
Creates a scrollbar, with a number of options to define the exact appearance. This control is not commonly used in Writer. In Calc, a Data tab appears on the Control Properties dialog box, allowing you to link the scroll bar to a cell. |
|
|
Behaves exactly like a push button, but displays as an image. Choose the image in the Graphics option on the General tab in the Control Properties dialog box. |
|
|
Only useful when the form is connected to a data source and a field in the data source exists that can hold images. You can add new images to the database or retrieve and display images from it. |
|
|
Stores a date. You need to configure the earliest and latest dates the field will accept, the default date, and the date format. You can add a spinner. |
|
|
Works like a date field but specifies a time. |
|
|
Allows a user to select a file, either by typing the path and name directly or by clicking on a Browse button and choosing the file from a dialog box. |
|
|
Displays a number. You need to specify formatting, maximum, minimum and default values. You can add a spinner. |
|
|
Works like a numeric field; additionally you can add a currency symbol. |
|
|
Pattern fields are useful when the form links into a data source. Specify an Edit Mask to restrict what a user can enter into the field. Specify a Literal Mask to restrict which data is displayed from the data source. |
|
|
The group box control has two different uses depending on whether wizards are on or off. If wizards are on, creating a group box launches the Group Element wizard. This creates a group of options buttons (in which only one may be selected at a time). In most cases, using a group box is the best way to create a set of option buttons. If wizards are off, a group box is simply a visual box to group together different controls. It has no effect on the way the controls operate. |
|
|
Table Control is only useful with a data source. If no data source is specified, you will be prompted to choose one in the Table Element Wizard. You then pick the fields to display and, when design mode is off, the data appears in the table. The table also includes controls to step through the records. Records can be added, deleted, and modified in the table. |
|
|
A navigation bar is the same as the Form Navigation toolbar (View → Toolbars → Form Navigation), but can be placed anywhere in the document and be resized. |
|
Form Design toolbar |
|
|
|
Selects a form control to perform an action on it. |
|
|
Toggles between design mode on (to edit forms) and design mode off (to use forms). |
|
|
Launches form control properties dialog box. This dialog box can be kept open as different controls are selected. |
|
|
Launches form properties dialog box, controlling properties for the form as a whole, such as which data source it connects to. |
|
|
The Form Navigator is a utility displaying all the forms and controls in the current document. It allows you to edit and delete them easily. If you use the Form Navigator, it's recommended that you give your controls names (in the properties dialog box). The name appears in the navigator so, for example, if you have ten text boxes, you can tell which is which. |
|
|
Add Field is only useful if you have specified a data source for the form. If no data source is specified, an empty box opens. If you have specified a data source, Add Field opens a list of all the fields in the specified table, which you can then drag and drop onto the page. The fields are placed on the page with the name of the field before them. This is a quick and easy way to create a form from a data source. |
|
|
Allows you to specify the order in which focus shifts between controls. You can test the order by leaving design mode and using Tab to switch between the controls. |
|
|
Opens the current form in design mode (to edit the form rather than entering data into it). |
|
|
If activated, focus is set to the first form control. |
|
|
Launches the Position and Size dialog box, allowing you to specify both by typing in precise values, rather than dragging the control. You can also lock the size or position, so they do not get changed accidentally. For some controls, you can rotate and set the slant and corner radius. |
|
|
Just as with a frame, any form control can be anchored to page, paragraph or character and also anchored as a character (meaning that it behaves like any other character on the page). |
|
|
The Alignment button is disabled unless the control is anchored as a character. You can align a control in different ways, for example so the top of the control lines up with the top of the text or the bottom lines up with the bottom of the text. |
|
|
Displays a grid of dots on the page, to help you line up controls. |
|
|
When a control is brought close to a grid point or line, it will snap to the grid. This makes it is easier to line up controls. |
|
|
When a control is being moved, lines extend from the control horizontally and vertically to help you position it accurately. |
Open a new document (File → New → Text Document). It is a good idea to write down the outline of the document, without form controls, though of course it can easily be changed later.
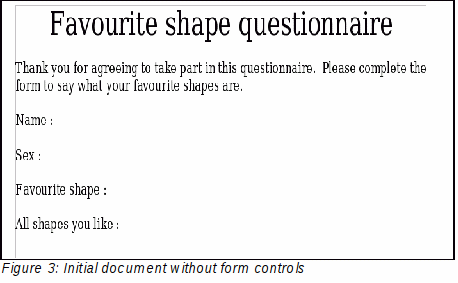
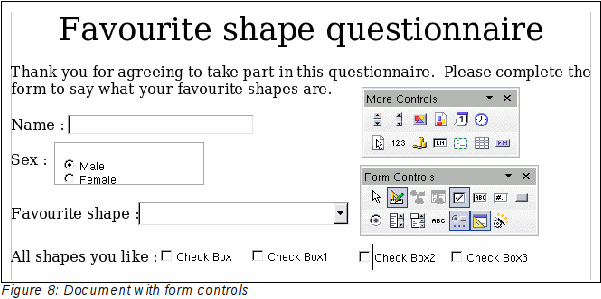
The next step is to add the form controls to the document. We will have four controls:
Name is a text box.
Sex is two option buttons, male or female.
Favourite shape is a list of options.
All shapes you like is a series of check boxes.
To add these controls:
Select View → Toolbars → Form Controls to open the Form Control toolbar.
If
the tools are not active, click the Design
Mode On/Off
![]() button to activate them.
button to activate them.
Click
the Text
Box
button
![]() ,
then click in the document and, with the left mouse button held
down, drag the shape of the Name text box to approximately the size
you want.
,
then click in the document and, with the left mouse button held
down, drag the shape of the Name text box to approximately the size
you want.
Make
sure the Wizards
On/Off
button
![]() is on (shaded with a border). Click the More
Controls
button
is on (shaded with a border). Click the More
Controls
button
![]() to launch the More Controls toolbar.
to launch the More Controls toolbar.
On
the More Controls toolbar, click the Group Box button
![]() .
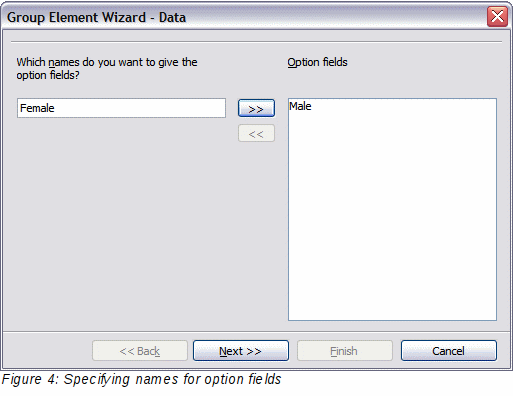
Draw a group box by the Sex: entry. The Group Element Wizard opens.
.
Draw a group box by the Sex: entry. The Group Element Wizard opens.
On the first page of the wizard, enter two names for the options fields: Male and Female. Click the >> button after each entry. Click Next >>.
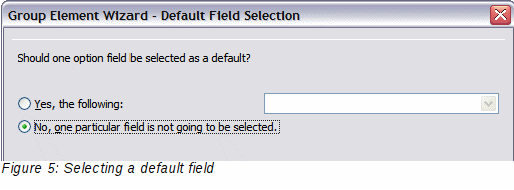
On the next page, select the option No, one particular field is not going to be selected. Click Next>>.
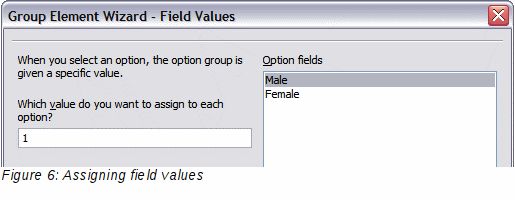
Give a value to your fields. Typically, you would give one field the value 1 and the other field the value 2. If there are more than 2 option fields, you would give them values of 3, 4, and so on. Click Next >>.
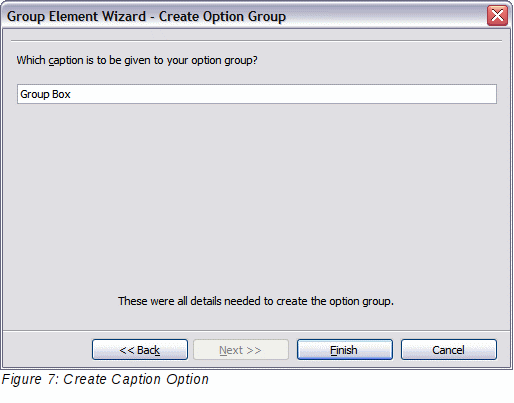
You can either delete the caption or give a caption to your Group Box. In this example, delete the caption. Then click Finish.
Now
create the list box. On the Form Controls toolbar, click the Wizards
On/Off
button
![]() to turn wizards off. Click the List
Box
button
to turn wizards off. Click the List
Box
button
![]() and draw a list box by Favourite
Shape
in the document. This will just be an empty pane for now.
and draw a list box by Favourite
Shape
in the document. This will just be an empty pane for now.
Finally
create four check boxes by All
shapes you like.
Click on the Check
Box
button
![]() and then draw out four check boxes, side by side across the page.
and then draw out four check boxes, side by side across the page.
You should now have a document looking something like Figure 8.
No further configuration is required to the Name and Sex fields, but you could, if you wish, give a name to each control and change the appearance of the controls.
The list box must be configured to add the list of options. The check boxes must be configured to add in the names (instead of Check Box, Check Box 2, and so forth). Following are instructions to configure these controls:
Be sure design mode is on. Double-click on the List Box control within the document to open the control’s Properties dialog box. Select the General tab.
In the List Entries box (scroll down if it is not visible), type the names of the shapes (Circle, Triangle, Square, Pentagon) one at a time. After each, press Shift+Enter. You should end up with a line saying "Circle";"Triangle";"Square";"Pentagon".
Click on the first Check Box. The Properties dialog box stays open but changes to show the properties for the check box.
Change the Label from Check Box to Circle and press Enter. The cursor moves to Label Field and the label on the check box in the document changes immediately.

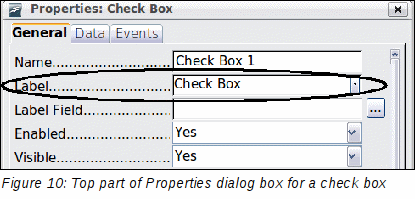
Click on each of the other three check boxes in turn. Change the Label in the Properties dialog box to Triangle, Square, and Pentagon in turn.
Close the Properties dialog box.
Turn
design mode off
![]() and close the two Controls toolbars.
and close the two Controls toolbars.
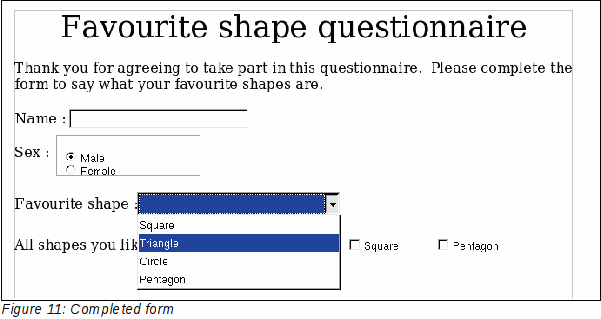
You have now completed the form, which should look something like Figure 11.
The form is complete, but you are free to make further changes to the document. If you were sending this out to other people to complete, you would probably want to make the document read-only. The effect would be that users would be able to fill in the form but not to make any other changes to the document.
To make the document read-only, select Tools → Options → LibreOffice → Security → Open this document in read-only mode.
|
Note |
If the document is read-only, anyone filling in the form will need to use File → Save as to save the document. |
The most common use for a form is as the front end of a database. You can provide a form that allows users to enter information into a contacts database and, because it is part of a Writer document, the form can contain graphics, formatting, tables, and other elements to make it look just the way you want. Modifying the form is as simple as editing a document.
LibreOffice can access numerous data sources. These include ODBC, MySQL, Oracle JDBC, spreadsheets and text files. As a general rule, databases can be accessed for read and write; other data sources (such as spreadsheets) are read-only.
|
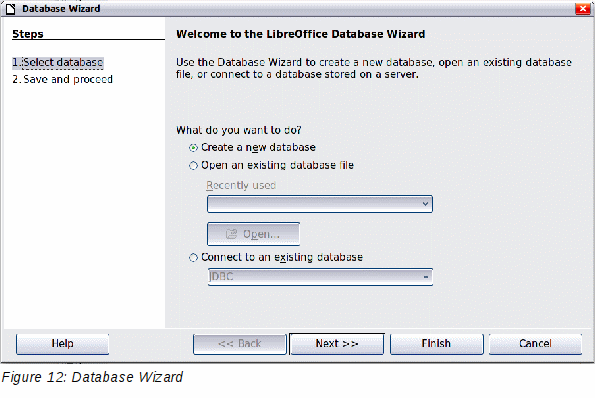
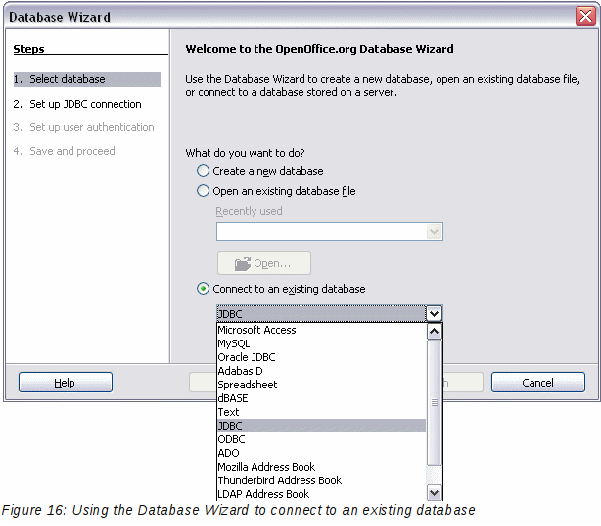
Tip |
To see the list of supported data source types for your operating system, choose File → New → Database. On the first page of the Database Wizard (Figure 15), select Connect to an existing database and then open the drop-down list. An example is shown in Figure 16. |
Chapter 8, Getting Started with Base, in the Getting Started guide covers in more detail how to create a database. Here we give a short guide to creating a very simple database with LibreOffice Base.
Select File → New → Database to start the Database Wizard.
Select Create a new database and click Next >>.
On the next page, select Yes, register the database for me and Open the database for editing. Registering the database means that it can be accessed from other LibreOffice components such as Writer and Calc. You need to do this if you want to link forms into it.
Click Finish and save your new database, giving it a name. Unlike creating other documents in LibreOffice, databases must be saved when you first create them.
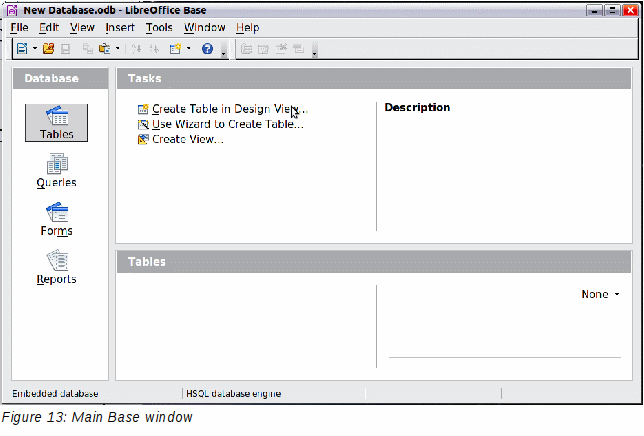
After saving the database, you should see the main Base window (Figure 13), which contains three panels. The left-hand panel is Database, with icons for Tables, Queries, Forms and Reports.
The next step is to create a table. Again, this is covered in more detail in Chapter 8, Getting Started with Base, in the Getting Started guide. Here we are going to create a small table as an example.
Choose Tables in the left-hand column, then choose Create Table in Design View under Tasks.
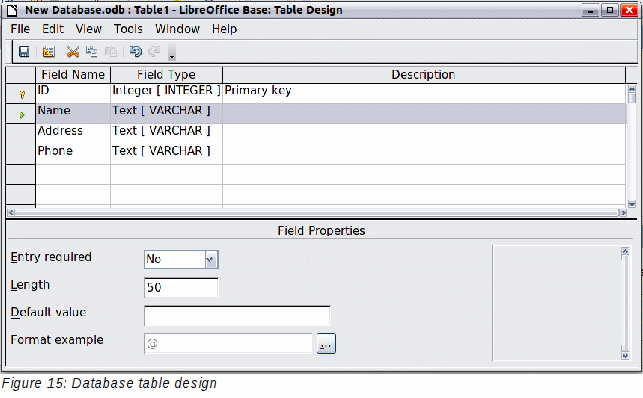
Use the Table Design window to tell Base which fields to create. We will have three input data fields: Name, Address, and Telephone.
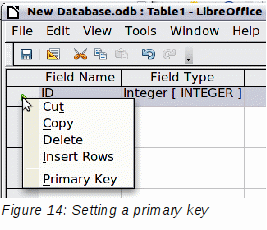
On the first line, enter under Field Name ID and set the Field Type to Integer [INTEGER]. In the gray box at the left of the line, right-click and select Primary Key, bringing up a key icon in the box. In the Field Properties at the bottom of the window is an Auto Value option; change this to Yes. Optionally, type Primary key in the Description column. See Figure 14.
|
Tip |
Setting up the Primary Key field with Auto Value set to Yes is an important step. If this is not done, the form you create later will be much trickier to use and may generate errors for the user. Make sure you get this step right! |
On the next three lines, enter under Field Name Name, Address and Telephone. Accept the default Field Type of Text [VARCHAR] and leave Description blank.
Save the table (File → Save). You will be prompted to name it. The name can be anything you like.
Finally, close the table design window to return to the main Base window. If File → Save is available, select it to save the whole database.
Accessing an existing data source
If you have an existing data source, such as a spreadsheet or database, you simply need to tell LibreOffice about it. This is called registering a data source.
To register an existing data source:
Select File → New → Database to launch the Database Wizard.
Select Connect to an existing database and choose the type from the drop-down list.
Click Next and follow the instructions to select the database to register (the exact process varies between different types of data source).
In Step 3: Save and proceed, check that Yes, register the database for me is selected. Deselect Open the database for editing – you just need to register it, not edit it through Base.
Creating a form for data entry
Whether you created a new database, or already had a data source, it must be registered with LibreOffice (see above). Once it is registered, linking your form to the data source is simple. Follow these steps to create a new form and link it to a registered data source.
Create a new document in Writer (File → New → Text Document).
Design your form, without putting in the actual fields (you can always change it later).
Show the Form Controls toolbar (View → Toolbars → Form Controls).
Click
the Design
Mode On/Off button
![]() to put the document into design mode, if necessary. With design mode
off, most of the toolbar buttons are grayed out. If the Design Mode
button is also grayed out, click on the Select
button to activate it.
to put the document into design mode, if necessary. With design mode
off, most of the toolbar buttons are grayed out. If the Design Mode
button is also grayed out, click on the Select
button to activate it.
Click
the Text
Box button
![]() .
Click in the document and, holding down the left mouse button, drag
the mouse to create a text box for the first form field (for
example, Name, if you are linking to the database created above).
.
Click in the document and, holding down the left mouse button, drag
the mouse to create a text box for the first form field (for
example, Name, if you are linking to the database created above).
Click
the Text
Box button
![]() again
and drag the mouse to draw another field. Additional fields, of any
type, can be added in the same way (click and drag).
again
and drag the mouse to draw another field. Additional fields, of any
type, can be added in the same way (click and drag).
So far you have followed the same steps used before when creating your first form. Now you will link the form with the data source you registered.
Click the Form
button
![]() in the Form
Controls toolbar, or right-click on any of the
fields you inserted and select Form,
to open the Form Properties dialog box.
in the Form
Controls toolbar, or right-click on any of the
fields you inserted and select Form,
to open the Form Properties dialog box.
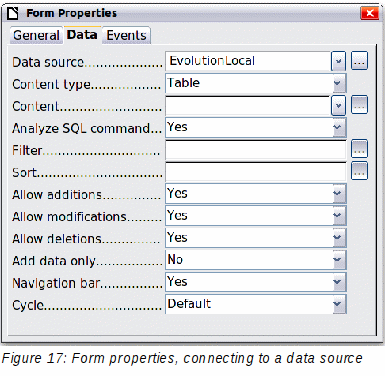
In the Form Properties dialog box, click on the Data tab.
Set Data Source to be the data source you registered.
Set Content Type to be Table.
Set Content to be the name of the table you want to access.
Close the dialog box.
For
each form control in turn, click on the control to select it (so
small green boxes appear around it), then launch the Properties
dialog
box: either right-click and select Control
or
click on the Control
button
![]() on the Form
Controls toolbar.
on the Form
Controls toolbar.
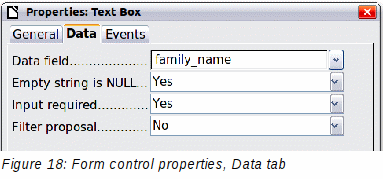
In the Properties dialog box, click on the Data tab (Figure 18). If you set up the form correctly, the Data Field option will contain a list of the different fields in the data source (for example, Name, Address and Telephone). Select the field you want.
Repeat for each control in turn until every control that should be has been assigned to a field.
|
Tip |
If you created a database in LibreOffice Base and your Primary Key field had Auto Value set to Yes, that field does not need to be part of the form. If Auto Value was set to No, you will have to include it and have your users enter a unique value into that field whenever they make a new entry—not something that is recommended. |
Once you have created a form and tied it to a database, you want to use it to enter data into your data source, or modify data already there.
Make sure that the form is not
in design mode. In the Form
Controls toolbar,
click on the Design
Mode On/Off button
![]() .
If design mode is off, most of the buttons on the toolbar will be
grayed out.
.
If design mode is off, most of the buttons on the toolbar will be
grayed out.
Make sure that the Form Navigation toolbar is on (View → Toolbars → Form Navigation). This toolbar normally appears at the bottom of the window.

If there is existing data in the data source, use the control buttons on the Form Navigation toolbar to look at different records. You can amend data in a record by editing the values in the form. To submit the changes, press the Enter key with the cursor in the last field. The record is saved and the next record is displayed.
If there is no data in the form, you can start entering information by typing into the fields of the form. To submit the new record, press the Enter key with the cursor in the last field.
Other functions can be performed from the Form Navigation toolbar, including deleting a record and adding a new record.
Linking a macro to a form control
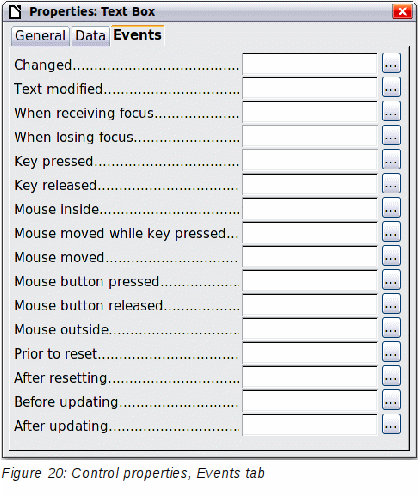
You can set any form control (for example, text box or button) to perform an action when triggered by some event. To see the full list of events, right-click on the form control when the design mode is on, select Control and click on the Events tab.
To assign a macro to an event:
Create the macro. See Chapter 13, Getting Started with Macros, in the Getting Started guide.
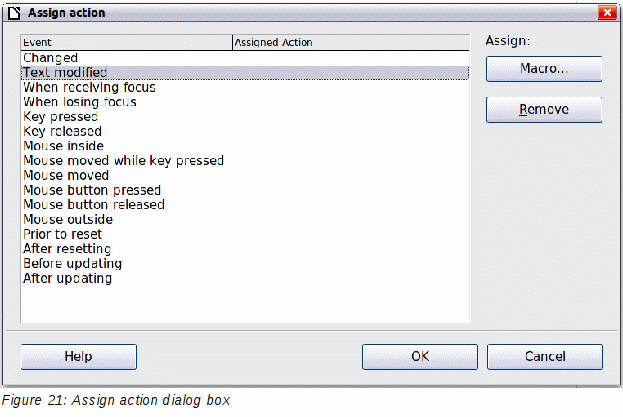
Be sure the form is in design mode. Right-click on the form control, select Control and click on the Events tab.
Click
the browse
![]() button to bring up the Assign
action dialog
box (Figure 21).
button to bring up the Assign
action dialog
box (Figure 21).
Click the Macro button and select the macro from the list in the Macro Selector dialog box. You return to the Assign action dialog box. Repeat as needed, then click OK to close the dialog box.
Macros can also be assigned to events relating to the form as a whole. To assign these, right-click on a form control in the document, select Form and click on the Events tab.
Having created your form, you want whoever is using it to be able to access the information stored in the database, or complete the form, without changing the layout. To do this, make the document read-only by choosing File → Properties → Security and selecting the Open file read-only option.
Fine-tuning database access permissions
By default, when a database is accessed from a form, any changes can be made to it: records can be added, deleted, and amended. You may not want that behavior. For example, you may want users to be able only to add new records or to be prohibited from deleting existing records.
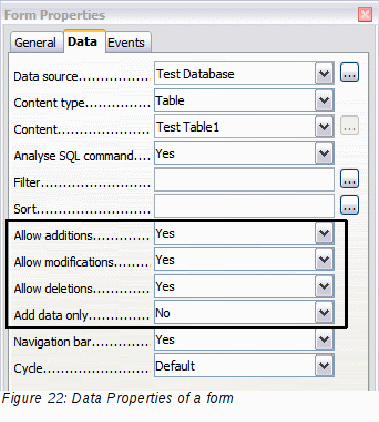
In design mode, right-click on a form control and select Form from the context menu. On the Data tab of the Form Properties dialog box are a number of options: Allow additions, Allow deletions, Allow modifications and Add data only. Set each of these to Yes or No to control the access users have to the data source.
Individual fields can also be protected. This might be useful if you wanted a user to be able to modify some parts of a record but only view others, such as a stock list where item descriptions are fixed and quantities can be modified.
To make an individual field read-only, in design mode, right-click on the form control within the document and select Control from the context menu. Select the General tab and set Read-only to Yes.
Form control formatting options
You can customize the way form controls look and behave in a number of ways. These are all accessed in design mode. Right-click on the form control, select Control from the context menu and select the General tab in the Properties dialog box.
Set a label for the control in the Label box (not to be confused with the box called Label Field). Some form controls, such as push buttons and option buttons, have visible labels that can be set. Others, such as text boxes, do not.
Set whether the form control will print out if the document is printed with the Print option.
Use the Font setting to set the font, typeface, and size for a field’s label or for text typed into a field. This setting does not affect the size of check boxes or option buttons.
For a text box, you can set the maximum text length. This is very useful when adding records into a database. Every database text field has a maximum length and, if the data entered is too long, LibreOffice displays an error message. By setting the maximum text length of the form control to be the same as that of the database field, this error can be avoided.
You can set the default option for a form control. By default, a control is blank, or has every option unselected. You can set the control to start with a particular option or list item selected.
For controls where a password is being entered, setting the Password character (for example to *) displays only that character, but saves what the user really types.
You can add additional information and help text for a form control.
Other formatting controls such as background color, 3-D look, text formatting, scroll bars, and borders allow you to further define how the control appears.
XForms are a new type of web form, developed by the World Wide Web Consortium (W3C). LibreOffice 3 supports the XForms 1.0 open standard for creating web forms with XML.
In LibreOffice, an XForms document is a special type of Writer document. XForms use the same controls as the ordinary forms described in this chapter.
After you create and save an XForms document, you can open the document, fill out the form, and submit the changes to a server.
A
detailed discussion of XForms is beyond the scope of this chapter, as
it is related more to databases than word processing. A good tutorial
introduction is J. David Eisenberg’s XForms
and OpenDocument in OpenOffice.org, available from
http://opendocument.xml.org/files/xforms_ooo_06_10_25.pdf
and from
http://books.evc-cit.info/xforms_ooo_06_08_15.odt.
Another good resource is Valden Longhurst's Using
XForms and the OpenDocument format in OpenOffice.org and StarOffice,
http://wiki.services.openoffice.org/wiki/Documentation/Using_XForms