
Writer Guide
Chapter
2
Setting up Writer
Choosing options to suit the way you work
This document is Copyright © 2011 by its contributors as listed below. You may distribute it and/or modify it under the terms of either the GNU General Public License (http://www.gnu.org/licenses/gpl.html), version 3 or later, or the Creative Commons Attribution License (http://creativecommons.org/licenses/by/3.0/), version 3.0 or later.
All trademarks within this guide belong to their legitimate owners.
Contributors
John
M. Długosz
Ron
Faile Jr.
Hal Parker
Feedback
Please direct any comments or suggestions about this document to: documentation@libreoffice.org
Acknowledgments
This chapter is based on Chapter 2 of the Writer Guide for OpenOffice.org. The contributors to that chapter are:
Jean
Hollis Weber Agnes Belzunce
Daniel Carrera Peter
Hillier-Brook
Stefan A. Keel Gary Schnabl
Janet M.
Swisher Michele Zarri
Jared Kobos
Publication date and software version
Published 16 March 2011. Based on LibreOffice 3.3.
Some keystrokes and menu items are different on a Mac from those used in Windows and Linux. The table below gives some common substitutions for the instructions in this chapter. For a more detailed list, see the application Help.
|
Windows/Linux |
Mac equivalent |
Effect |
|
Tools → Options menu selection |
LibreOffice → Preferences |
Access setup options |
|
Right-click |
Control+click |
Opens context menu |
|
Ctrl (Control) |
z (Command) |
Used with other keys |
|
F5 |
Shift+z+F5 |
Opens the Navigator |
|
F11 |
z+T |
Opens Styles & Formatting window |
Contents
Choosing options that affect all of LibreOffice 4
Security options and warnings 14
Choosing options for loading and saving documents 15
VBA Properties Load/Save options 17
Microsoft Office Load/Save options 18
HTML compatibility Load/Save options 18
Choosing options for Writer 20
Choosing options for HTML documents 29
Install the required dictionaries 30
Choosing options that affect all of LibreOffice
This section covers some of the settings that apply to all the components of LibreOffice and are particularly important when using Writer. Other general options are discussed in Chapter 2, Setting Up LibreOffice, in the Getting Started guide.
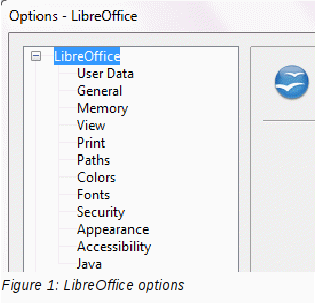
Click Tools → Options. The list on the left-hand side of the Options – LibreOffice dialog box varies depending on which component of LibreOffice is open. The illustrations in this chapter show the list as it appears when a Writer document is open.
Click the expansion symbol (+ sign or triangle) by LibreOffice on the left-hand side. A list of pages drops down. Selecting an item in the list causes the right-hand side of the dialog box to display the relevant page.
|
Note |
The Back button has the same effect on all pages of the Options dialog box. It resets options to the values that were in place when you opened LibreOffice. |
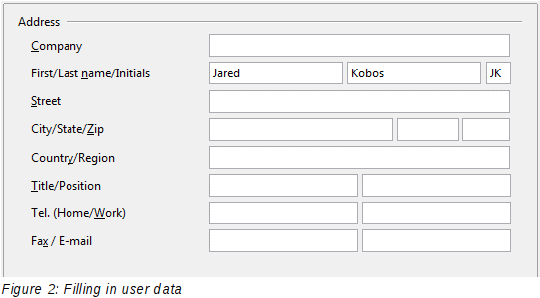
Because Writer uses the name or initials stored in the LibreOffice – User Data page for several things, including document properties (created by and last edited by information) and the name of the author of notes and changes, you will want to ensure that the correct information appears here.
Fill in the form (shown in Figure 2) or amend or delete any existing incorrect information.
The options on the LibreOffice – General page are described below.
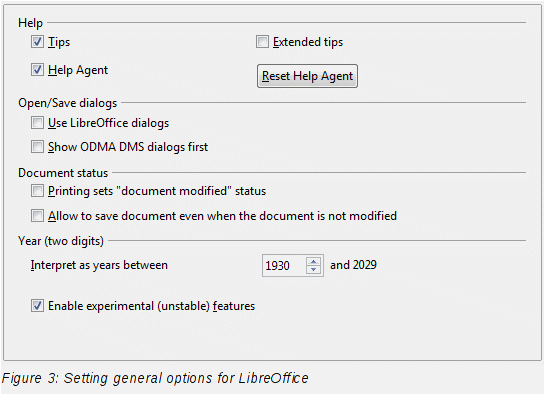
Help – Tips
When Tips is active, one or two words will appear when you hold the mouse pointer over an icon or field, without clicking.
Help – Extended tips
When Extended tips is active, a brief description of the function of a particular icon or menu command or a field on a dialog box appears when you hold the mouse pointer over that item.
Help Agent
To turn off the Help Agent (similar to Microsoft’s Office Assistant), deselect this option. To restore the default behavior, click Reset Help Agent.
Open/Save dialogs – Use LibreOffice dialogs
To use the standard Open and Save dialog boxes for your operating system, deselect the Use LibreOffice dialogs option. When this option is selected, the Open and Save dialog boxes supplied with LibreOffice will be used. See Chapter 1, Introducing Writer, for more about the LibreOffice Open and Save dialog boxes. This book uses the LibreOffice Open and Save dialog boxes in illustrations.
Open/Save dialogs – Show ODMA DMS dialogs first
(Windows only) If you have the GroupWise client installed on the computer, you can select this option to have LibreOffice.org offer to open documents from GroupWise, or save documents in GroupWise. If the GroupWise client is not installed, this option has no effect.
Print dialogs – Use LibreOffice dialogs
(Mac only) To use the standard Print dialog boxes for your operating system, deselect the Use LibreOffice dialogs option. When this option is selected, the Print dialog boxes supplied with LibreOffice will be used. This book uses the LibreOffice Print dialog boxes in illustrations.
Document status – Printing sets “document modified” status
If this option is selected, then the next time you close the document after printing, the print date is recorded in the document properties as a change and you will be prompted to save the document again, even if you did not make any other changes.
Document status – Allow to save document even when the document is not modified
Normally when a document has not been modified, the File → Save menu option and the Save icon on the Standard toolbar are disabled and the keyboard shortcut Ctrl+S has no effect. Select this option to allow documents to be saved even when they have not been modified.
Year (two digits)
Specifies how two-digit years are interpreted. For example, if the two-digit year is set to 1930, and you enter a date of 1/1/30 or later into your document, the date is interpreted as 1/1/1930 or later. An “earlier” date is interpreted as being in the following century; that is, 1/1/20 is interpreted as 1/1/2020.
Enable experimental (unstable) features
To try out two experimental features in LibreOffice, in-line formula editing and macro recording, select this option.
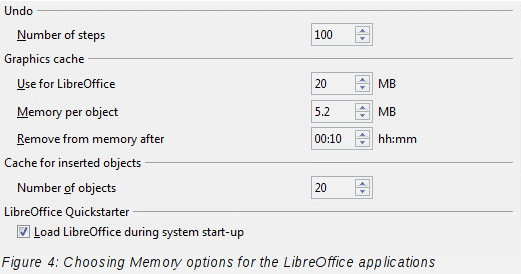
In the Options dialog, click LibreOffice → Memory. These options control how LibreOffice uses your computer’s memory and how much memory it requires. Before changing them, you may wish to consider the following points:
More memory can make LibreOffice faster and more convenient (for example, more undo steps require more memory); but the trade-off is less memory available for other applications and you could run out of memory altogether.
If your documents contain a lot of objects such as images, or the objects are large, LibreOffice’s performance may improve if you increase the memory for LibreOffice or the memory per object. If you find that objects seem to disappear from a document that contains a lot of them, increase the number of objects in the cache. (The objects are still in the file even if you cannot see them on screen.)
To load the Quickstarter (an icon on the desktop or in the system tray) when you start your computer, select the option near the bottom of the dialog. This makes LibreOffice start faster; the trade-off is that LibreOffice uses some memory even when not being used. This option (called Enable systray Quickstarter on Linux) is not available on Mac OS X.
The options on the LibreOffice – View page affect the way the document window looks and behaves. Some of these options are described below. Set them to suit your personal preferences.
User Interface – Scaling
If the text in the help files or on the menus of the LibreOffice user interface is too small or too large, you can change it by specifying a scaling factor. Sometimes a change here can have unexpected results, depending on the screen fonts available on your system. However, it does not affect the font size of the text in your documents.
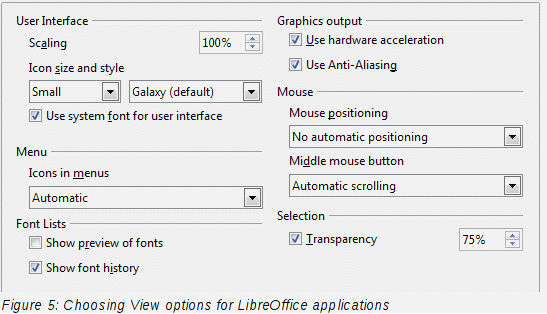
User Interface – Icon size and style
The first box specifies the display size of toolbar icons (Automatic, Small, or Large); the Automatic icon size option uses the setting for your operating system. The second box specifies the icon style (theme); here the Automatic option uses an icon set compatible with your operating system and choice of desktop: for example, KDE or Gnome on Linux.
User Interface – Use system font for user interface
If you prefer to use the system font (the default font for your computer and operating system) instead of the font provided by LibreOffice for the user interface, select this option.
User interface – Screen font Anti-Aliasing
(Not available in Windows; not shown in Figure 5.) Smooths the screen appearance of text. Enter the smallest font size to apply anti-aliasing.
Menu – Show icons in menus
Causes icons as well as words to be visible in menus.
Font Lists – Show preview of fonts
Causes the font list to look like Figure 6, Left, with the font names shown as an example of the font. With the option deselected, the font list shows only the font names, not their formatting (Figure 6, Right). The fonts you will see listed are those that are installed on your system.
|
|
|
|
Figure 6: Font list (Left) showing preview; (Right) without preview |
|
Font Lists – Show font history
Causes the last five fonts you have assigned to the current document are displayed at the top of the font list.
Graphics output – Use hardware acceleration
Directly accesses hardware features of the graphical display adapter to improve the screen display. Not supported on all operating systems and LibreOffice distributions.
Graphics output – Use Anti-Aliasing
Enables and disables anti-aliasing, which makes the display of most graphical objects look smoother and with fewer artifacts. Not supported on all operating systems and LibreOffice distributions.
|
Tip |
Press Shift+Control+R to restore or refresh the view of the current document after changing the anti-aliasing settings, to see the effect. |
Specifies if and how the mouse pointer will be positioned in newly opened dialog boxes.
Defines the function of the middle mouse button.
Automatic scrolling – dragging while pressing the middle mouse button shifts the view.
Paste clipboard – pressing the middle mouse button inserts the contents of the “Selection clipboard” at the cursor position.
The “Selection clipboard” is independent of the normal clipboard that you use by Edit → Copy/Cut/Paste or their respective keyboard shortcuts. Clipboard and “Selection clipboard” can contain different contents at the same time.
|
Function |
Clipboard |
Selection clipboard |
|
Copy content |
Edit → Copy Control+C |
Select text, table, or object. |
|
Paste content |
Edit → Paste Control+V pastes at the cursor position. |
Clicking the middle mouse button pastes at the mouse pointer position. |
|
Pasting into another document |
No effect on the clipboard contents. |
The last marked selection is the content of the selection clipboard. |
Selection – Transparency
Determines the appearance of selected text or graphics, which appear on a shaded background. To make the shaded background more or less dark, increase or decrease the Transparency setting.
If you prefer selected material to appear in reversed color (typically white text on a black background), deselect this option.
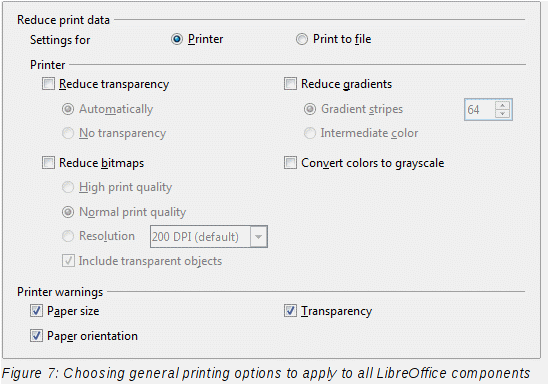
On the LibreOffice – Print page, set the print options to suit your default printer and your most common printing method.
In the Printer warnings section near the bottom of the page, you can choose whether to be warned if the paper size or orientation specified in your document does not match the paper size or orientation available for your printer. Having these warnings turned on can be quite helpful, particularly if you work with documents produced by people in other countries where the standard paper size is different from yours.
|
Tip |
If your printouts are incorrectly placed on the page or chopped off at the top, bottom, or sides or the printer is refusing to print, the most likely cause is page size incompatibility. |
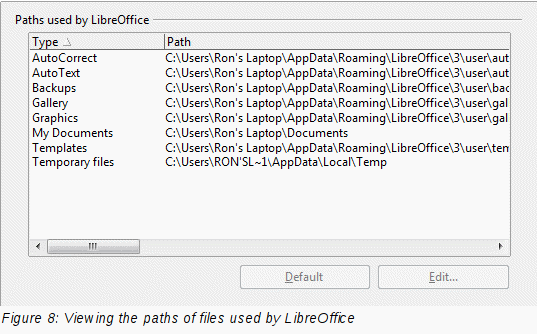
On the LibreOffice – Paths page, you can change the location of files associated with, or used by, LibreOffice to suit your working situation. In a Windows system, for example, you might want to store documents by default somewhere other than My Documents.
To make changes, select an item in the list shown in Figure 8 and click Edit. On the Select Paths dialog (not shown), add or delete folders as required, and then click OK to return to the Options dialog. Note that many items can have at least two paths listed: one to a shared folder (which might be on a network) and one to a user-specific folder (normally on the user’s personal computer). Items with more than one path allowed will use an Edit Paths dialog box (not shown).
|
Tip |
You can use the entries in the LibreOffice – Paths dialog to compile a list of files, such as those containing AutoText, that you need to back up or copy to another computer. |
On the LibreOffice – Colors page, you can specify colors to use in LibreOffice documents. You can select a color from a color table, edit an existing color, or define new colors. These colors will then be available in color selection lists in LibreOffice.
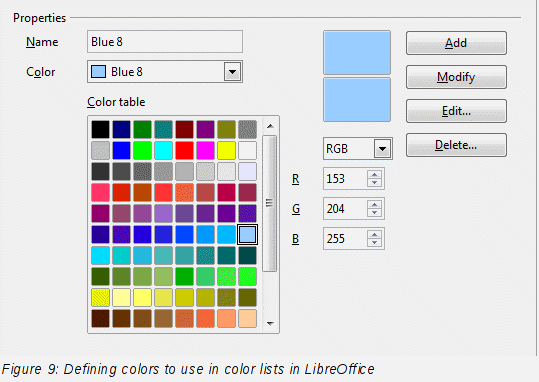
To modify a color:
Select the color to modify from the list or the color table.
Enter the new values that define the color. If necessary, change the settings from RGB (Red, Green, Blue) to CMYK (Cyan, Magenta, Yellow, Black) or vice versa. The changed color appears in the lower of the two color preview boxes at the top.
Modify the Name as required.
Click the Modify button. The newly defined color is now listed in the Color table.
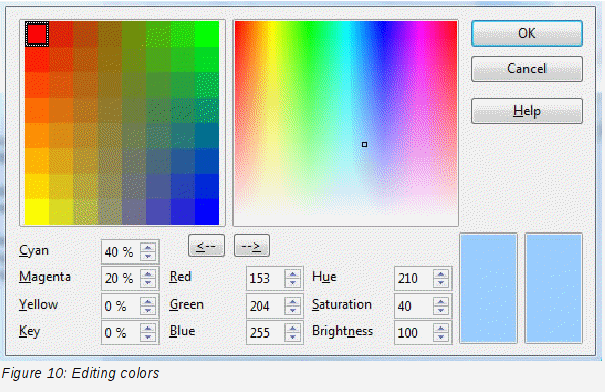
Alternatively, click the Edit button to open the Color dialog, shown in Figure 10. Here you can select a color from one of the color windows in the upper area, or you can enter values in the lower area using your choice of RGB, CMYK, or HSB (Hue, Saturation and Brightness) values.
The upper right color window is linked directly with the color input fields in the lower area; as you choose a color in the upper window, the numbers change accordingly. The two color fields at the lower right show the value of the selected color on the left and the currently set value from the color value fields on the right.
Modify the color components as required and click OK to exit the dialog. The newly defined color now appears in the lower of the color preview boxes shown in Figure 9. Type a name for this color in the Name box, then click the Add button. A small box showing the new color is added to the Color table.
Another way to define or alter colors is through the Colors page of the Area dialog, where you can also save and load color lists, a feature that is not possible here. In Writer, draw a temporary Draw object and use the context menu of this object to open the Area dialog. If you load a color list in one component of LibreOffice, it is only active in that component; the other components keep their own palettes.
You can define replacements for any fonts that might appear in your documents. If you receive from someone else a document containing fonts that you do not have on your system, LibreOffice will substitute fonts for those it does not find. You might prefer to specify a different font from the one the program chooses.
On the LibreOffice – Fonts page:
Select Apply Replacement Table option.
Select or type the name of the font to be replaced in the Font box. (If you do not have this font on your system, it will not appear in the drop-down list in this box, so you need to type it in.)
In the Replace with box, select a suitable font from the drop-down list of fonts installed on your computer.
The check mark to the right of the Replace with box turns green. Click on this check mark. A row of information now appears in the larger box below the input boxes. Select Always to replace the font, even if the original font is installed on your system. Select Screen only to replace the screen font only and never replace the font for printing. The results of combining these selections are given in Table 1.
In the bottom section of the page, you can change the typeface and size of the font used to display source code such as HTML and Basic (in macros).
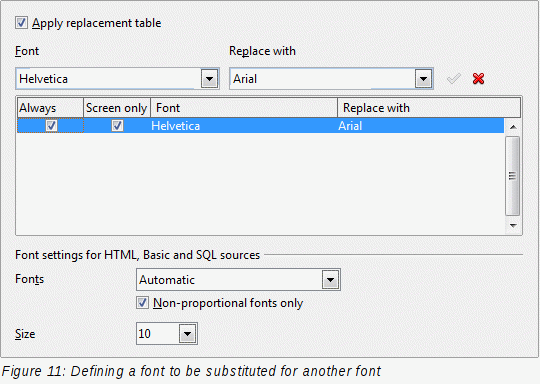
Table 1. Font substitution replacement actions
|
Always checkbox |
Screen only checkbox |
Replacement action |
|
checked |
blank |
Font replacement on screen and when printing, whether the font is installed or not. |
|
checked |
checked |
Font replacement only on screen, whether the font is installed or not. |
|
blank |
checked |
Font replacement only on screen, but only if font is not available. |
|
blank |
blank |
Font replacement on screen and when printing, but only if font is not available. |
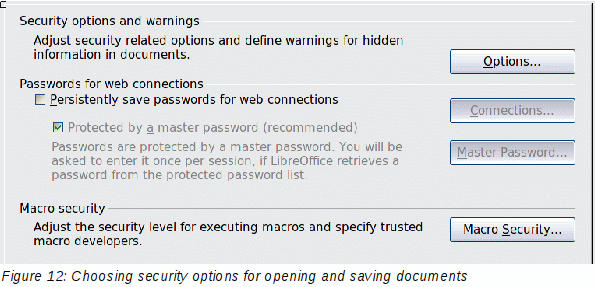
Use the LibreOffice – Security page (Figure 12) to choose security options for saving documents and for opening documents that contain macros.
Security Options and warnings
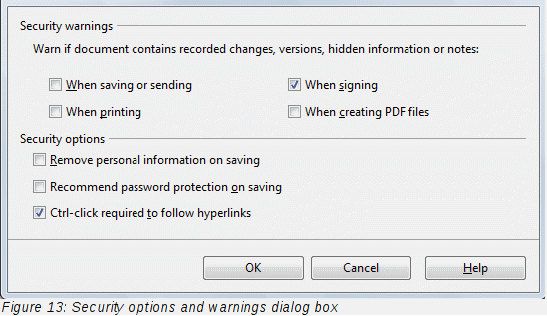
If you record changes, save multiple versions, or include hidden information or notes in your documents, and you do not want some of the recipients to see that information, you can set warnings to remind you to remove it, or you can have LibreOffice remove some of it automatically. Note that (unless removed) much of this information is retained in a file whether the file is in LibreOffice’s default Open Document format, or has been saved to other formats, including PDF.
Click the Options button to open a separate dialog with specific choices (Figure 13).
Macro security
Click the Macro Security button to open the Macro Security dialog, where you can adjust the security level for executing macros and specify trusted sources.
The following options are on the Security options and warnings dialog (Figure 13).
Remove personal information on saving
Select this option to always remove user data from the file properties when saving the file. To manually remove personal information from specific documents, deselect this option and then use the Delete button under File → Properties → General.
Ctrl-click required to follow hyperlinks
The default behavior in LibreOffice is to Ctrl+click on a hyperlink to open the linked document. Many people find creation and editing of documents easier when accidental clicks on links do not activate the links. To set LibreOffice to activate hyperlinks using an ordinary click, deselect this option.
The other options on this dialog should be self-explanatory.
Writing, editing, and (especially) page layout are often easier when you can see the page margins (text boundaries), the boundaries of tables and sections, grid lines, and other features. In addition, you might prefer to use colors that are different from LibreOffice’s defaults for such items as comment indicators or field shadings.
On the LibreOffice – Appearance page, you can specify which items are visible and the colors used to display various items.
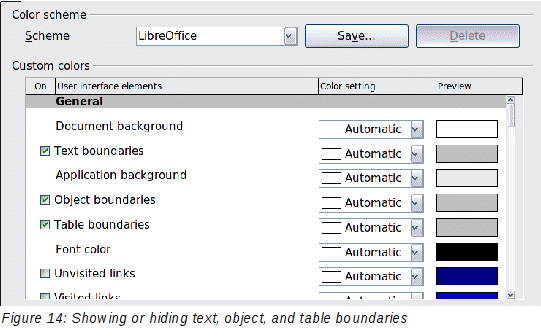
To show or hide items such as text boundaries, select or deselect the options next to the names of the items.
To change the default colors for items, click the down-arrow in the Color setting column by the name of the item and select a color from the pop-up box. Note that you can change the list of available colors as described in “Color options” on page 11.
To save your color changes as a color scheme, click Save… and you will be prompted for a name.
Choosing options for loading and saving documents
You can set the Load/Save options to suit the way you work.
If the Options dialog is not already open, click Tools → Options. Click the expansion symbol (+ sign or triangle) to the left of Load/Save.

Most of the choices on the Load/Save – General page are familiar to users of other office suites. Some items of interest are described below.
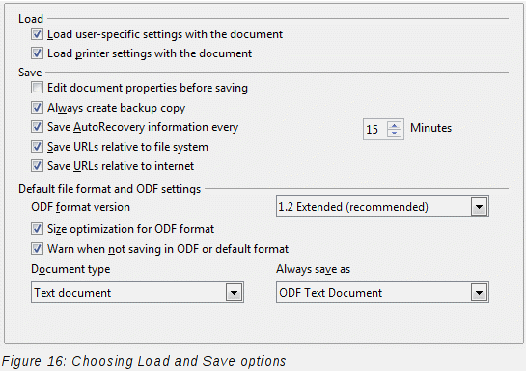
Load user-specific settings with the document
When you save a document, certain settings are saved with it. Some settings (printer name, data source linked to the document) are always loaded with a document, whether or not this option is selected. If you select this option, these document settings are overruled by the user-specific settings of the person who opens it. If you deselect this option, the user’s personal settings do not overrule the settings in the document. For example, your choice (in the options for LibreOffice Writer) of how to update links is affected by the Load user-specific settings option.
Load printer settings with the document
If this option is not selected, the printer settings that are stored with the document are ignored when you print it using the Print File Directly icon. The default printer in your system is used instead.
Edit document properties before saving
If this option is selected, the document’s Properties dialog pops up to prompt you to enter relevant information the first time you save a new document (or whenever you use Save As).
Save AutoRecovery information every __ Minutes
Choose whether to enable AutoRecovery and how often to save the information used by the AutoRecovery process.
AutoRecovery in LibreOffice overwrites the original file. If you also choose Always create backup copy, the original file then overwrites the backup copy. If you have this option set, recovering your document after a system crash will be easier; but recovering an earlier version of the document may be harder.
Save URLs relative to file system / internet
Relative addressing to a file system is only possible if the source document and the referenced document are both on the same drive. A relative address always starts from the directory in which the current document is located. It is recommended to save relatively if you want to create a directory structure on an Internet server.
Default file format and ODF settings
ODF format version. LibreOffice by default saves documents in Open Document Format (ODF) version 1.2 Extended. While this allows for improved functionality, there may be backwards compatibility issues. When a file saved in ODF 1.2 is opened in an earlier version of LibreOffice (using ODF 1.0/1.1), some of the advanced features may be lost. Two notable examples are cross-references to headings and the formatting of numbered lists. If you plan to share documents with people who are still using older versions of LibreOffice, save the document using ODF version 1.0/1.1.
Size optimization for ODF format. LibreOffice documents are XML files. When you select this option, LibreOffice writes the XML data without indents and line breaks. If you want to be able to read the XML files in a text editor in a structured form, deselect this option.
Document type. If you routinely share documents with users of Microsoft Word, you might want to change the Always save as attribute for text documents to one of the Word formats. Current versions of Microsoft Word can open ODF files, so this may no longer be needed.
|
Note |
LibreOffice can open and save files in the .docx (Word) and .xlsx (Excel) formats produced by Microsoft Office 2007 and 2010. |
VBA Properties Load/Save options
On the Load/Save – VBA Properties page, you can choose whether to keep any macros in Microsoft Office documents that are opened in LibreOffice. These macros are disabled in LibreOffice.
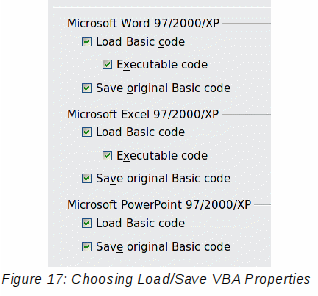
If you choose Load Basic code, you can edit the macros in LibreOffice. The changed code is saved in an LibreOffice document but is not retained if you save into a Microsoft Office format.
If you are importing a Microsoft Word or Excel file containing VBA code, you can select the option Executable code. Whereas normally the code is preserved but rendered inactive, with this option the code is ready to be executed.
If you choose Save original Basic code, the macros are retained unchanged if you save the file into Microsoft Office format.
Save original Basic code takes precedence over Load Basic code. If both options are selected and you edit the disabled code in LibreOffice, the original Microsoft Basic code will be saved when saving in a Microsoft Office format.
To remove any possible macro viruses from the Microsoft Office document, deselect Save original Basic code. The document will be saved without the Microsoft Basic code.
Microsoft Office Load/Save options
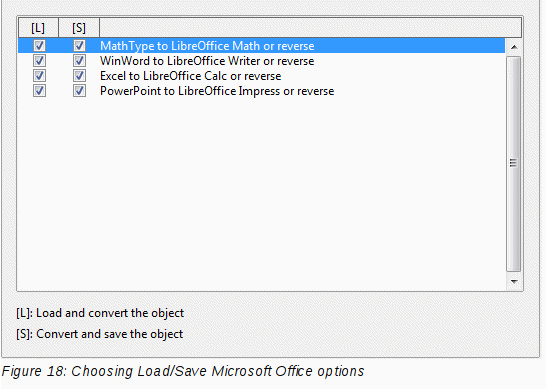
On the Load/Save – Microsoft Office page, you can choose what to do when importing and exporting Microsoft Office OLE objects (linked or embedded objects or documents such as spreadsheets or equations).
Select the [L] check boxes to convert Microsoft OLE objects into the corresponding LibreOffice OLE objects when a Microsoft document is loaded into LibreOffice (mnemonic: “L” for “load”).
Select the [S] check boxes to convert LibreOffice OLE objects into the corresponding Microsoft OLE objects when a document is saved in a Microsoft format (mnemonic: “S” for “save”).
HTML compatibility Load/Save options
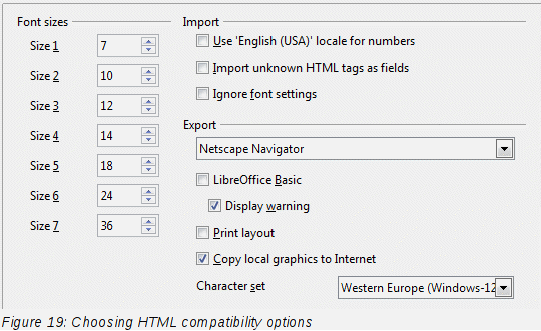
Choices made on the Load/Save – HTML Compatibility page affect HTML pages imported into LibreOffice and those exported from LibreOffice. See HTML documents; importing/exporting in the Help for more information.
Font sizes
Use these fields to define the respective font sizes for the HTML <font size=1> to <font size=7> tags, if they are used in the HTML pages. (Many pages no longer use these tags.)
Import - Use 'English (USA)' locale for numbers
When importing numbers from an HTML page, the decimal and thousands separator characters differ according to the locale of the HTML page. The clipboard, however, contains no information about the locale. If this option is not selected, numbers will be interpreted according to the Locale setting in Tools → Options → Language Settings → Languages (see page 29). If this option is selected, numbers will be interpreted as for the English (USA) locale.
Import – Import unknown HTML tags as fields
Select this option if you want tags that are not recognized by LibreOffice to be imported as fields. For an opening tag, an HTML_ON field will be created with the value of the tag name. For a closing tag, an HTML_OFF will be created. These fields will be converted to tags in the HTML export.
Import – Ignore font settings
Select this option to have LibreOffice ignore all font settings when importing. The fonts that were defined in the HTML Page Style will be used.
Export
To optimize the HTML export, select a browser or HTML standard from the Export box. If LibreOffice Writer is selected, specific LibreOffice Writer instructions are exported.
Export – LibreOffice Basic
Select this option to include LibreOffice Basic macros (scripts) when exporting to HTML format. You must activate this option before you create the LibreOffice Basic macro; otherwise the script will not be inserted. LibreOffice Basic macros must be located in the header of the HTML document. Once you have created the macro in the LibreOffice Basic IDE, it appears in the source text of the HTML document in the header.
If you want the macro to run automatically when the HTML document is opened, choose Tools → Customize → Events. See Chapter 13, Getting Started with Macros, in the Getting Started guide for more information.
Export – Display warning
When the LibreOffice Basic option (see above) is not selected, the Display warning option becomes available. If the Display warning option is selected, then when exporting to HTML a warning is shown that LibreOffice Basic macros will be lost.
Export – Print layout
Select this option to export the print layout of the current document as well.
The HTML filter supports CSS2 (Cascading Style Sheets Level 2) for printing documents. These capabilities are only effective if this print layout export option is selected.
Export – Copy local graphics to Internet
Select this option to automatically upload the embedded pictures to the Internet server when uploading using FTP.
Export – Character set
Select the appropriate character set for the export.
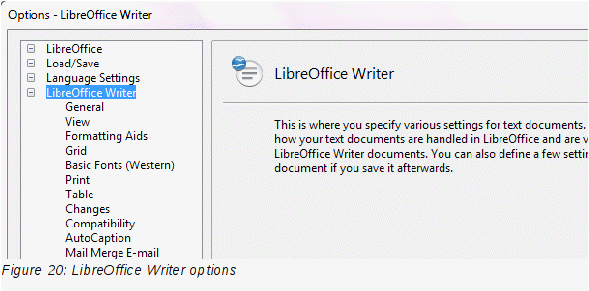
Settings chosen on the pages in the LibreOffice Writer section of the Options dialog box determine how your Writer documents look and behave while you are working on them.
If the Options dialog box is not already open, click Tools → Options.
Click the expansion symbol (+ sign or triangle) by LibreOffice Writer on the left-hand side of the dialog box. A list of pages drops down.
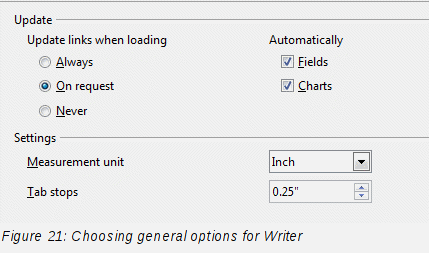
The choices on the LibreOffice Writer – General page affect the updating of links and fields, the units used for rulers and other measurements, and the default tab stop positions.
Update links when loading
Depending on your work patterns, you may not want links to be updated when you load a document. For example, if your file links to other files on a network, you won’t want those links to update when you are not connected to the network.
Update fields and charts automatically
You may not want fields or charts to update automatically when you are working, because that slows down performance.
Settings – Tab stops
The Tab stops setting specifies the distance the cursor travels for each press of the Tab key. This setting is also used for the indent distance applied by the Increase Indent and Decrease Indent buttons on the Formatting toolbar, which affect the indentation of entire paragraphs.
Using the default tab stops to space out or indent material on a page is not recommended. If you use the default tab interval and then send the document to someone who uses a different default tab interval, then your tabbed material will be displayed using the other person’s default tab settings. In addition, any changes to the default tab stops will change the existing default tab stops in any document you open afterward, as well as tab stops you insert after making the change.
To avoid these unwanted changes, define your own tabs in paragraph styles or individual paragraphs (see “Defining your own tab stops and indents” in Chapter 3, Working with Text).
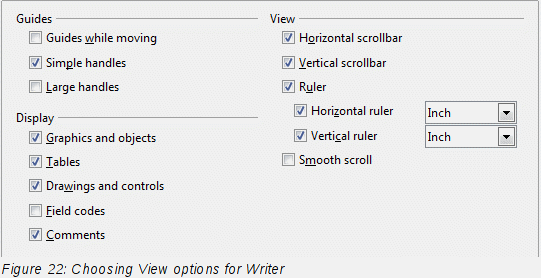
Two pages of options set the defaults for viewing Writer documents: View (described here) and Formatting Aids (described below).
If the items on the LibreOffice Writer – View page are not self-explanatory, you can easily test their effects in a blank document.
This is a good page to check if, for example, you cannot see graphics on the screen or you see field codes instead of the text or numbers you are expecting.
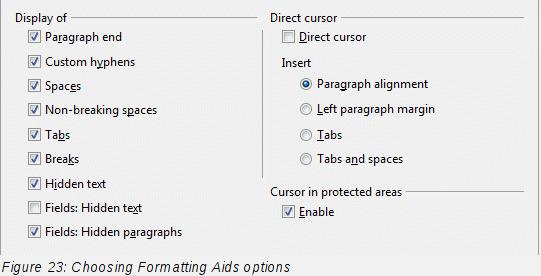
The display of symbols such as paragraph ends and tabs help you when writing, editing, and doing page layout. For example, you might want to know if any blank paragraphs or tabs are included or if any tables or graphics are too wide and intrude into the margins of the page.
On the LibreOffice Writer – Formatting Aids page, select the required options.
|
Note |
Direct cursor lets you enter text, images, tables, frames, and other objects in any blank area in your document. Writer inserts blank paragraphs and tabs to position the text or objects. This feature is incompatible with rigorous use of styles and can lead to many formatting oddities, so it should be avoided by professional writers. |
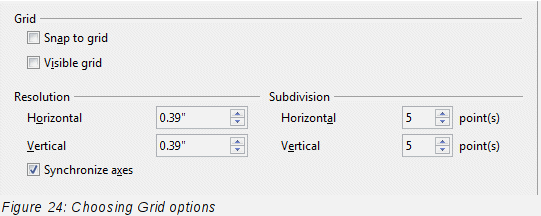
Specifying snap to grid can be very helpful when you are trying to align several objects such as graphics or tables.
On the LibreOffice Writer – Grid page, you can choose whether to enable this feature and what grid intervals to use. If the grid intervals (subdivisions) are too large, you may find that you do not have enough control in placing the objects.
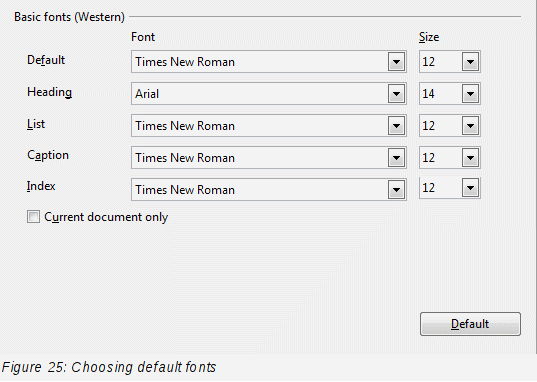
The default fonts specified on the LibreOffice Writer – Basic Fonts (Western) page apply to both Writer documents and HTML (Web) documents. They define the basic fonts for the predefined templates. If you want to change the defaults, do so on this page. If you have Asian language support enabled (see Figure 33 on page 30) there will be a page for Basic Fonts (Asian) as well.
You can, of course, modify specific templates (as described in Chapter 10) or choose other fonts for use in specific documents, either by applying direct formatting or by defining and applying styles in those templates and documents.
When choosing fonts on this page, you are not limited to single fonts or to the ones shown in the drop-down list. You can specify a “font family” as a comma separated set of fonts that includes those suitable for Windows, Macintosh, Linux, and other operating systems. These choices are particularly important in HTML documents.
If the document is viewed on a system that does not have the first font specified, it will use one of the other fonts if that one is available. Otherwise, it will substitute a font that is available on the system.
Type the list of fonts, separated by commas, in the boxes. If you want these defaults to apply to the current document only, select that option. The Default button resets the values on this page to the defaults installed with LibreOffice.
On the LibreOffice Writer – Print page (Figure 26), you can choose which items are printed with the document by default. These options are in addition to those on the LibreOffice – Print page (Figure 7).
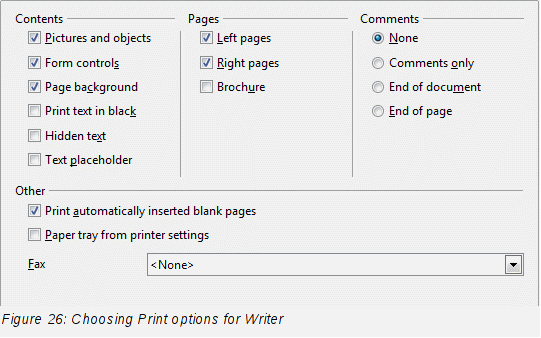
Some considerations:
When you are working on drafts and you want to save printer ink or toner, you might want to deselect some of the items in the Contents section.
The Print text in black selection causes color text (but not graphics) to print as black on a color printer; on a black-and-white printer, this option causes color text to print as solid black instead of shades of gray (dithered).
The Print text in black option has a different effect than the Convert colors to grayscale option on the Options – LibreOffice – Print page (Figure 7), which prints all graphics as grayscale on color printers. (On black-and-white printers, color in graphics normally prints as grayscale.)
If you are printing double-sided on a non-duplexing printer, you might choose to print only left or right pages, then turn the stack over and print the other pages.
|
Tip |
You can override any of these defaults when printing a document. Click File → Print, then use the options on the various pages of the Print dialog box. |
On the LibreOffice Writer – Table page, you can specify the default behavior of tables.
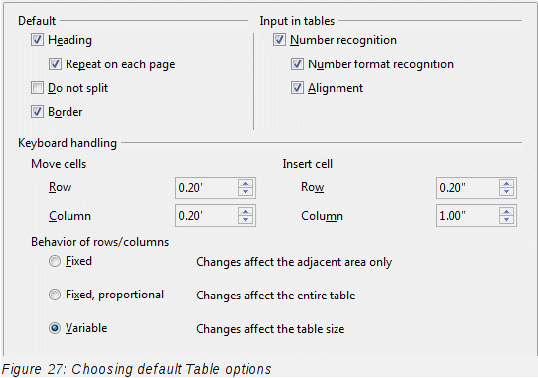
Some considerations:
If most of your tables will require borders or headings, select those options. If most of your tables are used for page layout, deselect borders and headings.
Number recognition can be very useful if most of your tables contain numerical data; Writer will recognize dates or currency, for example, and format the numbers appropriately. However, if you want the numbers to remain as ordinary text, this feature can be quite irritating, so you will want to deselect it.
The Keyboard handling section specifies the distances that cells move when you use keyboard shortcuts to move them and the size of rows and columns inserted using keyboard shortcuts.
The choices in the Behavior of rows/columns section determine the effects that changes to rows or columns have on adjacent rows or columns and the entire table. You might need to test these selections to fully understand the effects.
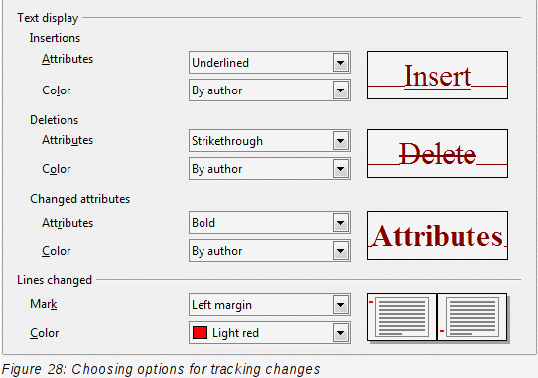
If you plan to use the change-tracking feature of Writer, use the LibreOffice Writer – Changes page to choose the way inserted and deleted material is marked, whether and how attribute changes are marked, and whether and how change bars are marked in the margins.
Do you need to import Microsoft Word documents into LibreOffice Writer? If so, you might want to select some or all of the settings on the LibreOffice Writer – Compatibility page. If you are not sure about the effects of these settings, leave them as the defaults provided by LibreOffice. For information about the settings not described below, see the Help.
Use printer metrics for document formatting
If this option is selected, the printer specified for the document determines how the document is formatted for viewing on screen. The line breaks and paragraph breaks you see on screen match those that apply when the document is printed on that printer.
This setting can be useful when several people are reviewing a document that will eventually be printed on a specific printer or when the document is exported to PDF (a process that uses “Adobe PDF” as the printer).
If this option is not selected, a printer-independent layout will be used for screen display and printing.
Add spacing between paragraphs and tables (in current document)
In LibreOffice Writer, paragraph spacing is defined differently than it is in MS Word documents. If you have defined spacing between two paragraphs or tables, spacing is also added in the corresponding MS Word documents.
If this option is selected, MS Word-compatible spacing is added between paragraphs and tables in LibreOffice Writer documents.
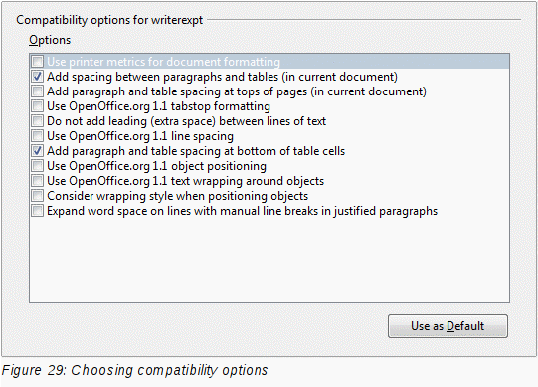
Add paragraph and table spacing at tops of pages (in current document)
You can define paragraphs to have space appear before (above) them. If this option is selected, any space above a paragraph will also appear if the paragraph is at the beginning of a page or column, if the paragraph is positioned on the first page of the document, or after a manual page break.
If you import an MS Word document, the spaces are automatically added during the conversion.
Add paragraph and table spacing at bottom of table cells
Specifies that the bottom spacing is added to a paragraph, even when it is the last paragraph in a table cell.
Use as Default
Click this button to use the current settings on this page as the default in LibreOffice.
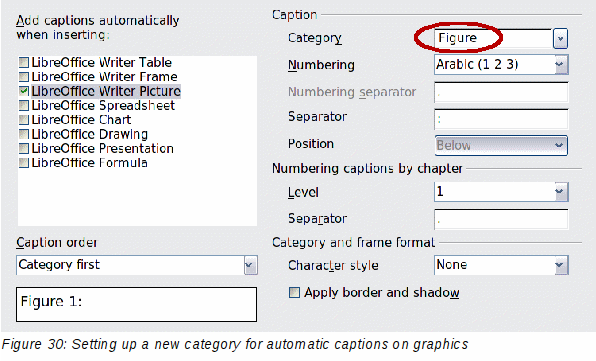
Do you want LibreOffice to automatically insert captions for tables, pictures, frames, and OLE objects that have been inserted in a Writer document?
|
Note |
You may not always want captions for every table, for example, if you use tables for layout as well as for tables of data. You can always add captions to individual tables, graphics, or other objects (right-click → Caption). |
If you do want automatic captions on one or more object types, use the options on the LibreOffice Writer → AutoCaption page. Enable the check box next to an object you want to be automatically captioned (Picture in the example shown).With the item highlighted, specify the characteristics of the caption.
The supplied categories for captions are Drawing, Illustration, Table, and Text. However, you are not limited to the supplied categories. If you want to use another name (for example, Figure) for the caption label, type the required term in the box. In the example shown, Figure has been added to the list.
Additional information about numbering captions by chapter, character styles, frame styles, and other items on the AutoCaption page, is given in later chapters in the Writer Guide.
You can produce form letters using Writer and then use the mail merge function to personalize those letters and send them to a number of addresses taken from a data source, such as an address book. Mail merged documents can be printed and mailed, or sent by e-mail. (See Chapter 11, Using Mail Merge, for details.)
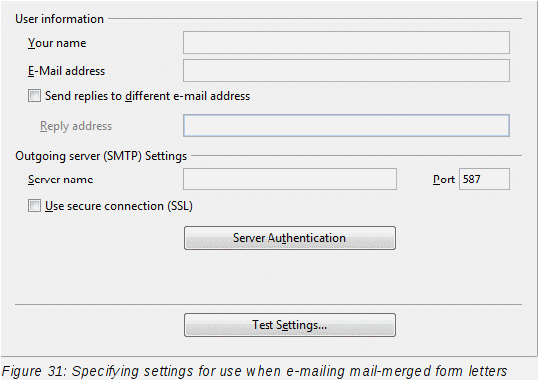
Use the LibreOffice Writer – Mail Merge E-mail page to set up the user and server information for sending form letters by e-mail. If you are not sure what information to put in any of the fields, consult your e-mail program or your Internet service provider.
Choosing options for HTML documents
You can configure LibreOffice to treat HTML documents in Writer differently than regular documents.
If the Options dialog box is not already open, click Tools → Options.
Click the expansion symbol (+ sign or triangle) by LibreOffice Writer/Web on the left-hand side of the Options dialog box. A list of pages drops down.
Here you can customize settings related to printing, formatting aids, view options, table defaults, the grid, and a default background for HTML documents you're working with in Writer.
The pages for View, Formatting Aids, Grid, Print, and Table are the same (or subsets) of the pages described above under LibreOffice Writer, but are for Writer/Web instead.
The Background page allows you to specify the defalt background color for documents in Writer/Web.
You may need to do several things to set the language settings to what you want:
Install the required dictionaries
Change some locale and language settings
Choose spelling options
Install the required dictionaries
LibreOffice3 automatically installs several dictionaries with the program. To add other dictionaries, be sure you are connected to the Internet, and then use Tools → Language → More Dictionaries Online. LibreOffice will open your default web browser to a page containing links to additional dictionaries that you can install. Follow the prompts to select and install the ones you want.
Change some locale and language settings
You can change some details of the locale and language settings that LibreOffice uses for all documents or for specific documents.
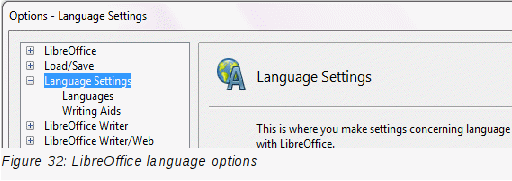
In the Options dialog box, choose Language Settings → Languages. Click the expansion symbol (+ sign or triangle). The exact list shown depends on the Enhanced language support settings (see Figure 33).
On the right-hand side of the Language Settings – Languages page (Figure 33), change the User interface, Locale setting, Default currency, and the settings under Default languages for documents as required. In the example, English (USA) has been chosen for all the appropriate settings.
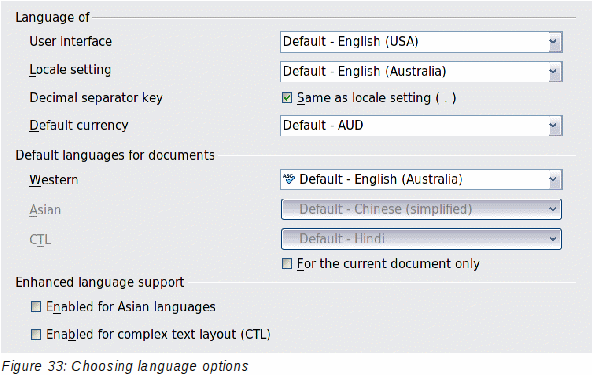
If you want the language setting to apply to the current document only, instead of being the default for all new documents, select For the current document only.
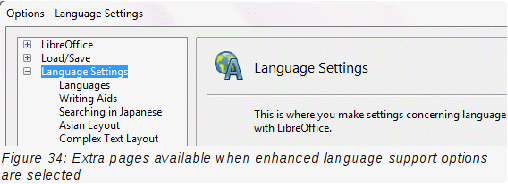
If necessary, select the options to enable support for Asian languages (Chinese, Japanese, Korean) and support for CTL (complex text layout) languages such as Hindi, Thai, Hebrew, and Arabic. If you choose either of these options, the next time you open the Options dialog, you will see some extra pages under Language Settings, as shown in Figure 34. These pages (Searching in Japanese, Asian Layout, and Complex Text Layout) are not discussed here.
To choose the options for checking spelling, choose Language Settings → Writing Aids. In the Options section of the page, choose the settings that are useful for you.
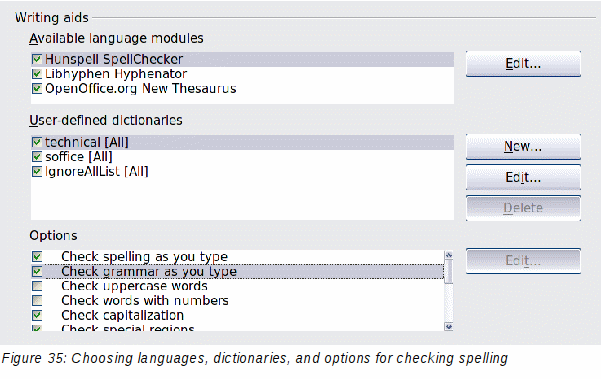
Some considerations:
If you do not want spelling checked while you type, deselect Check spelling as you type.
If you use a custom dictionary that includes words in all uppercase and words with numbers (for example, AS/400), select Check uppercase words and Check words with numbers.
Check special regions includes headers, footers, frames, and tables when checking spelling.
Here you can also check which of the user-defined (custom) dictionaries are active, or you can add or remove dictionaries by clicking the New or Delete buttons.
Controlling Writer’s AutoCorrect functions
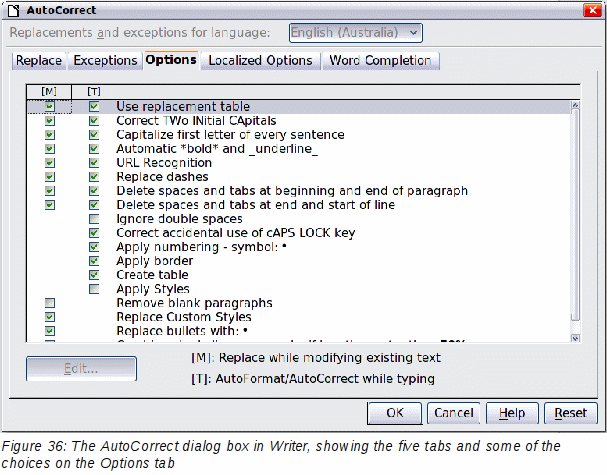
Some people find some or all of the items in Writer’s AutoCorrect feature annoying because Writer changes what you type when you do not want it changed. Many people find some of the AutoCorrect functions quite helpful; if you do, then select the relevant options. But if you find unexplained changes appearing in your document, this is a good place to look to find the cause.
To open the AutoCorrect dialog box, choose Tools → AutoCorrect Options. (You need to have a document open for this menu item to appear.) In Writer, this dialog box has five tabs. Many of the options are described in Chapter 3, Working with Text, in this book.
