Writer Guide
Chapter
4
Formatting Pages
Using Page Styles, Tables, Frames, Columns, and Sections
This document is Copyright © 2010 by its contributors as listed below. You may distribute it and/or modify it under the terms of either the GNU General Public License (http://www.gnu.org/licenses/gpl.html), version 3 or later, or the Creative Commons Attribution License (http://creativecommons.org/licenses/by/3.0/), version 3.0 or later.
All trademarks within this guide belong to their legitimate owners.
Contributors
Ron Faile Jr.
Hal Parker
Feedback
Please direct any comments or suggestions about this document to: documentation@libreoffice.org
Acknowledgments
This chapter is based on Chapter 4 of the Writer Guide for OpenOffice.org. The contributors to that chapter are:
Agnes
Belzunce Ken Byars
Daniel Carrera Peter Hillier-Brook
Lou
Iorio Sigrid Kronenberger
Peter Kupfer Ian Laurenson
Iain
Roberts Gary Schnabl
Janet Swisher Jean Hollis Weber
Claire
Wood Michele Zarri
Publication date and software version
Published 29 Jaanuary 2011. Based on LibreOffice 3.3.
Some keystrokes and menu items are different on a Mac from those used in Windows and Linux. The table below gives some common substitutions for the instructions in this chapter. For a more detailed list, see the application Help.
|
Windows/Linux |
Mac equivalent |
Effect |
|
Tools → Options menu selection |
LibreOffice → Preferences |
Access setup options |
|
Right-click |
Control+click |
Open context menu |
|
Ctrl (Control) |
z (Command) |
Used with other keys |
|
F5 |
Shift+z+F5 |
Open the Navigator |
|
F11 |
z+T |
Open Styles & Formatting window |
Contents
Setting up basic page layout using styles 7
Inserting a page break without switching the style 7
Defining a different first page for a document 7
Changing page orientation within a document 9
Setting up a landscape page style 9
Inserting a landscape page into a portrait document 10
Using columns to define the page layout 13
Defining the columns on a page 13
Specifying the number of columns 14
Formatting column width and spacing 14
Reverting to a single-column layout 14
Changing the number of columns for existing text 14
Distributing text across columns 15
Using frames for page layout 16
Moving, resizing, and changing frame attributes 17
Using tables for page layout 21
Example: Creating sideheads using tables 21
Using sections for page layout 23
Password-protecting sections 25
Formatting a section into columns 26
Indenting the section from margins 26
Changing the background of the section 27
Customizing footnotes and endnotes in a section 27
Editing and deleting sections 29
Editing the format of a section 30
Updating links automatically 30
Creating headers and footers 31
Formatting headers and footers 32
Portrait headers on landscape pages 32
Preliminaries: insert and format a header 35
Combining header text and page number 36
Numbering the first page something other than 1 37
Example: Restart page numbering: a preface 40
Problems with restarting page numbering 42
Solving the page count problem 42
Numbering portrait and landscape pages 44
Defining borders and backgrounds 44
Adding color to the background 45
Writer provides several ways for you to control page layouts:
Page styles
Columns
Frames
Tables
Sections
This chapter describes these methods and some associated things:
Headers and footers
Numbering pages
Changing page margins
|
Tip |
Page layout is usually easier if you select the options to show text, object, table, and section boundaries in Tools → Options → LibreOffice → Appearance and if you select the options for paragraph ends, tabs, breaks, and other items in Tools → Options → LibreOffice Writer → Formatting Aids. |
The best layout method depends on what the final document should look like and what sort of information will be in the document. Here are some examples. Do not worry if all this does not mean much to you now. The techniques mentioned are all described in this chapter.
Setting up basic page layout using styles
In Writer, page styles define the basic layout of all pages, including page size, margins, the placement of headers and footers, borders and backgrounds, number of columns, and so on.
Writer comes with several page styles, which you can build on or modify, and you can define new (custom) page styles. You can have one or many page styles in a single document.
|
Note |
All pages in a Writer document are based on styles. If you do not specify a page style, Writer uses the Default page style. |
To change the layout of individual pages, either define a new page style or use one of the techniques (sections, frames, or tables) described later in this chapter.
This chapter describes some uses of page styles. Some other uses are discussed in Chapter 6, Introduction to Styles. The Page Style dialog box is covered in detail in Chapter 7, Working with Styles.
|
Tip |
Any modifications of page styles, including the Default page style, apply only to the document you are working on. If you want the changes to be the default for all documents, you need to put the changes into a template and make that template the default template. See Chapter 10, Working with Templates, for details. |
Inserting a page break without switching the style
In many documents (for example, a multi-page report), you may want the text to flow from one page to the next as you add or delete information. Writer does this automatically, unless you override the text flow using one of the techniques described earlier.
If you do want a page break in a particular place, for example, to put a heading at the top of a new page, here is how to do it:
Position the cursor in the paragraph you want to be at the start of the next page. Right-click and choose Paragraph in the pop-up menu.
On the Text Flow page of the Paragraph dialog box (Figure 1), in the Breaks section, select Insert. Do not select With Page Style.
Click OK to position the paragraph at the start of the next page.

Defining a different first page for a document
Many documents, such as letters and reports, have a first page that is different from the other pages in the document. For example, the first page of a letterhead typically has a different header, as shown in Figure 2, or the first page of a report might have no header or footer, while the other pages do. With Writer, you can define the style for the first page and specify the style for the following page to be applied automatically.
As an example, we can use the First Page and Default page styles that come with Writer. Figure 3 shows what we want to happen: the first page is to be followed by the default page, and all the following pages are to be in the Default page style.
To set up this sequence:
Open the Styles and Formatting
window. (Do one of the following: click the Styles
and Formatting icon
![]() located at the left-hand end of the object bar, choose Format
→
Styles and Formatting, or press F11.)
located at the left-hand end of the object bar, choose Format
→
Styles and Formatting, or press F11.)
On the Styles and Formatting
window, click on the Page
Styles icon
![]() to display a list of page styles.
to display a list of page styles.
Right-click on First Page and select Modify from the pop-up menu.
On the Organizer page of the Page Style dialog box, look at the Next Style property. This property defines what the page style for the next page will be. It should be set to Default, but if it is not, you can change the next style by clicking on the drop-down button and choosing Default from the list of page styles.
On the other pages of this dialog box, you can turn on or off the header and footer for the first page and define other characteristics, such as columns, a page border, or a page background. For more information, see Chapter 7, Working with Styles.
Click OK to save the changes.
|
Note |
You can override the Next Style property by manually inserting a page break and specifying a page style or by starting a page with a paragraph or table that has its own page style property defined. These techniques are described in “Inserting a landscape page into a portrait document” on page 10. |
Changing page orientation within a document
A document can contain pages in more than one orientation. A common scenario is to have a landscape page in the middle of a document, whereas the other pages are in a portrait orientation. Here are the steps to achieve it.
Setting up a landscape page style
Note the page style that is current and the margin settings. (You can find the margin settings on the Page page of the Page Style dialog box, as shown in Figure 6.)
Create a new style. (Right-click on the current page style in the Styles and Formatting window and choose New from the pop-up menu)
On the Organizer page of the Page Style dialog box (Figure 5), name (by typing in the Name field) this new style Landscape and set the Next Style property to Landscape (to allow for having more than one sequential landscape page).
On the Page page of the Page Style dialog box (Figure 6), set the Orientation to Landscape. The width and height attributes of the page will automatically change.
Change the margins so that they correspond with the margins of the portrait page. That is, the portrait top margin becomes the landscape left margin, and so on. Click OK to save the changes.
Inserting a landscape page into a portrait document
Now that you have defined the Landscape page style, here is how to apply it.
Position the cursor in the paragraph or table at the start of the page that is to be set to landscape. Right-click and choose Paragraph or Table, respectively, in the pop-up menu.
On the Text Flow page of the Paragraph dialog box (Figure 8) or the Table Format dialog box (Figure 7), select Insert (or Break for a table) and With Page Style. Set the Page Style property to Landscape. Click OK to close the dialog box and to apply the new page style.
Position the cursor in the paragraph or table where the page is to return to portrait orientation and change the properties of that paragraph or table properties so that With Page Style is the portrait page style that was used before the Landscape page style.
Click OK to return to the previous portrait page style.
|
Tip |
If you need the headers or footers on the landscape pages to be in portrait orientation, see “Portrait headers on landscape pages” on page 32. |
LibreOffice Writer provides a fast and convenient way to add one or more title pages to a document and optionally to restart the page number at 1 for the body of the document.
To being, choose Format → Title Page from the menu bar.
On the Title Pages dialog box (Figure 9), you can make a variety of choices.
Convert existing pages to title pages, or insert new title pages
How many pages to convert or insert
Where those pages are located
If and where to restart page numbering, and what number to start with
What page style to use for the title page
Using this technique, you could insert several “title pages” at different points in your document, for example to add decorative pages between chapters as well as title, copyright, and other pages at the beginning of a book.
You can change page margins in two ways:
Using the page rulers—quick and easy, but does not have fine control.
Using the Page Style dialog box—can specify margins to two (fractional) decimal places.
|
Note |
If you change the margins using the rulers, the new margins affect the page style and will be shown in the Page Style dialog box the next time you open it. |
To change margins using the rulers:
The shaded sections of the rulers are the margins (see Figure 10). Put the mouse cursor over the line between the gray and white sections. The pointer turns into a double-headed arrow.
Hold down the left mouse button and drag the mouse to move the margin.
|
Tip |
The small arrows on the ruler are used for indenting paragraphs. They are often in the same place as the page margins, so you need to be careful to move the margin marker, not the arrows. Place the mouse pointer between the arrows and, when the pointer turns into a double-headed arrow, you can move the margin (the indent arrows will move with it). |
To change margins using the Page Style dialog box (Figure 6):
Right-click anywhere on the page and select Page from the pop-up menu.
On the Page page of the dialog box, type the required distances in the Margins boxes.
Using columns to define the page layout
You can use columns for page layout in these ways:
Define the number of columns and their layout on a page, using page styles.
Change the number of columns for existing text.
Defining the columns on a page
It is a good idea to define your basic page style (such as Default) with the most common layout to be used in your document, either single-column or multiple-column. You can then either define extra page styles for pages with different numbers of columns or use sections (described in “Using sections for page layout” starting on page 23) for pages or parts of pages with different numbers of columns.
To define the number of columns on a page:
Choose Format → Columns or go to the Columns page of the Page Style dialog box,
In the Settings area, choose the number of columns and specify any spacing between the columns and whether you want a vertical separator line to appear between the columns. You can use one of Writer’s predefined column layouts, or you can create a customized column layout. The preview box, located to the right of the Settings area, shows how the column layout will look.
Notice the Apply to box on the right-hand side of the dialog box. In this case, the changes are being applied to the Default page style.
Click OK to save the changes.
Specifying the number of columns
The Settings area displays five predefined column layouts. To use one of them, click the desired layout.
If you prefer to create a customized column layout, you must specify the number of columns that you want by entering the desired number in the Columns box.
Formatting column width and spacing
To create evenly-spaced columns that are all the same width, select the AutoWidth option in the Width and spacing area.
To customize the width and spacing of the columns, follow these steps:
In the Width and spacing area, deselect the AutoWidth option.
On the Width line, enter a width for each column.
On the Spacing line, enter the amount of space that you want between each pair of columns.
If you specify more than three columns, use the arrow keys on the Column line to scroll among the columns.
To display separator lines between the columns:
Eighteen separator line options exist: None or various lines of thicknesses ranging from 0.05 to 9 pt. From the Line drop-down list in the Separator line area, select the type of line that you want. (1 pt = 1 point = 1/12 pica = 1/72 inch = 127/360 mm = 0.3527 mm.)
The default format is for the separator lines to have the same height as the columns. If you want the separator lines to be shorter than the columns, use the Height box to enter the height of the separator lines as a percentage of the height of the columns. For example, if you enter 50%, the separator lines will be half as high as the columns.
If you entered a height of less than 100%, use the Position drop-down list to select a vertical alignment for the separator lines. The vertical-positioning options are: Top, Centered, or Bottom.
Reverting to a single-column layout
To revert to a single-column layout for the page style, go to the Settings area and either reset the number in the Columns box to 1 or click the single-column layout icon.
Changing the number of columns for existing text
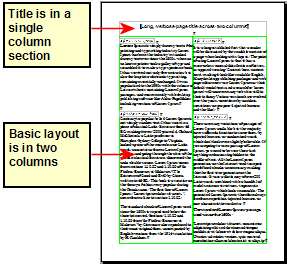
You might want some parts of a page to have one column and other parts of the page to have two or more columns. For example, you might have a page-width headline over a three-column news story.
You can create columns and then type or paste text into them, or you can select some existing text and change the number of columns for displaying it.
When you select text and change the number of columns for that text, Writer turns the selected text into a section, as described in “Using sections for page layout” on page 23.
Figure 12 shows the Columns dialog box for a selection. The Apply to box on the right-hand side has Selection highlighted and an extra option (Evenly distribute contents to all columns) appears in the upper left-hand part of the dialog box.
|
Tip |
You cannot select text on a two-column page and change it to a single column using this method. Instead, you need to define a single-column page and then select the text you want to be in a two-column section. |
Distributing text across columns
As you add text to the section, you will see that the text flows from one column to the next. You can distribute text across the columns in one of two ways:
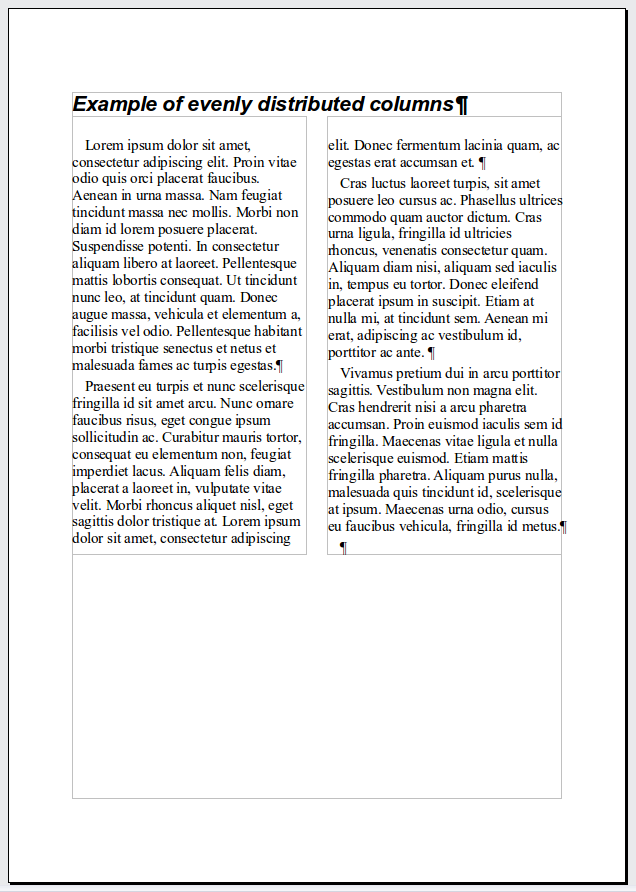
Evenly—Writer adjusts the length of the columns to the amount of text, so that all the columns are approximately the same height. As you add or delete text, the columns readjust.
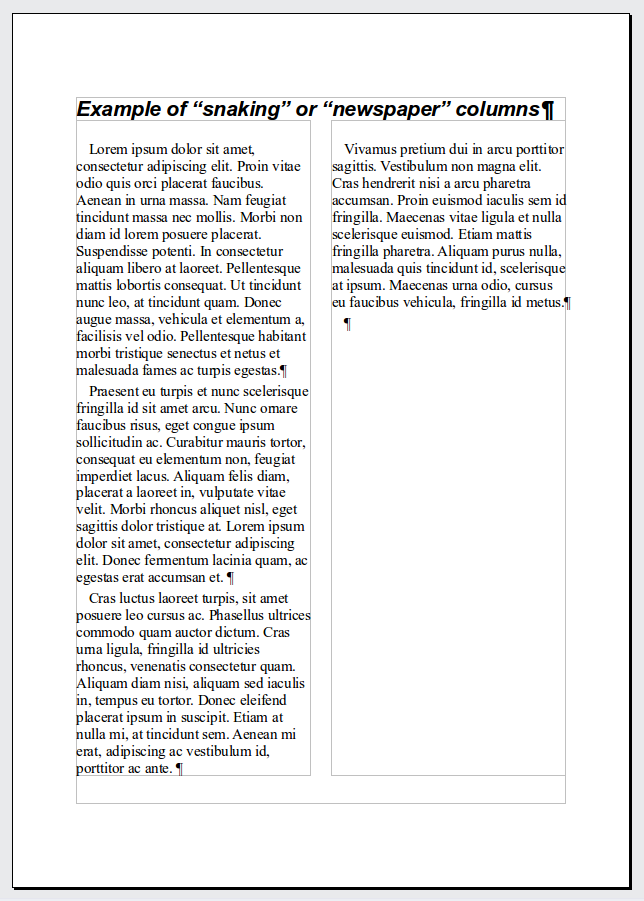
Newspaper-style—Writer fills the columns one at a time, beginning with the first column. The last column may be shorter than the others.
To distribute text evenly, select the Evenly distribute contents to all columns option in the Settings area. Deselect this option if you want to distribute text newspaper-style.
|
Tip |
Choose View → Nonprinting Characters (or press Ctrl+F10) to display end of paragraph markers (¶). Often, unexpected behavior of columns is due to extra paragraphs that are normally invisible to the user but are taking up space. |
|
|
|
|
Figure 13: (Left) Evenly distributed columns; (Right) Newspaper-style columns. |
|
Frames can be very useful when producing a newsletter or other layout-intensive documents. Frames can contain text, tables, multiple columns, pictures, and other objects.
Use frames when you need to:
Position something in a particular place on a page, for example, a logo or a “stop press” news box in one corner of a page.
Allow text on one page to continue on another page, somewhere more distant than the next one, by linking the content of one frame to another so the contents flow between them as you edit the text.
Wrap text around an object, such as a photograph.
Because LibreOffice does not allow you to define page styles with recurring frames, consider doing some quick sketches of the basic page layouts you need, indicating the approximate positions of different frames and their purposes. Try to keep the number of different page layouts as low as possible in order to avoid chaos in your design.
Pay special attention to the positioning of frames. Many of the predefined styles default to a center alignment. Although centering all frames looks reasonably good in most cases, itis rarely the best choice.
One of the most visually effective ways to position a frame is to align its left margin with that of the paragraph above it. To achieve this effect, insert the frame in a blank paragraph of the same style as the paragraph above. Then, select Insert → Frame → Type → Position → Horizontal → From Left to position the frame exactly where you want it.
You also should think about the type of wrap and the spacing between the frame and text. Instead of cramming a frame close to the text, use the Wrap tab to place some white space between them.
You can format frames individually or define and apply frame styles—see Chapter 7, Working with Styles.
Example: Using a frame to center text on a page
Although you can center text horizontally as part of a paragraph style or by using manual formatting, those methods do not work for vertical centering. To center text vertically, you need to place the text in a frame, anchor the frame to a page or a paragraph, and then center the frame vertically on the page. See “Anchoring frames” on page 19.
You can create a frame in several ways, depending on your needs.
Choose Insert → Frame) to create an empty frame. The Frame dialog box (Figure 15) appears. You can click OK and come back to customize it later, or you can set the frame’s characteristics at this stage.
Select text or a graphic, choose Insert → Frame, and click OK to create a frame containing the selection. The selected text is automatically deleted from the normal text flow and inserted into the frame, and the Frame dialog box appears.
Insert a picture or other object by selecting Insert → Picture → From file or Insert → Object to start the process to insert a picture or object. The item inserted automatically appears in a frame, but the Frame dialog box does not appear.
Use the Insert
Frame Manually
![]() button on the Insert toolbar (go to View
→
Toolbars
→
Insert
to display it), select the number of frames in the drop-down menu,
and drag the mouse to draw the frame.
button on the Insert toolbar (go to View
→
Toolbars
→
Insert
to display it), select the number of frames in the drop-down menu,
and drag the mouse to draw the frame.

 When
you release the mouse button, a box appears where the cursor is
located in the document. This box represents the frame: an area
isolated from the main document.
When
you release the mouse button, a box appears where the cursor is
located in the document. This box represents the frame: an area
isolated from the main document.
To add content to a frame, first deselect the frame by clicking somewhere else on the page. Then, click inside the frame so that the cursor shifts its focus there. Now add content just like you would on the main page. When you are done, deselect the frame.
Moving, resizing, and changing frame attributes
When an object is added to Writer, it is automatically enclosed in a frame of a predetermined type. The frame sets how the object is placed on the page, as well as how it interacts with other elements in the document. You can edit the frame by modifying the frame style it uses or by using a manual override when a frame is added to the document. Frame styles are discussed in Chapter 7, Working with Styles.
To change the size or location of a frame, first select the frame, then use either the mouse or the Frame dialog box (Figure 15). Using the mouse is faster but less accurate. You might want touse the mouse for gross layout and the dialog box for fine-tuning.
You can resize the frame manually (by clicking on the green squares and dragging to the appropriate size) or start adding content to it (the frame will resize automatically if, for example, you add a large picture to it) or go back to the Frame dialog box and set the size and other characteristics.
To change the location of the frame using the mouse, drag and drop one of the edges or put the cursor anywhere within the frame. (The I-bar cursor changes to a four-headed arrow when properly positioned for a drag-and-drop move.)
To change the size of the frame, drag one of the handles. Drag a handle on one of the sides to enlarge or reduce the text frame in one dimension only; drag a corner handle to enlarge or reduce it in both dimensions.
These resizing actions distort the proportions of the frame. Holding down the Shift key while dragging one of the handles makes the frame keep the same proportions.
You can open the Frame dialog box at any time by selecting the frame, right-clicking, and choosing Frame from the pop-up menu.
To remove the default border on a newly created frame, open the Frame dialog box, go to the Borders page, and under Line Style, select None. Alternatively, you can assign a borderless style to the frame; see the Chapter 7, Working with Styles, for information on frame styles.
|
Tip |
Do not confuse a frame’s border with the text boundaries that are made visible using the View menu (by selecting View → Text Boundaries). |
Using the Frame dialog box (or by right-clicking and pointing to Anchor), you can anchor a frame to a page, paragraph, or character, or you can anchor it as a character.
The frame keeps the same position in relation to the page margins. It does not move as you add or delete text. This method is useful when the frame does not need to be visually associated with a particular piece of text. It is often used when producing newsletters or other documents that are very layout-intensive. This method is also used to center text on a page.
The frame is associated with a paragraph and moves with the paragraph. It may be placed in the margin or another location. This method is useful as an alternative to a table for placing icons beside paragraphs. It is also used to center text on a page in documents which will be used in a master document (frames anchored to pages will disappear from the master document).
The frame is associated with a character but is not in the text sequence. It moves with the paragraph but may be placed in the margin or another location. This method is similar to anchoring to a paragraph.
The frame is placed in the document like any other character and, therefore, affects the height of the text line and the line break. The frame moves with the paragraph as you add or delete text before the paragraph. This method is useful for adding a small icon in sequence in a sentence. It is also the best method for anchoring a graphic to an empty paragraph so it does not move around the page in unexpected ways.
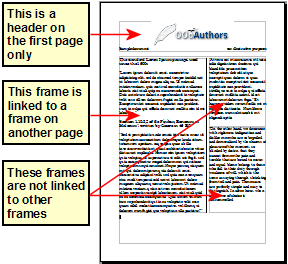
You can link frames to each other even when they are on different pages of a document. The contents will automatically flow from one to the next. This technique is very useful when designing newsletters, where articles may need to be continued on a different page.
|
Note |
You cannot link from a frame to more than one other frame. |
To link one frame to another:
Select the frame to be linked from.
Click the Link
Frames icon
![]() on the object bar.
on the object bar.
Click the next frame in the series (which must be empty).
When a linked frame is selected, any existing links are indicated by a faint connecting line, as shown in Figure 17. Note that any frame-linking line will not be as clear as illustrated in the figure.
The height of a frame that is being linked from is fixed; you can change this height manually or by using the Frame dialog box, but it does not automatically adjust to the size of the contents (that is, the AutoHeight attribute is disabled). Only the last frame of a chain can adapt its height to the content.
The Options page of the Frame dialog box (Figure 18) shows the names of the selected frame and any frames it is linked to or from. You can change this information here. On this page, you can also select options to protect the contents, position, and size of the frame.

On the Hyperlink page (Figure 19), you can specify the file for the hyperlink to open. This file can be on your machine, a network, or the Internet.
The Wrap, Borders, Background, Columns, and Macro pages of the Frame dialog box are the same as those for frame styles. Refer to the Chapter 7, Working with Styles, for details.
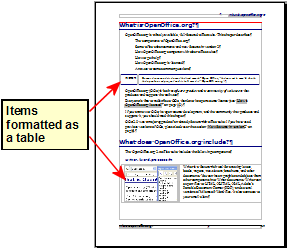
Writer’s tables can serve several purposes, such as holding data as you might see it in a spreadsheet, lining up material, and creating more complex page layouts. For information about using tables of data, see Chapter 9, Working with Tables.
This topic describes how to achieve some common layouts by using tables.
Example: Creating sideheads using tables
Sideheads and marginal notes are commonly used in documents from resumes to computer user guides. The main body of the text is offset to leave white space (usually on the left-hand side) in which the sideheads or notes are placed. The first paragraph is aligned beside the sidehead, as in Figure 20.
|
Example of a sidehead |
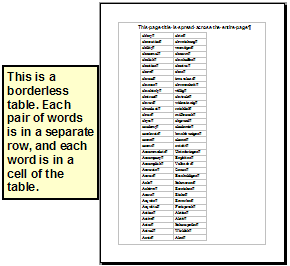
In some cases you may want to put only one or two paragraphs in the table itself and the rest of the text and graphics in ordinary paragraphs (formatted to line up with the paragraphs in the table) so that text and graphics will flow more easily from one page to another when you add or delete material. In other cases, you might put each paragraph in a separate row of the table and allow the table to break between pages. |
Figure 20: Example of a sidehead
|
Note |
Sideheads can also be created by placing text in a frame using the Marginalia frame style, as described in the Chapter 7, Working with Styles. |
To create a table for use with a sidehead:
Place the cursor where you want the table to appear and choose Insert → Table (Ctrl+F12).
In the Insert Table dialog box, define a one-row, two-column table with no border and no heading. Click OK to create the table.
Right-click on the table and choose Table from the pop-up menu. On the Columns page of the Table Format dialog box, make the columns the required width.

On the Table page of the Table Format dialog box (Figure 23), in the Spacing section, make the Above and Below values the same as the Top and Bottom spacing you have defined for ordinary paragraphs of text. Click OK to save your settings.
|
Tip |
To check the top and bottom spacing for ordinary paragraphs:
|
You may also want to turn off number recognition so that Writer will not try to format numbers if you want them to be plain text. To turn number recognition off:
Right-click in the table and then click Number Format on the pop-up menu.
On the Number Format dialog box, make sure the Category is set to Text. Click OK.
|
Tip |
If you use this table format often, you may want to save it as AutoText, as described in Chapter 3, Working with Text. Select the table (not just the contents) to assign the shortcut. |
Using sections for page layout
A section is a block of text that has special attributes and formatting. You can use sections to:
Write-protect text
Hide text
Dynamically insert the contents of another document
Add columns, margin indents, a background color, or a background graphic to a portion of your document
Customize the footnotes and endnotes for a portion of your document
To create a section:
Place the cursor at the point in your document where you want to insert the new section. Or, select the text that you want to place in the new section.
From the main menu, choose Insert → Section. The Insert Section dialog box opens.
Click the Section tab, if it is not already displayed.
The Insert Section dialog box has five tabbed pages.
Use the Section page to set the section’s attributes.
Use the Columns page to format the section into columns.
Use the Indents page to set indents in the right and left margins of the section.
Use the Background page to add color or a graphic to the section’s background.
Use the Footnotes/Endnotes page to customize the section’s footnotes and endnotes.
At any time, you can reset a tabbed page to its default settings by clicking the Reset button. (Note, however, that you cannot reset the Section page. If you wish to undo changes to the Section page, you must do so manually.)
Use the Section page to set the attributes of the current section.
Writer automatically enters a name for the current section in the top box of the New section area. To change the name, select it and type over it. The name is displayed in the Sections category of the Navigator window. If you give your sections meaningful names, you can navigate to them more easily.
You can insert the contents of another document into the current section and then have Writer update the section whenever the other document is updated. This is called linking the section to the other document.
To link the current section to another document, follow these steps:
In the Link area, select the Link option.
Click the (...) button to the right of the File name field. The Insert dialog box opens.
Find and select the document you want to insert and then click the Insert button. The Insert dialog box closes and the name of the selected document appears in the File name field.
If you want to insert only a section of the selected document, select the desired section from the Section drop-down list.
|
Note |
The section must already exist in the selected document. You cannot create a section in the selected document at this point. |
You can update links automatically or manually. See “Updating links” on page 30.
To write-protect the current section so that its contents cannot be edited, select the Protect option in the Write protection area.
|
Note |
Write-protection protects only the section’s contents, not its attributes or format. |
To prevent others from editing the section’s attributes or format, protect the section with a password, as follows:
Select the With password option. The Enter Password dialog box opens.
Type a password in the Password field and then confirm the password by typing it again in the Confirm field.
Click OK. The Enter Password dialog box closes. Anyone who tries to edit the section’s attributes or format will be prompted to enter the password.
|
Note |
Passwords must contain at least five characters. The OK button remains inactive until you have typed five characters. |
You can hide the current section so that it will not be displayed on the screen or printed. You can also specify conditions for hiding the section. For example, you can hide the section only from certain users.
|
Note |
You cannot hide a section if it is the only content on the page or if the section is in a header, footer, footnote, endnote, frame, or table cell. |
To hide a section, select the Hide option in the Hide area.
To hide the section only under certain conditions, enter the desired conditions in the With Condition field. The syntax and operators that you use to enter conditions are the same ones that you use to enter formulas. For syntax and a list of operators, see Writer’s online help under conditions.
If the section is write-protected with a password, the password must be entered to hide or reveal the text.
|
Note |
Hiding text is not a secure way to stop someone else reading it. It will stop the casual reader but will not prevent someone who actively wants to find out what you have hidden―even if it is password protected. |
Formatting a section into columns
Use the Columns page of the Insert Section dialog box to format the current section into columns. This page is very similar to the Columns dialog box shown in Figure 12 on page 15. Please refer to that topic for details.
Indenting the section from margins
Use the Indents page (Figure 30), to set indents in the right and left margins of the current section.
Enter the desired left-margin indent in the Before section box. Enter the desired right-margin indent in the After section box. The preview box on the right-hand side of the page shows you how the section will look with the indents applied.
Changing the background of the section
Use the Background page to add color or a graphic to the background of the current section. This page is similar to the Background pages for paragraphs, frames, tables, and other objects in LibreOffice. For more information, refer to Chapter 7, Working with Styles.
Customizing footnotes and endnotes in a section
Use the Footnotes/Endnotes page to customize the current section’s footnotes and endnotes.
If you want the current section’s footnotes to appear separately from the other footnotes in the document, select the Collect at end of text option in the Footnotes area.
To number the current section’s footnotes separately from the other footnotes in the document, follow these steps:
In the Footnotes area, make sure that the Collect at end of text option is selected.
Select the Restart numbering option.
If you want the section’s footnotes to start at a number other than 1, enter the desired starting number in the Start at spin box.
To edit the format of the section’s footnotes, follow these steps:
In the Footnotes area, make sure that the Collect at end of text and Restart numbering options are selected.
Select the Custom format option.
From the drop-down list under and to the right of the Custom format option, select a numbering format for the footnotes.
To add text to the selected numbering format, use the Before and After fields. For example, if you want the footnote numbers to be preceded by the word “Note” and followed by a colon, fill the Before and After fields like this:
If you want the current section’s endnotes to appear at the end of the section rather than at the end of the document, select the Collect at end of section option in the Endnotes area.
To number the current section’s endnotes separately from the other endnotes in the document, follow these steps:
In the Endnotes area, make sure that the Collect at end of section option is selected.
Select the Restart numbering option.
If you want the section’s endnotes to start at a number other than 1, enter the desired starting number in the Start at spin box.
To edit the format of the section’s endnotes, follow these steps:
In the Endnotes area, make sure that the Collect at end of section and Restart numbering options are selected.
Select the Custom format option.
From the drop-down list under and to the right of the Custom format option, select a numbering format for the endnotes.
To add text to the selected numbering format, use the Before and After fields, as shown above for footnotes (Figure 32).
To save a new section so that it appears in your document, click the Insert button. The Insert Section dialog box closes and the new section appears in your document.
You can edit a section’s attributes and formatting, or delete sections, by using Format → Sections.
To select the section that you want to edit or delete, follow these steps:
From the main menu, choose Format → Sections. The Edit Sections dialog box opens.

The name of the current section appears in the Section area, in the field above the list box. If you want to edit or delete a different section, click the name of the desired section in the list. The selected section becomes the current section, and its name appears in the field above the list box.
To delete the current section, click the Remove button.
|
Note |
Writer will not prompt you to confirm the delete! To undo a delete, click the Cancel button. |
To rename the current section, simply type over its name in the Section area.
From the Edit Sections dialog box, you can also edit the current section’s link, write-protect, and hide attributes. To learn how to edit these attributes, see:
“Linking sections” on page 25.
“Write-protecting sections” on page 25.
“Hiding sections” on page 26.
Editing the format of a section
To edit the format of the current section, click the Options button.
The Options dialog box has four tabbed pages: Columns, Indents, Background, and Footnotes/Endnotes. The use of these pages is described earlier in this topic.
To reset a page to its most recently saved settings, click the Reset button.
To save your Options settings and return to the Edit Sections dialog box, click OK.
You can set Writer to update linked sections automatically, and you can also update links manually.
To set Writer to update links without prompting you, or to turn off automatic updating, follow these steps:
Choose Tools → Options → LibreOffice Writer → General. The dialog box displays general text document settings.
In the Update area, under Update links when loading, select one of the following three options:
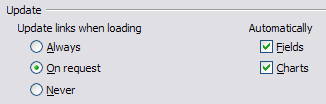
Select Always if you want Writer to update links automatically, without prompting you, whenever you open a document that contains links.
Select On request if you want Writer to prompt you before updating links.
Select Never if you do not want Writer to update links.
Click OK to save your settings. The Options dialog box closes.
To update a link manually:
Open the document that contains the link.
Choose Edit → Links. The Edit Links dialog box opens.
The list in the Edit Links dialog box displays the names of all the files that are linked to the current document. Click the file that corresponds to the link that you want to update.
Click the Update button. The most recently saved contents of the linked file appear in the current document.
To close the Edit Links dialog box, click Close.
Headers are portions of a document that always appear at the top of a page; footers appear at the bottom of a page. Typically, headers display the title or chapter name of a document.
In LibreOffice, headers are specified by page styles; therefore, when inserted, all the pages with the same page style will display the same header. Chapter 7 describes how to format a header as part of the page style formatting. For the purpose of this example, we will insert a header in the Default pages using manual formatting.
Select from the main menu Insert → Header → [Page Style]. The submenu lists the page styles used in your document. In addition, the submenu includes the entry All, which activates headers on all the pages of the document regardless of their page style.
For our example, select the Default menu item to activate the headers only on the pages that use the Default page style. Similarly, to insert a footer, choose Insert → Footer.
|
Caution
|
The Insert Menu can also be used for deleting a preexisting header or footer for a page style. If that page style has a check mark in front of it, clicking on it opens an LibreOffice dialog box warning about this and asking whether you want to delete the header or footer for that particular page style. |
Depending on which option you choose, an area will appear at the top or bottom of the page. In this area you can enter text and graphics that will appear on every page.
Items such as document titles, chapter titles, and page numbers, which often go into headers and footers, are best added as fields. That way, if something changes, the headers and footers are all updated automatically.
Fields are covered in Chapter 14, Working with Fields, but one example here may be useful. To insert the document title into the header:
Select File → Properties → Description, enter a title for your document in the Title area, and click OK to close the dialog box.
Add a header (Insert → Header → Default).
Place the cursor in the header part of the page.
Select Insert → Fields → Title. The title should appear on a gray background (which does not show when printed and can be turned off).
To change the title for the whole document, choose File → Properties → Description.
Formatting headers and footers
In Writer headers and footers are considered paragraphs and therefore you can format the header or footer text using the same techniques you use for formatting text in the main body of the document.
|
Tip |
You can define styles for headers and footers so that you can quickly obtain a consistent formatting in case you use several page styles. Writer includes three predefined header styles and three footer styles: generic ones, for left pages, and for right pages. You can also add custom header and footer styles. |
Portrait headers on landscape pages
When you define a header and footer on a landscape page, they will be aligned with the long side of the page. If your landscape pages are going to be inserted between portrait pages, you might want the headers and footers to be on the short sides of the landscape pages, so the final printed product looks like the contents of the landscape pages have been rotated 90 degrees on portrait pages.
You can set up portrait headers and footers on landscape pages by using a trick involving frames. These are a bit tedious to set up, but once you have done so, you can copy and paste them to other landscape pages. There does not appear to be a way to make this part of the landscape page style.
To set up portrait headers and footers on landscape pages:
Calculate the required margins so the text area of the landscape page is the same size as the text area on the portrait pages, taking into account the space for headers and footers on the portrait pages.
For example, consider a book which uses the margins shown in the following table. The landscape right and left margins are 1 cm larger than the portrait top and bottom margins, respectively. This difference accounts for the extra space used by the portrait header and footer (0.5 cm for the height of the header or footer and a 0.5 cm gap between the header or footer and the main text).
|
Portrait page (right page) |
Landscape page (right page) |
||
|
Top margin |
1.5 cm |
Right margin |
2.5 cm |
|
Bottom margin |
1.5 cm |
Left margin |
2.5 cm |
|
Left (inner) margin |
2.8 cm |
Top margin |
2.8 cm |
|
Right (outer) margin |
1.8 cm |
Bottom margin |
1.8 cm |
Create the Landscape page style.
Measure the distance from the upper and left edges of the page to the upper left-hand corner of the space where you want the footer to appear. Measure the width and length of the space the footer will occupy (to match footers on portrait pages). (See Figure 37.)
In a blank paragraph in the text, type the footer text or insert fields such as the page number or the chapter number and name—to match the footer text and fields on the portrait pages. Assign the Footer style to this paragraph so the typeface, font size, and tab settings match those of the footers on the portrait pages.
Select the text (including the fields) you just entered. Choose Format → Character. On the Character dialog box, choose the Position tab and set Rotation / scaling to 270 degrees (counterclockwise). Click OK.
With the text still selected, choose Insert → Frame. In the Frame dialog box, choose the Type tab and enter the width, height, and horizontal and vertical position for the footer.
If your footer has a line above the text, as in this book, on the Borders page, select a right border and specify the line width and spacing to the frame’s contents.
Click OK to save these settings. The footer should now appear in the required position and orientation.
Repeat these steps (using appropriate measurements) to set up a portrait header on the landscape page.
This section describes techniques to insert page numbers and related information in a document. Some basic knowledge of page styles, which are fully described in chapters 6 and 7, may be needed to follow some of the examples given.
LibreOffice uses fields to manage page numbers. To insert a page number field, position the cursor where you want to insert the number and choose Insert → Fields → Page Number. The page number appears with a gray background. The gray background denotes a field.
|
Note |
The gray background is simply there to denote a field. This background is not printed. If you wish to turn this feature off, choose View → Field Shadings (or press Ctrl+F8). |
The page number field always displays the page number for the page where it is placed. If you see the words “Page number” instead of a number, press Ctrl+F9. This shortcut key toggles LibreOffice between displaying the field’s contents (what the field is for) and the field’s results (what the field creates).
|
Note |
For a full introduction to fields, see Chapter 14, Working with Fields. |
Preliminaries: insert and format a header
For the purpose of this example, we will insert a header in the Default page style pages using manual formatting. See “Creating headers and footers” on page 31.
The simplest case is to have the page number at the top of every page and nothing more. To do this, put the cursor on the header and select Insert → Fields → Page Number.
Now the correct page number appears on every page.
Combining header text and page number
There are a lot of interesting variations that you can apply without further knowledge of page styles. Here are some suggestions:
Right-align the header to make the page number appear on the top-right.
Type the word page before the page number field so the header reads page 1, page 2, and so on. This also requires using the Page Number field, discussed earlier (page 35).
Add the document title so the header reads, for example: Peter's favourite poems, left justified, and page x with right justification, where x is the value of the Page Number field. Consider using a (right-aligned) tab to separate the title from the page number.
LibreOffice also has a Page Count field (Insert → Fields → Page Count). Using it, you could, for example, have a header that reads page 2 of 12.
These variations are all illustrated in Figure 42.
Many more variations are possible. For example, you can set the page number to display in Roman numerals. To do that, you could double-click on the page number and select the desired format; however, a better choice is to specify the format of numbers in the page style as explained here.
In the Styles and Formatting window (press F11 if not already displayed) select the Page Styles icon and right-click on the highlighted entry for the current style. Select Modify, which opens the Page Style dialog box.
On the Page page of the Page Style dialog box, in the Layout settings section, select i, ii, iii, ... from the Format drop-down list.
Numbering the first page something other than 1
Sometimes you may want to start a document with a page number greater than 1. For example, you may be writing a book, with each chapter in a separate file. Chapter 1 may start with page 1, but Chapter 2 could begin with page 25 and Chapter 3 with page 51.
Follow these instructions to start the page numbering in a document at a number greater than 1. (These instructions are for a page number in a footer, but you could use a header instead.)
|
Tip |
Do not set a starting page number that is an even number because you will end up with a blank page before the first page when you print the file or export it as a PDF. |
Choose Insert → Footer → [page style] to activate the footer. (If the page style is already selected in the Footer menu, point to it and click OK in the dialog box that appears. Then point to that page style again to select it.)
The cursor is now in the footer. To insert the page number, choose Insert → Fields → Page Number. The page number will be 1.
Click in the first paragraph in the text area or type a paragraph of text.
Choose Format → Paragraph (or right-click and choose Paragraph from the pop-up menu) to display the Paragraph dialog box.
On the Text Flow page, in the Breaks section, select Insert and select Page in the Type drop-down list. Select With Page Style and the page style you are using for the first page of the document.
The Page number field is now active. Type the page number you want to start with. Click OK to close the Paragraph dialog box.
Technical documents often include the chapter number with the page number in the header or footer. For example, 1-1, 1-2, 1-3, ...; 2-1, 2-2, 2-3, ...
To set up this type of page numbering in LibreOffice, you need to do three things:
Ensure that your chapter titles are all identified by the same paragraph style, for example, the Heading1 style.
Use Tools → Outline Numbering to tell LibreOffice what paragraph style you are using for Level 1 in your outline, and specify “1,2,3” in the Number box.
Insert the chapter number in your document. To do this:
Place the cursor in the header or footer just before the page number you inserted earlier, and choose Insert → Fields → Other from the menu bar.
On the Fields dialog (Figure 45), go to the Document page. Select Chapter in the Type list, Chapter number in the Format list, and 1 in the Layer box. Click Insert.
Type a hyphen or other punctuation between the chapter number and the page number.
For more information, see “Choosing paragraph styles for outline levels” and “Including chapter or section information in page headers” in Chapter 7, Working with Styles.
Often you will want to restart the page numbering at 1, for example, on the page following a title page or a table of contents. In addition, many documents have the front matter (such as the table of contents) numbered with Roman numerals and the main body of the document numbered in Arabic numerals, starting with 1.
You can restart page numbering in two ways.
Method 1:
Place the cursor in the first paragraph of the new page.
Choose Format → Paragraph.
On the Text Flow page of the Paragraph dialog box (Figure 8 on page 11), select Insert in the Breaks area.
In the Type drop-down list, select Page.
In the Position drop-down list, select Before or After to position where you want to insert the page break.
Select With Page Style and specify the page style to use.
Specify the page number to start from and then click OK.
Method 2:
Place the cursor in the first paragraph of the new page.
Choose Insert → Manual break.
Page break is the default selected on the Insert Break dialog box.

Choose the required page in the Style drop-down list.
Select Change page number.
Specify the page number to start from and then click OK.
Example: Restart page numbering: a preface
A standard preface has the following properties:
Page numbers are displayed in Roman numerals (i, ii, iii, iv, …).
After the preface, the document starts on a Default page.
The page number resets to 1, and the number format becomes Arabic (1, 2, 3, 4, …).
Resetting the page number requires page breaks.
First, let’s get the preliminary work done for the Preface style:
Create a new page style and name it Preface.
Set its Next Style to Preface because a preface could span multiple pages.
Add a header to Preface and insert the Page Number field. Make the page numbers display as Roman numerals (i, ii, iii, iv, …):
Open the page style window for Preface (if not already open) and click the Header tab. Select Header on under Header.
Click the Page tab. Under Layout settings, in the Format drop-down list, set the format to i, ii, iii, …. Click OK to close the dialog box.
After the preface is written, we are ready to restart the page numbering in the main body of the document to Arabic numerals. Follow these steps:
Make an empty paragraph at the very end of the preface.
Put the cursor on the blank line.
Choose Insert → Manual Break.
Select Page break and choose the Default style.
Select the Change page number option and set the new value to 1. Click OK to close the dialog box.
These settings are shown in Figure 48.
|
Note |
You cannot assign an odd page number to a left page or an even page number to a right page. LibreOffice strongly adheres to the convention that odd page numbers go on right-hand pages and even page numbers on left-hand pages. |
This change is also reflected on the status bar. The Page section of the status bar now includes both the total page count and the entry of the page number field.
Problems with restarting page numbering
Restarting page numbering may lead to two problems.
The Statistics page in the document’s Properties (File → Properties) always displays the total number of pages in the document, which may not be what you want to appear in the Page Count field.
When page numbering is restarted, LibreOffice always makes odd-numbered pages to be on the right and even-numbered pages to be on the left. It does this by inserting a blank page, if necessary. Sometimes this blank page is not desired, particularly when creating PDFs or when printing single sided.
Solving the page count problem
Suppose you know exactly how many pages are not to be included in the page count. (You want one page to be excluded in the page count for the following example.)
Instead of inserting a Page Count field, you can do the following:
Position the cursor where you want the page count to appear.
Press F2 to open the formula bar, just above the horizontal ruler in the main Writer window (see Figure 50).
After the equal sign, type page –1. If you want to exclude several pages, substitute the number of excluded pages for 1 in the formula.
Press Enter to close the formula bar and insert the resulting field into the document.
If you do not know the total number of pages in advance, then one approach is to create a bookmark on the last page and then insert a cross reference to it.
To create a bookmark on the last page:
Go to the last page (Ctrl+End).
Choose Insert → Bookmark.
In the Insert Bookmark dialog box, type a name for the bookmark, for example LastPage. Click OK.
To insert a cross-reference to the last page in the header or footer where you want to refer to the total number of pages:
Position the cursor at the desired location—for example after the space added after of in the header or footer, as in page xx of yy.
Choose Insert → Cross-reference.
On the Cross-references page of the Fields dialog box, select Bookmarks in the Type column and LastPage in the Selection column. LastPage now appears in the Name box.
In the Insert Reference to box, select As page style. Click Insert.

|
Note |
Do not delete the bookmark at the end of the document. If you do, the cross-reference will not work. If a field, such as a cross-reference, does not automatically update, select the text containing the field and press F9. |
Numbering portrait and landscape pages
To create page numbers on portrait and landscape pages in the same place and orientation:
Refer to “Portrait headers on landscape pages” on page 32 to create a landscape page style and landscape header or footer styles. When creating the page style, select the Use dynamic spacing option in the Spacing area in the Header or Footer pages of the Page Style dialog box.
Insert the page break and choose the landscape page style; do not change the page numbering.
In the relevant header or footer, insert the page number field (Insert → Fields → Page Number).
Defining borders and backgrounds
You can apply borders and backgrounds to many elements in Writer. Paragraphs, pages, frames, sections, page styles, paragraph styles, and frame styles can include both borders and backgrounds; character styles, tables of contents, and indexes can include backgrounds only.
The dialog box pages for borders and backgrounds are similar in each case. To illustrate their use, we will define a border and background for a text frame.
|
Tip |
Page backgrounds fill only the area within the margins, including the header or footer (if any). To extend the background color or graphic into the margins, you need to define a frame of appropriate size and position, anchor it to the page or a paragraph, and send it to the background. For more about anchoring frames, see Chapter 8, Working with Graphics. |
To begin, select the frame, right-click, and choose Frame from the pop-up menu. Choose the Borders tab.
Borders have three components: where they go, what they look like, and how much space is left around them.
Line arrangement specifies where the borders go. Writer provides five default arrangements but you can just as easily click on the line you want to customize in the User-defined area to get exactly what you want. Each line can be individually formatted.
Line specifies what the border looks like: the style and color. There are a number of different styles and colors to choose from. The Line Style and Color will apply to those borders highlighted by a pair of black arrows in the User-defined map on the left hand side of the dialog box.
Spacing to contents specifies how much space to leave between the border and the contents of the element. Spaces can be specified to the left, right, above, and below. Check Synchronize to have the same spacing for all four sides. This spacing is like a padding and it is not factored in when calculating the text measurements.
Shadow style properties always apply to the whole element. A shadow has three components: where it is, how far from the element it is cast, and what color it is.
Adding color to the background
In the Frame dialog box, choose the Background page. Here you can add color or a graphic.
To add color to the background, select from the color grid. You can adjust the transparency of the color to make any text easier to read.
Adding a graphic to the background
To add a graphic to the background:
From the As drop-down list on the Background page, select Graphic. The page now displays the graphics options, as shown in Figure 54.
Click the Browse button. The Find Graphics dialog box opens.
Find the file you want and then click the Open button. The Find Graphics dialog box closes and the selected graphic appears in the preview box on the right-hand side of the Background tab. (If you do not see the graphic, select the Preview option.)
To embed the graphic in your document, deselect Link. To link the graphic to the document but not embed it, select Link. For more about linking graphics, see Chapter 8, Working with Graphics.
In the Type area, choose how you want the background graphic to appear:
To position the graphic in a specific location, select Position and then click the desired location in the position grid.
To stretch the graphic to fill the entire background area, select Area.
To repeat the graphic across the entire background area, select Tile.
In the Transparency area, you can adjust the transparency of the graphic. This adjustment is often necessary to make any text easier to read.
Deleting color or graphics from the background
To delete color or graphics from the background:
From the As drop-down list, select Color.
Click No Fill on the color grid.