
Getting Started Guide
Chapter
1
Introducing LibreOffice
This document is Copyright © 2010–2011 by its contributors as listed below. You may distribute it and/or modify it under the terms of either the GNU General Public License (http://www.gnu.org/licenses/gpl.html), version 3 or later, or the Creative Commons Attribution License (http://creativecommons.org/licenses/by/3.0/), version 3.0 or later.
All trademarks within this guide belong to their legitimate owners.
Contributors
Ron Faile Jr.
Jeremy
Cartwright
Jean Hollis Weber
Feedback
Please direct any comments or suggestions about this document to: documentation@libreoffice.org
Acknowledgments
This chapter is based on Chapter 1 of Getting Started with OpenOffice.org. The contributors to that chapter are:
Thomas
Astleitner Richard Barnes Agnes Belzunce
Daniel Carrera Laurent
Duperval Richard Holt
Ian Laurenson Alan Madden Carol
Roberts
Iain Roberts Gary Schnabl Janet M. Swisher
Jean Hollis
Weber Linda Worthington Michele Zarri
Publication date and software version
Published 19 June 2010. Based on LibreOffice 3.3.
Some keystrokes and menu items are different on a Mac from those used in Windows and Linux. The table below gives some common substitutions for the instructions in this chapter. For a more detailed list, see the application Help.
|
Windows/Linux |
Mac equivalent |
Effect |
|
Tools → Options menu selection |
LibreOffice → Preferences |
Access setup options |
|
Right-click |
Control+click |
Opens a context menu |
|
Ctrl (Control) |
z (Command) |
Used with other keys |
|
F5 |
Shift+z+F5 |
Opens the Navigator |
|
F11 |
z+T |
Opens the Styles & Formatting window |
Contents
The advantages of LibreOffice 6
Starting from an existing document 8
Using the Quickstarter under Windows 9
Using the Quickstarter in Linux and Mac OS X 10
Right-click (context) menus 13
What are all these things called? 14
Opening an existing document 16
Saving a document automatically 18
Renaming and deleting files 18
Using the Open and Save As dialogs 18
LibreOffice is a freely available, full-featured office productivity suite. Its native file format is OpenDocument, an open standard format that is being adopted by governments worldwide as a required file format for publishing and accepting documents. LibreOffice can also open and save documents in many other formats, including those used by several versions of Microsoft Office.
LibreOffice includes the following components:
Writer is a feature-rich tool for creating letters, books, reports, newsletters, brochures, and other documents. You can insert graphics and objects from other components into Writer documents. Writer can export files to HTML, XHTML, XML, Adobe’s Portable Document Format (PDF), and several versions of Microsoft Word files. It also connects to your email client.
Calc has all of the advanced analysis, charting, and decision-making features expected from a high-end spreadsheet. It includes over 300 functions for financial, statistical, and mathematical operations, among others. The Scenario Manager provides “what if” analysis. Calc generates 2-D and 3-D charts, which can be integrated into other LibreOffice documents. You can also open and work with Microsoft Excel workbooks and save them in Excel format. Calc can export spreadsheets to Adobe’s PDF and to HTML.
Impress provides all the common multimedia presentation tools, such as special effects, animation, and drawing tools. It is integrated with the advanced graphics capabilities of LibreOffice’s Draw and Math components. Slide shows can be further enhanced with Fontwork’s special effects text, as well as sound and video clips. Impress is compatible with Microsoft’s PowerPoint file format and can also save your work in numerous graphics formats, including Macromedia Flash (SWF).
Draw is a vector drawing tool that can produce everything from simple diagrams or flowcharts to 3-D artwork. Its Smart Connectors feature allows you to define your own connection points. You can use Draw to create drawings for use in any of LibreOffice’s other components, and you can create your own clip art and add it to the Gallery. Draw can import graphics from many common formats and save them in over 20 formats, including PNG, HTML, PDF, and Flash.
Base provides tools for day-to-day database work within a simple interface. It can create and edit forms, reports, queries, tables, views, and relations, so that managing a connected database is much the same as in other popular database applications. Base provides many new features, such as the ability to analyze and edit relationships from a diagram view. Base incorporates HSQLDB as its default relational database engine. It can also use dBASE, Microsoft Access, MySQL, or Oracle, or any ODBC-compliant or JDBC-compliant database. Base also provides support for a subset of ANSI-92 SQL.
Math is LibreOffice’s formula or equation editor. You can use it to create complex equations that include symbols or characters not available in standard font sets. While it is most commonly used to create formulas in other documents, such as Writer and Impress files, Math can also work as a standalone tool. You can save formulas in the standard Mathematical Markup Language (MathML) format for inclusion in web pages and other documents not created by LibreOffice.
Here are some of the advantages of LibreOffice over other office suites:
No licensing fees. LibreOffice is free for anyone to use and distribute at no cost. Many features that are available as extra cost add-ins in other office suites (like PDF export) are free with LibreOffice. There are no hidden charges now or in the future.
Open source. You can distribute, copy, and modify the software as much as you wish, in accordance with either of LibreOffice’s Open Source licenses.
Cross-platform. LibreOffice runs on several hardware architectures and under multiple operating systems, such as Microsoft Windows, Mac OS X and Linux,.
Extensive language support. LibreOffice’s user interface is available in over 40 languages, and the LibreOffice project provides spelling, hyphenation, and thesaurus dictionaries in over 70 languages and dialects. LibreOffice also provides support for both Complex Text Layout (CTL) and Right to Left (RTL) layout languages (such as Urdu, Hebrew, and Arabic).
Consistent user interface. All the components have a similar “look and feel,” making them easy to use and master.
Integration. The components of LibreOffice are well integrated with one another.
All the components share a common spelling checker and other tools, which are used consistently across the suite. For example, the drawing tools available in Writer are also found in Calc, with similar but enhanced versions in Impress and Draw.
You do not need to know which application was used to create a particular file. For example, you can open a Draw file from Writer.
Granularity. Usually, if you change an option, it affects all components. However, LibreOffice options can be set at a component level or even document level.
File compatibility. In addition to its native OpenDocument formats, LibreOffice includes PDF and Flash export capabilities, as well as support for opening and saving files in many common formats including Microsoft Office, HTML, XML, WordPerfect, and Lotus 1-2-3 formats. Using an extension (included): the ability to import and edit some PDF files.
No vendor lock-in. LibreOffice uses OpenDocument, an XML (eXtensible Markup Language) file format developed as an industry standard by OASIS (Organization for the Advancement of Structured Information Standards). These files can easily be unzipped and read by any text editor, and their framework is open and published.
You have a voice. Enhancements, software fixes, and release dates are community-driven. You can join the community and affect the course of the product you use.
You can read more about LibreOffice and The Document Foundation on their websites at http://www.libreoffice.org/ and http://www.documentfoundation.org/.
LibreOffice 3.x requires one of the following operating systems:
Microsoft Windows 2000 (Service Pack 4 or higher), XP, Vista, or 7
GNU/Linux Kernel version 2.6.18 and glibc2 version 2.5 or higher is required
Mac OS X 10.4 (Tiger) or higher
Some LibreOffice features (wizards and the HSQLDB database engine) require that the Java Runtime Environment (JRE) 1.6.x or higher be installed on your computer. Although LibreOffice will work without Java support, some features will not be available. If you have an older PC and do not need the features requiring the JRE, you can disable it to speed up the loading of the program.
For a more detailed listing of requirements, see the LibreOffice website, http://www.libreoffice.org/get-help/system-requirements/.
The software can be downloaded from http://www.libreoffice.org/. You can also download the software by using a Peer-to-Peer client, such as BitTorrent, at the same address.
Linux users will find LibreOffice included in many of the latest Linux distributions (Ubuntu is just one example).
Information on installing and setting up LibreOffice on the various supported operating systems is given here: http://www.libreoffice.org/get-help/installation/.
Extensions and add-ons are available to enhance LibreOffice. Several extensions are installed with the program and others are available from the official extensions repository, http://extensions.libreoffice.org/. See Chapter 14, Customizing LibreOffice, for more information on installing them.
This book, the other LibreOffice user guides, the built-in Help system, and user support systems assume that you are familiar with your computer and basic functions such as starting a program, opening and saving files.
LibreOffice comes with an extensive Help system. This is your first line of support for using LibreOffice.
To display the full Help system, press F1 or select LibreOffice Help from the Help menu. In addition, you can choose whether to activate Tips, Extended tips, and the Help Agent (using Tools → Options → LibreOffice → General).
If Tips are enabled, place the mouse pointer over any of the icons to see a small box (“tooltip”) with a brief explanation of the icon’s function. For a more detailed explanation, select Help → What's This? and hold the pointer over the icon.
The LibreOffice community not only develops software, but provides free, volunteer-based support. Users of LibreOffice can get comprehensive online support from the community through mailing lists or forums. There are also other websites run by users that offer free tips and tutorials.
|
Free LibreOffice support |
|
|
FAQs |
Answers to Frequently Asked Questions |
|
Documentation |
User guides, how-tos, and other documentation. http://www.libreoffice.org/get-help/documentation/ |
|
Mailing Lists |
Free community support is provided by a network of experienced users. |
|
International Support |
The LibreOffice website in your language. http://www.libreoffice.org/international-sites/ International mailing lists |
|
Accessibility Options |
Information in accessibility options are available. http://www.libreoffice.org/get-help/accessibility/ |
|
Mac Support |
Support for installing and using LibreOffice on Mac OS X. http://www.libreoffice.org/get-help/installation/ |
Alternatively, you can pay for support services. Service contracts can be purchased from a vendor or consulting firm specializing in LibreOffice.
The most common way to launch any component of LibreOffice is by using the system menu, the standard menu from which most applications are started. On Windows, it is called the Start menu. On GNOME, it is called the Applications menu. On KDE it is identified by the KDE logo. On Mac OS X, it is the Applications menu.
When LibreOffice was installed on your computer, in most cases a menu entry for each component was added to your system menu. The exact name and location of these menu entries depend on the operating system and graphical user interface.
Starting from an existing document
You can start LibreOffice by double-clicking the filename of an LibreOffice document in a file manager such as Windows Explorer. The appropriate component of LibreOffice will start and the document will be loaded.
If you have associated Microsoft Office file types with LibreOffice, then when you double-click on a *.doc (Word) file, it opens in Writer; *.xls (Excel) files open in Calc, and *.ppt (PowerPoint) files open in Impress.
If you did not associate the file types, then when you double-click on a Microsoft Word document, it opens in Microsoft Word (if Word is installed on your computer), Excel files open in Excel, and PowerPoint files open in PowerPoint.
You can use another method to open Microsoft Office files in LibreOffice and save in those formats from LibreOffice. See “Opening an existing document” on page 16 for more information.
Using the Quickstarter under Windows
The Quickstarter is an icon that is placed in the Windows system tray during system startup. It indicates that LibreOffice has been loaded and is ready to use. (The Quickstarter loads library *.DLL files required by LibreOffice, shortening the startup time for LibreOffice components). If the Quickstarter is disabled, see “Reactivating the Quickstarter” if you want to enable it.
Right-click the Quickstarter icon in the system tray to open a pop-up menu (Figure 1) from which you can open a new document, open the Templates and Documents dialog, or choose an existing document to open. You can also double-click the Quickstarter icon to display the Templates and Documents dialog.
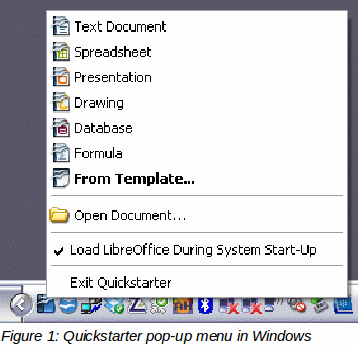
To close the Quickstarter, right-click on the icon in the system tray, and then click Exit Quickstarter on the pop-up menu. The next time the computer is restarted, the Quickstarter will be loaded again.
To prevent LibreOffice.org from loading during system startup, deselect the Load LibreOffice during system start-up item on the pop-up menu. You might want to do this if your computer has insufficient memory, for example.
If the Quickstarter has been disabled, you can reactivate it by selecting the Load LibreOffice during system start-up checkbox in Tools → Options → LibreOffice → Memory.
Using the Quickstarter in Linux and Mac OS X
LibreOffice under Linux has a Quickstarter that looks and acts like the one described above for Windows (the checkbox on the Memory page is labeled Enable systray quickstarter).
Mac OS X provides similar functionality through a popup menu from the dock.
The main window is similar in each component of LibreOffice, although some details vary. See the chapters in this book about Writer, Calc, Draw, and Impress for descriptions of those details.
Common features include the menu bar, the standard toolbar, and the formatting toolbar at the top of the window and the status bar at the bottom.
The Menu bar is located across the top of the LibreOffice window, just below the Title bar. When you choose one of the menus listed below, a submenu drops down to show commands.
File contains commands that apply to the entire document such as Open, Save, and Export as PDF.
Edit contains commands for editing the document such as Undo: xxx (where xxx is the command to undo) and Find & Replace. It also contains commands to cut, copy, and paste selected parts of your document.
View contains commands for controlling the display of the document such as Zoom and Web Layout.
Insert contains commands for inserting elements into your document such as Header, Footer, and Picture.
Format contains commands, such as Styles and Formatting and AutoCorrect, for formatting the layout of your document.
Table shows all commands to insert and edit a table in a text document.
Tools contains functions such as Spelling and Grammar, Customize, and Options.
Window contains commands for the display window.
Help contains links to the LibreOffice Help file, What’s This?, and information about the program. See “How to get help“ on page 7.
LibreOffice has several types of toolbars: docked (fixed in place), floating, and tear-off. Docked toolbars can be moved to different locations or made to float, and floating toolbars can be docked.
The top docked toolbar, just under the Menu bar is called the Standard toolbar. It is consistent across the LibreOffice applications.
The second toolbar at the top is the Formatting bar. It is context-sensitive; that is, it shows thetools relevant to the cursor’s current position or selection. For example, when the cursor is on a graphic, the Formatting bar provides tools for formatting graphics; when the cursor is in text, the tools are for formatting text.
To display or hide toolbars, choose View → Toolbars, then click on the name of a toolbar in the list. An active toolbar shows a checkmark beside its name. Tear-off toolbars are not listed in the View menu.
Submenus and tear-off toolbars
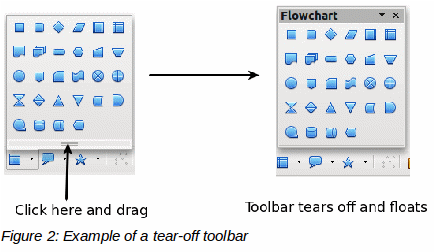
Toolbar icons with a small triangle to the right will display submenus, tear-off toolbars, and other ways of selecting things, depending on the icon.
Figure 2 shows a tear-off toolbar from the Drawing toolbar.
Tear-off toolbars can be floated or docked along an edge of the screen or in one of the existing toolbar areas. To move a floating tear-off toolbar, drag it by the title bar, as shown in Figure 4.
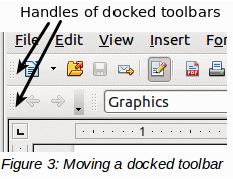
To move a docked toolbar, place the mouse pointer over the toolbar handle (the small vertical bar to the left of the toolbar), hold down the left mouse button, drag the toolbar to the new location, and then release the mouse button (Figure 3). To move a floating toolbar, click on its title bar and drag it to a new location (Figure 4).
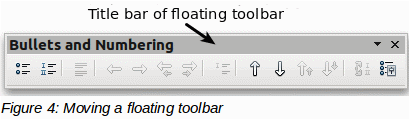
LibreOffice includes several additional context-sensitive toolbars, whose defaults appear as floating toolbars in response to the cursor’s current position or selection. For example, when the cursor is in a table, a floating Table toolbar appears, and when the cursor is in a numbered or bullet list, the Bullets and Numbering toolbar appears. You can dock these toolbars to the top, bottom, or side of the window, if you wish (see “Moving toolbars” above).
Docking/floating windows and toolbars
Toolbars and some windows, such as the Navigator and the Styles and Formatting window, are dockable. You can move, resize, or dock them to an edge.
To dock a window or toolbar, hold down the Control key and double-click on the frame of the floating window (or in a vacant area near the icons at the top of the floating window) to dock it in its last position.
To undock a window, hold down the Control key and double-click on the frame (or a vacant area near the icons at the top) of the docked window.
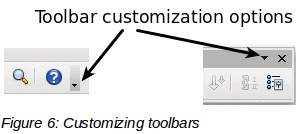
You can customize toolbars in several ways, including choosing which icons are visible and locking the position of a docked toolbar. You can also add icons and create new toolbars, as described in Chapter 14.
To access a toolbar’s customization options, use the down-arrow at the end of the toolbar or on its title bar.
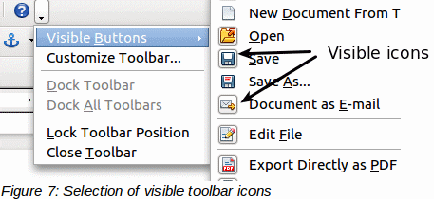
To show or hide icons defined for the selected toolbar, choose Visible Buttons from the drop-down menu. Visible icons are indicated by an outline around the icon. Click on icons to select or deselect them.
You can quickly access many menu functions by right-clicking on a paragraph, graphics, or other object. A context menu will pop up. Often the context menu is the fastest and an easier way to reach a function. If you are not sure where a function is located in the menus or toolbars , you can often find it by right-clicking.
The status bar is located at the bottom of the workspace. It provides information about the document and convenient ways to quickly change some features. It is similar in Writer, Calc, Impress, and Draw, although each component includes some component-specific items.
Common status bar items are described below.
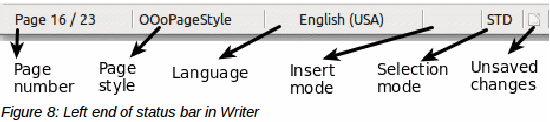
Page, sheet, or slide number
Shows the current page, sheet, or slide number and the total number of pages, sheets, or slides in the document. Double-click on this field to open the Navigator. Other uses of this field depend on the component.
Page style or slide design
Shows the current page style or slide design. To edit the current page style or slide design, double-click on this field.
Unsaved changes
An
icon
![]() appears here if changes to the document have not been saved.
appears here if changes to the document have not been saved.
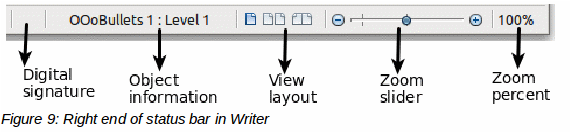
Digital signature
If
the document has been digitally signed, an icon
![]() shows here. You can double-click the icon to view the certificate.
shows here. You can double-click the icon to view the certificate.
Object information
Displays information relevant to the cursor’s position or the selected element of the document. Double-clicking in this area usually opens a relevant dialog.
Zoom slider and percent
To change the view magnification, drag the Zoom slider, or click on the + and – signs, or right-click on the zoom level percent to pop up a list of magnification values from which to choose.
Double-clicking on the zoom level percent opens the Zoom & View Layout dialog.
What are all these things called?
The terms used in LibreOffice for most parts of the user interface (the parts of the program you see and use, in contrast to the behind-the-scenes code that actually makes it work) are the same as for most other programs.
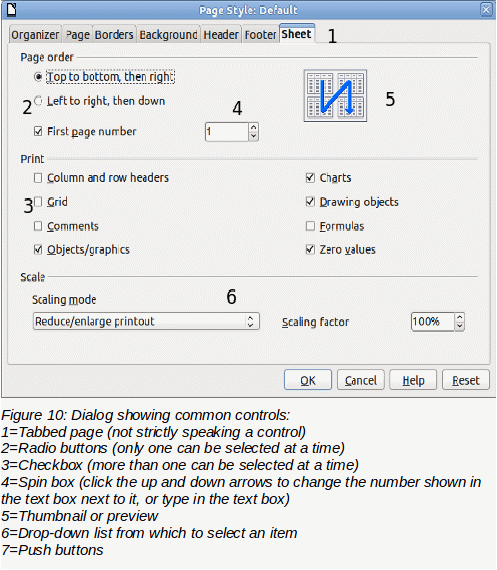
A dialog is a special type of window. Its purpose is to inform you of something, or request input from you, or both. It provides controls for you to use to specify how to carry out an action. The technical names for common controls are shown in Figure 10; not shown is the list box (from which you select an item). In most cases we do not use the technical terms in this book, but it is useful to know them because the Help and other sources of information often use them.
In most cases, you can interact only with the dialog (not the document itself) as long as the dialog remains open. When you close the dialog after use (usually, clicking OK or another button saves your changes and closes the dialog), then you can again work with your document.
Some dialogs can be left open as you work, so you can switch back and forth between the dialog and your document. An example of this type is the Find & Replace dialog.
You can start a new, blank document in LibreOffice in several ways.
When LibreOffice is open but no document is open (for example if you close all the open documents but leave the program running), the Start Center is shown. Click one of the icons to open a new document of that type, or click the Templates icon to start a new document using a template.
You can also start a new document in one of the following ways.
Use File → New and choose the type of document.
Use the arrow next to the New button on the main toolbar. From the drop-down menu, select the type of document to be created.
Press Control+N on the keyboard.
Use File → Wizards for some special types of documents.
If a document is already open in LibreOffice, the new document opens in a new window.
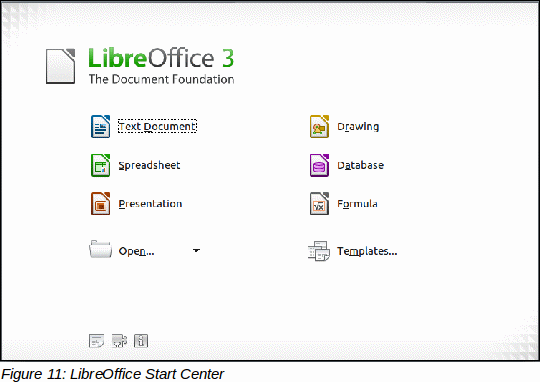
When no document is open, the Start Center provides an icon for opening an existing document or choosing from a list of recently-edited documents.

You can also open an existing document in one of the following ways.
Choose File → Open...
Click the Open button on the main toolbar.
Press Control+O on the keyboard.
In each case, the Open dialog appears. Select the file you want, and then click Open. If a document is already open in LibreOffice, the second document opens in a new window.
In the Open dialog, you can reduce the list of files by selecting the type of file you are looking for. For example, if you choose Text documents as the file type, you will only see documents Writer can open (including .odt, .doc, .txt); if you choose Spreadsheets, you will see .ods, .xls, and other files that Calc opens.
You can also open an existing document that is in an OpenDocument format by double-clicking on the file’s icon on the desktop or in a file manager such as Windows Explorer.
If you have associated Microsoft Office file formats with LibreOffice, you can also open these files by double-clicking on them.
|
Note |
Under Microsoft Windows you can use either the LibreOffice Open and Save As dialogs or the ones provided by Microsoft Windows. See “Using the Open and Save As dialogs” on page 18. |
To save a new document, do one of the following:
Press Control+S.
Choose File → Save from the menu bar.
Click the Save button on the main toolbar.
When the Save As dialog appears, enter the file name, verify the file type (if applicable), and click Save.
To save an open document with the current file name, choose File → Save. This will overwrite the last saved state of the file.
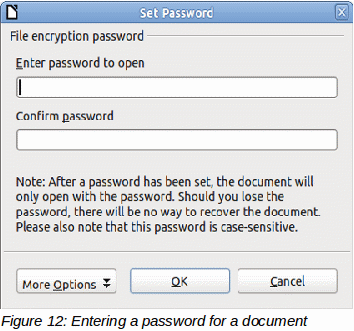
To protect a document from being viewable without a password, use the option on the Save As dialog to enter a password.
On the Save As dialog, select the Save with password option, and then click Save. You will receive a prompt (Figure 12).
Type the same password in both fields, and then click OK. If the passwords match, the document is saved password protected. If the passwords do not match, you receive an error message. Close the message box to return to the Set Password dialog and enter the password again.
|
Caution
|
LibreOffice uses a very strong encryption mechanism that makes it almost impossible to recover the contents of a document in case you lose the password. |
Writer and Calc provide a second level of protection, which allows a file to be viewed but not changed without a password; that is, the file opens in read-only mode.
To protect a document from being changed:
Choose More Options from the Set Password dialog.
Enter the password in the Enter password to allow editing field. Repeat the password in the Confirm password field. Click OK.
Saving a document automatically
You can choose to have LibreOffice save files for you automatically. Automatic saving, like manual saving, overwrites the last saved state of the file. To set up automatic file saving:
Choose Tools → Options... → Load/Save → General.
Mark Save AutoRecovery information every, and set the time interval.
You can rename or delete files within the LibreOffice dialogs, just as you can in your usual file manager. However, you cannot copy or paste files within the dialogs.
Using the Open and Save As dialogs
You can choose whether to use the LibreOffice Open and Save As dialogs or the ones provided by your operating system.
To view or change which type of dialog LibreOffice uses:
Choose Tools → Options → LibreOffice → General.
Select the Use LibreOffice dialogs option.
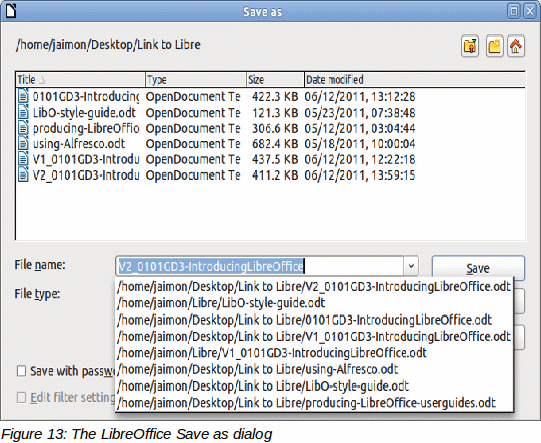
This section discusses the LibreOffice Open and Save As dialogs. Figure 13 shows the Save As dialog; the Open dialog is similar.
The three buttons in the top right of the LibreOffice Open and Save As dialogs are, from left to right:
Go Up One Level in the folder (directory) hierarchy. Click and hold this button for a second to drop down a list of higher level folders; to go to one of the folders on the list, move the mouse pointer over its name and release the mouse button.
Create New Folder.
Default Directory.
For LibreOffice documents that have been saved with more than one version, use the Version drop-down to select which version you wish to open in read-only mode. For Microsoft Office documents, only the current version can be opened.
Use the File type field to specify the type of file to be opened or the format of the file to be saved.
The Read-only option on the Open dialog opens the file for reading and printing only. Consequently, most of the toolbars disappear, and most menu options are disabled. An Edit File button is displayed on the Standard toolbar to open the file for editing.
You can open files from the Web by typing a URL in the File name field on the Open dialog.
The Navigator lists objects contained in a document, collected into categories. For example, in Writer it shows Headings, Tables, Text frames, Comments, Graphics, Bookmarks, and other items, as shown in Figure 14. In Calc it shows Sheets, Range Names, Database Ranges, Graphics, Drawing Objects, and other items. In Impress and Draw it shows Slides, Pictures, and other items.
To
open the Navigator, click its icon
![]() on the Standard toolbar, or press F5,
or choose View
→
Navigator on the menu bar.
on the Standard toolbar, or press F5,
or choose View
→
Navigator on the menu bar.
You can dock the Navigator to either side of the main LibreOffice window or leave it floating (see “Docking/floating windows and toolbars“ on page 12).
Click the marker (+ or triangle) by any of the categories to display the list of objects in that category.
To
hide the list of categories and show only the toolbars at the top,
click the List
Box On/Off icon
![]() .
Click this icon again to show the list box.
.
Click this icon again to show the list box.
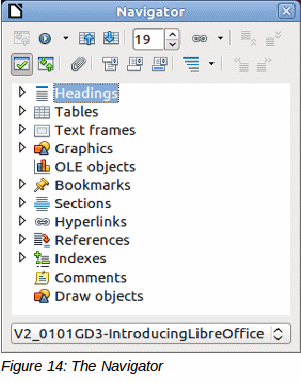
The Navigator provides several convenient ways to move around a document and find items in it:
When a category is showing the list of objects in it, double-click on an object to jump directly to that object’s location in the document.
Objects are much easier to find if you have given them names when creating them, instead of keeping LibreOffice’s default graphics1, graphics2, Table1, Table2, and so on—which may not correspond to the position of the object in the document.
If you only want to see the
content in a certain category, highlight the category and click the
Content View icon
![]() .
Until you click the icon again, only the objects of that category
will be displayed.
.
Until you click the icon again, only the objects of that category
will be displayed.
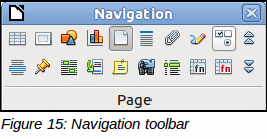
Click the Navigation icon
![]() (second icon from the left at the top of the Navigator) to display
the Navigation toolbar. Here you can pick one of the categories and
use the Previous
and Next
icons to move from one item to the next. This is particularly
helpful for finding items like bookmarks and indexes, which can be
difficult to see.
(second icon from the left at the top of the Navigator) to display
the Navigation toolbar. Here you can pick one of the categories and
use the Previous
and Next
icons to move from one item to the next. This is particularly
helpful for finding items like bookmarks and indexes, which can be
difficult to see.
The names of the icons (shown in the tooltips) change to match the selected category; for example, Next Graphic or Next Bookmark.
To jump to a specific page in the document, type its page number in the box at the top of the Navigator.
A bit of experimentation with the other icons will demonstrate their functions. Some component-specific uses are described in the chapters on Writer and the other components.
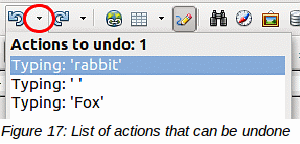
To
undo the most recent change, press Control+Z,
or click the Undo
icon
![]() on the Standard toolbar, or choose Edit
→
Undo from the menu bar.
on the Standard toolbar, or choose Edit
→
Undo from the menu bar.
The Edit menu shows the latest change that can be undone (see below for an example from Writer).
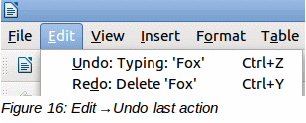
Click the small triangle to the right of the Undo icon to get a list of all the changes that can be undone. You can select multiple changes and undo them at the same time.
After
changes have been undone, Redo
becomes active. To redo a change, select Edit
→
Redo, or press Control+Y
or click on the Redo icon
![]() .
As with Undo, click on the triangle to the right of the arrow to get
a list of the changes that can be reapplied.
.
As with Undo, click on the triangle to the right of the arrow to get
a list of the changes that can be reapplied.
To modify the number of changes LibreOffice.org remembers, choose Tools → Options → LibreOffice → Memory and in the Undo section change Number of steps. Be aware that asking LibreOffice to remember more changes consumes more computer memory.
To close a document, choose File → Close.
You can also close a document by clicking on the Close icon on the document window. This button looks like the X shown in Figure 18. It may be in a different location on your operating system.
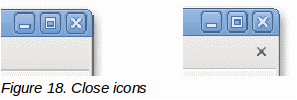
If more than one LibreOffice window is open, each window looks like the sample shown on the left in Figure 18. Closing this window leaves the other LibreOffice windows open.
If only one LibreOffice window is open, it looks like the sample shown on the right in Figure 18. Notice the small x below the large X. Clicking the small x closes the document but leaves LibreOffice open. Clicking the large X closes LibreOffice completely.
If the document has not been saved since the last change, a message box is displayed. Choose whether to save or discard your changes.
Save: The document is saved and then closed.
Discard: The document is closed, and all modifications since the last save are lost.
Cancel: Nothing happens, and you return to the document.
|
Caution
|
Not saving your document could result in the loss of recently made changes, or worse still, your entire file. |
To close LibreOffice completely, choose File → Exit, or close the last open document as described in “Closing a document” above.
If all the documents have been saved, LibreOffice closes immediately. If any documents have been modified but not saved, a warning message appears. Follow the procedure in “Closing a document” to save or discard your changes.
Some keystrokes and menu items are different on a Mac from those used in Windows and Linux. The following table gives some common substitutions for the instructions in this book. For a more detailed list, see the application Help.
|
Windows/Linux |
Mac equivalent |
Effect |
|
Tools → Options menu selection |
LibreOffice → Preferences |
Access setup options |
|
Right-click |
Control+click |
Opens a context menu |
|
Ctrl (Control) |
z (Command) |
Used with other keys |
|
F5 |
Shift+z+F5 |
Opens the Navigator |
|
F11 |
z+T |
Opens the Styles and Formatting window |